Are you ready to transform your garden into a colorful, eye-catching space without spending a fortune? Painting DIY rocks is an easy and fun way to add personality and charm to your outdoor area.
Whether you want to create whimsical garden markers, unique decorations, or simply brighten up dull corners, this guide will show you exactly how to paint your rocks step by step. You’ll learn the best materials to use, how to prepare your stones, and tips to make your designs last through all seasons.
Keep reading, and soon your garden will be bursting with creativity and color!

Credit: www.momendeavors.com
Choosing Rocks
Choosing the right rocks is the first step in your garden rock painting project. The type and shape of the rock affect how well the paint will stick and how your design will look. Good rocks make painting easier and your art last longer outdoors.
Best Rock Types
Flat and smooth rocks work best for painting. River rocks, slate, and sandstone are popular choices. These rocks have surfaces that hold paint well. Avoid porous or crumbly stones. They can absorb paint unevenly and break easily.
Where To Find Rocks
Look for rocks in your yard, local parks, or near rivers. Garden centers and craft stores also sell suitable stones. Choose clean rocks without dirt or moss. Clean rocks let paint stick better and last longer outside.
Selecting Smooth Surfaces
Smooth surfaces are easier to paint on and create clearer designs. Run your hand over the rock to check for bumps or rough spots. Pick rocks with gentle curves or flat tops. These surfaces help your paint brush glide smoothly.
Cleaning Rocks
Cleaning rocks is the first step to a successful DIY garden rock painting project. Dirt, oils, and debris on the rock’s surface can stop paint from sticking properly. A clean rock means brighter colors and longer-lasting designs. Take your time to prepare each rock carefully for the best results.
Removing Dirt And Oils
Start by rinsing the rocks under running water to wash away loose dirt. Use mild dish soap to break down oils and stubborn grime. Gently scrub the rock surface with a brush or old toothbrush. Focus on all sides, especially crevices where dirt hides. Rinse thoroughly to remove soap residue.
Tools For Cleaning
You need simple tools for cleaning your rocks. A soft scrub brush or toothbrush works well for scrubbing. Use a bowl or bucket to soak rocks if very dirty. Mild dish soap helps remove oils without damaging the rock. Avoid harsh chemicals that can harm the rock or paint.
Drying Techniques
After cleaning, dry the rocks carefully. Pat them with a paper towel or cloth to absorb water. Let the rocks air dry fully in a warm, shaded spot. Avoid direct sunlight which can cause cracks or fading. Make sure rocks are completely dry before painting to help paint stick and last longer.
Preparing Rocks
Preparing rocks is the first key step in your DIY garden painting project. Clean and smooth surfaces help paint stick better and last longer outdoors. Skipping preparation can cause paint to peel or fade quickly. Take time to ready each rock carefully for the best results.
Start by washing the rocks to remove dirt, dust, and oils. Use soap and a brush for this task. Let the rocks dry fully before moving on. Dry surfaces absorb paint evenly and prevent bubbling or chipping.
Priming The Surface
Priming creates a smooth base on your rock. It seals the surface to hold paint well. Without primer, paint may soak unevenly or wash away. Use a brush or spray to apply primer thinly and evenly. Let it dry completely before painting.
Choosing The Right Primer
Select a primer made for outdoor use and rough surfaces. Acrylic primers work well on rocks. They are water-based and easy to apply. Avoid oil-based primers as they take longer to dry and can crack. Clear primers keep the rock’s natural color visible. White primers brighten colors but cover the rock’s look.
Tips For Porous Rocks
Porous rocks absorb more paint and primer. Apply two thin coats of primer for better coverage. Let each coat dry fully before adding the next. Use a sponge brush to reach inside tiny holes. After priming, check the surface for rough spots and smooth them with fine sandpaper.
Painting Basics
Painting rocks for your garden is a fun and creative way to add color and charm. Before you start, understanding the painting basics helps you get better results. This section covers the key steps to prepare and paint your garden rocks with confidence.
Selecting Paint Types
Choose paints designed for outdoor use. Acrylic paint works well because it sticks to rocks and dries fast. Outdoor spray paints also last longer in rain and sun. Avoid watercolors or oil paints. They may peel or fade quickly outside.
Essential Brushes And Tools
Use brushes with firm but soft bristles to cover surfaces smoothly. Flat brushes work great for base coats. Fine-tipped brushes help with details and small designs. A palette or plate is useful to mix colors. Keep some paper towels handy for cleaning brushes.
Applying Base Coats
Start by applying a base coat to your rock. This layer creates a smooth surface for other colors. Use even, thin strokes to avoid paint clumps. Let the base coat dry completely before adding more paint. This step improves color brightness and paint adhesion.
Design Ideas
Choosing the right design ideas makes your painted garden rocks stand out. Simple designs add charm without much effort. Nature-inspired themes connect your rocks to the garden environment. Personalized art brings unique touches that show your style.
These design categories fit different skill levels and preferences. Each one can brighten your garden in a special way. Explore these ideas to create beautiful DIY painted rocks for your outdoor space.
Simple Patterns
Simple patterns are easy and quick to paint. Dots, stripes, and basic shapes work well. Use bright colors to make your rocks pop. These designs suit beginners and add a playful touch. Try geometric shapes or repeating patterns for variety.
Nature-inspired Designs
Nature-inspired designs blend your rocks with garden life. Paint flowers, leaves, or small animals like ladybugs and bees. Earth tones and soft colors keep the look natural. These designs bring a peaceful vibe to your garden. Use fine brushes for detailed leaves and petals.
Personalized Art
Personalized art lets your personality shine through. Add names, initials, or short messages to your rocks. Use symbols or icons that have special meaning to you. This makes your garden feel welcoming and personal. Choose colors that reflect your style and mood.
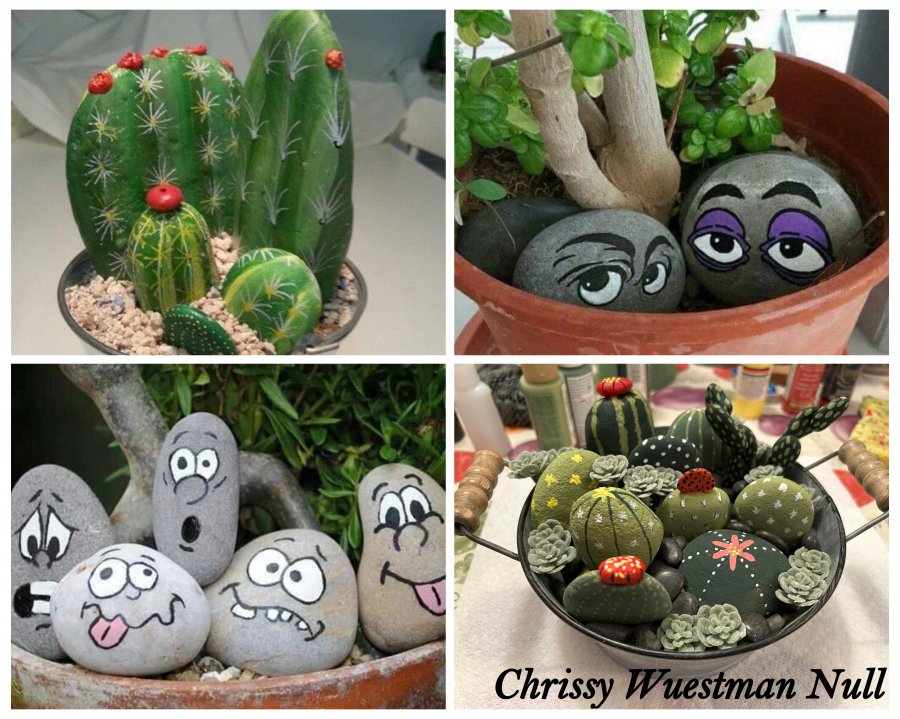
Credit: fb-rocks.com
Painting Techniques
Painting techniques shape the look of your DIY garden rocks. They help colors stand out and bring designs to life. Using the right methods makes your rocks more beautiful and durable. Below are key techniques to try for a polished finish.
Layering Colors
Start with a base color to cover the entire rock surface. Let it dry completely before adding more layers. Apply lighter or darker shades on top to create depth. Thin layers work best to avoid paint clumping. Layering blends colors smoothly and adds richness to your design.
Detailing And Highlights
Details bring your painted rocks to life. Use small brushes to add fine lines and shapes. Highlights create contrast and make parts pop. Paint white or bright colors on edges and raised areas. This technique gives your rocks a 3D effect and catches the eye.
Using Acrylic Paint Pens
Acrylic paint pens offer precision for detailed work. They are easy to control and work well on rough surfaces. Use pens to draw patterns, letters, or small decorations. Paint pens dry quickly and reduce mess. They are perfect for adding sharp lines and fine touches.
Sealing Painted Rocks
Sealing painted rocks is a key step in protecting your garden art. It helps keep colors bright and shields the paint from damage. Without sealing, paint can chip, fade, or wash away in rain. A good sealant extends the life of your DIY painted rocks.
Choosing Sealants
Select a sealant designed for outdoor use. Look for water-resistant and UV-protective qualities. Acrylic spray sealants and brush-on varnishes work well. Avoid sealants that yellow over time. Read labels carefully to find the best match for garden rocks.
Spray Vs Brush-on Varnish
Spray sealants are quick and easy to apply. They create an even, thin coat without brush marks. Brush-on varnishes offer more control over coverage. Use a soft brush to avoid streaks. Both types protect painted surfaces but choose based on your comfort and project size.
Ensuring Weather Resistance
Apply multiple thin coats of sealant for better protection. Let each coat dry fully before adding the next. Cover all painted areas, including edges and undersides. This prevents water from seeping in. Proper sealing guards your rocks from sun, rain, and frost damage.
Displaying Rocks In Garden
Displaying painted rocks in your garden brings charm and personality. These colorful stones brighten spaces and invite curiosity. Proper placement helps your DIY rocks stand out and complement garden elements.
Thoughtful display turns simple rocks into eye-catching features. Use different ideas to create visual interest and harmony with nature.
Arranging For Visual Impact
Group rocks by size, shape, or color to create focus points. Arrange stones in clusters or lines along pathways for flow. Place larger rocks at the back and smaller ones in front for depth. Keep spacing balanced to avoid overcrowding or emptiness. Play with angles so painted designs face common viewing spots.
Using Rocks As Garden Markers
Paint rocks with plant names or symbols for easy identification. Place markers near herbs, vegetables, or flower beds. Use bright colors to catch attention and prevent confusion. Labeling helps maintain garden order and adds a personal touch. Durable paint and sealant ensure markers last outdoors through weather changes.
Combining With Plants And Decor
Mix painted rocks with flowers, shrubs, or ground cover for contrast. Position stones near plant bases or along garden edges to highlight colors. Pair rocks with garden statues, birdbaths, or benches for a cohesive look. Natural textures of rocks and plants balance each other well. This blend creates a peaceful and artistic garden vibe.
Maintenance Tips
Keeping your DIY painted rocks looking fresh in the garden takes simple care. Proper maintenance helps preserve their bright colors and protects them from outdoor wear. Follow these easy tips to extend the life of your painted rocks.
Cleaning Painted Rocks Outdoors
Remove dirt and dust regularly to keep colors vibrant. Use a soft brush or cloth to gently clean the rocks. Avoid harsh scrubbing that can damage the paint. Rinse with water if needed and let the rocks air dry fully before placing them back.
Reapplying Sealant
Sealant protects paint from fading and chipping outdoors. Apply a clear outdoor sealant every year or after heavy rain. Use a spray or brush-on sealant made for outdoor crafts. Make sure the rocks are clean and dry before sealing for best results.
Protecting From Weather Damage
Strong sun, rain, and frost can wear down painted rocks. Place them in shaded or sheltered spots when possible. Bring rocks indoors during extreme weather or winter months. Covering painted rocks with a light tarp during storms can reduce damage.
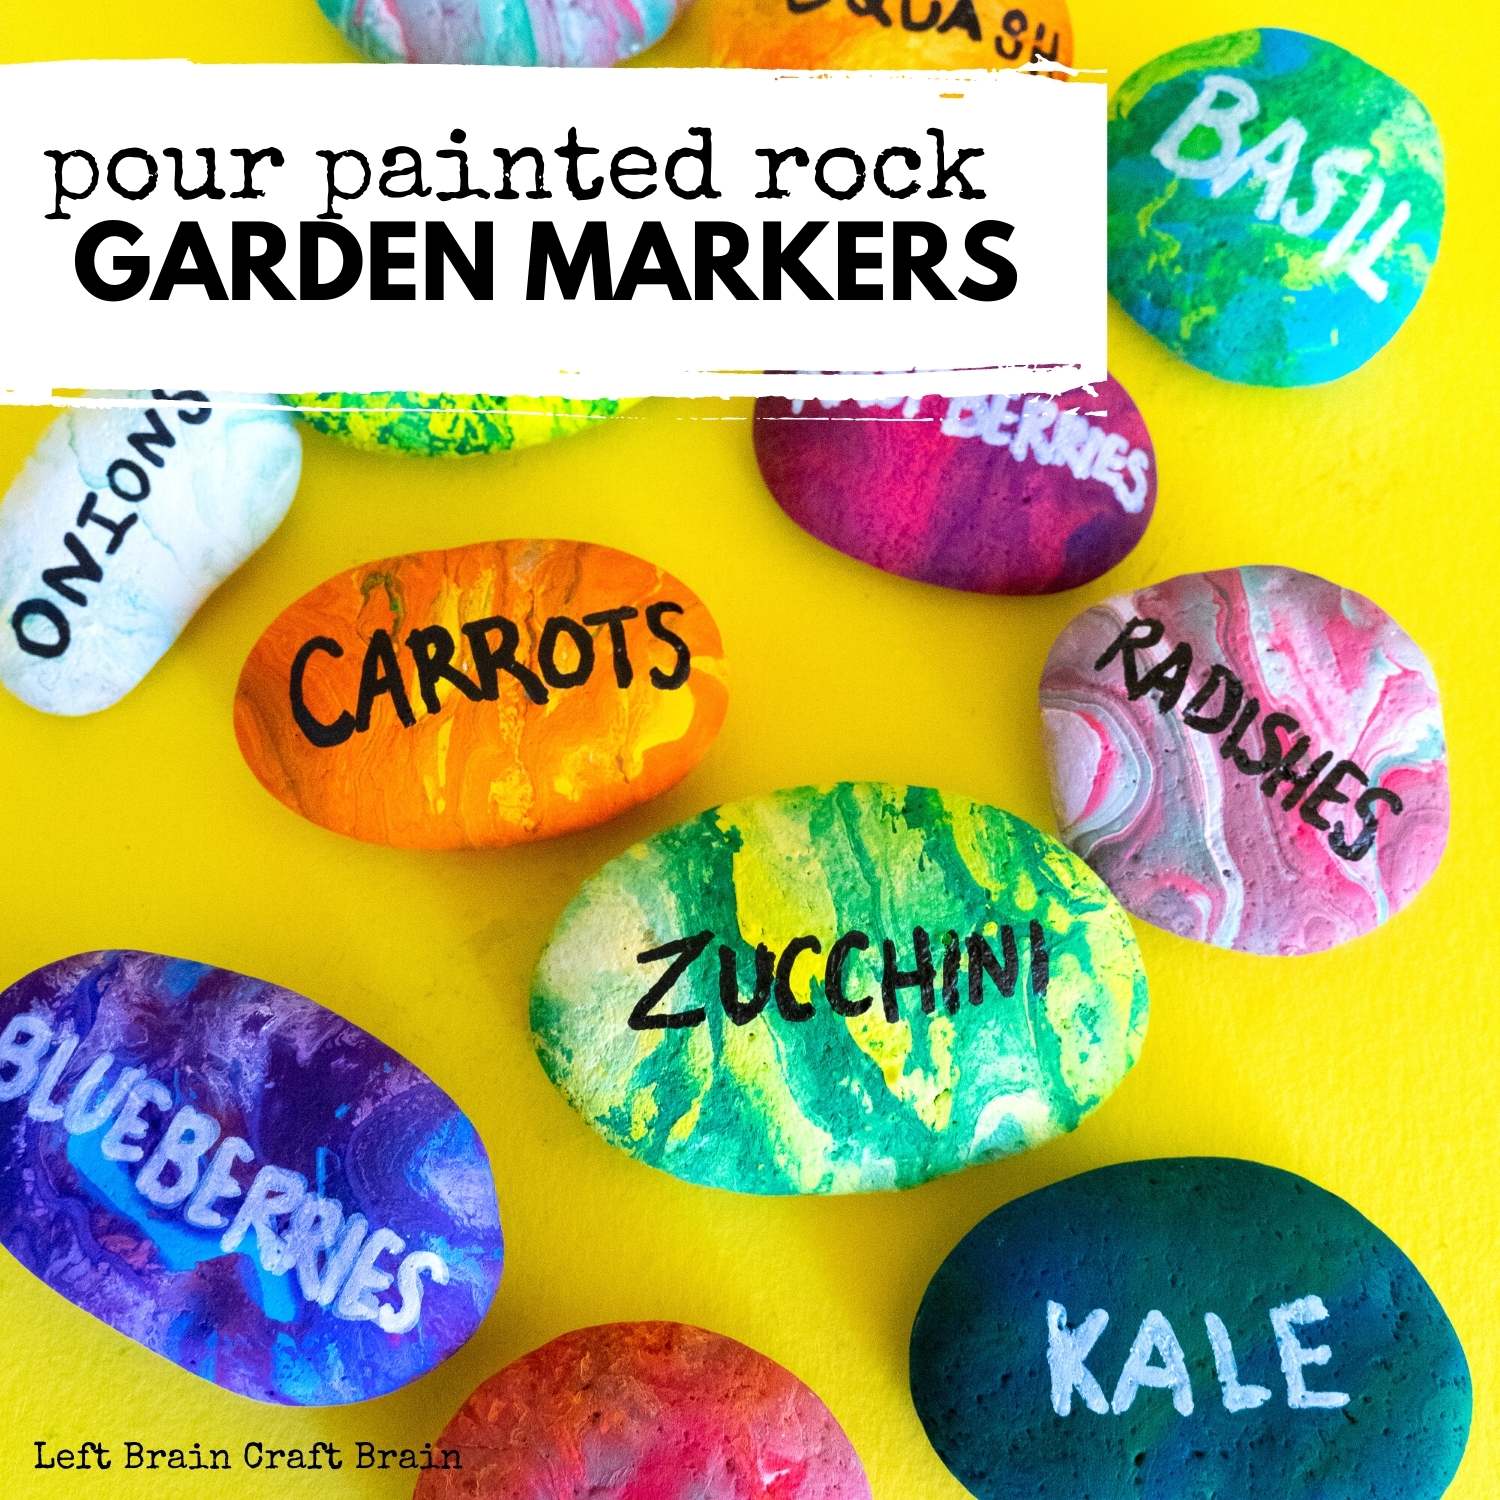
Credit: leftbraincraftbrain.com
Frequently Asked Questions
What Kind Of Paint Will Stick To Rocks?
Acrylic paint sticks best to rocks due to its durability and vibrant colors. Clean and dry rocks before painting. Use a primer for better adhesion and seal with a clear varnish for outdoor protection.
How To Paint Rocks For A Garden?
Clean rocks with soap and water, then dry completely. Apply a base coat of acrylic paint. Paint your design and let it dry. Seal with a clear outdoor varnish for durability. Place rocks in your garden as decorative accents.
What Do You Put On Rocks Before Painting?
Clean rocks with soap and water to remove dirt and oils. Let them dry completely. Apply a base coat of acrylic paint before detailed painting.
How Do I Seal Painted Rocks For Outdoor Use?
Clean and dry the painted rock thoroughly. Apply a clear, outdoor-grade acrylic sealer or varnish evenly. Let it dry fully before outdoor use. Repeat for extra protection.
Conclusion
Painting DIY rocks for your garden adds charm and color easily. Start with clean, dry stones for best results. Use bright colors and simple designs to make them stand out. Seal your painted rocks to protect them from weather. Place them around plants or pathways to brighten your outdoor space.
Enjoy this fun, creative project that anyone can do. Your garden will look more inviting and unique with these painted rocks. Give it a try and watch your garden come alive with color!