
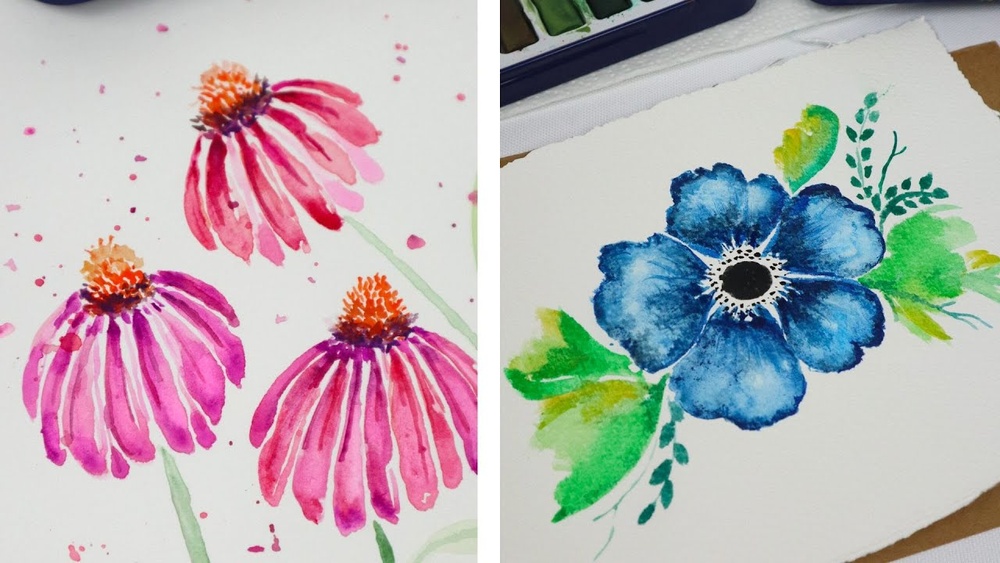
Quick answer: The easiest beginner watercolor painting ideas with flowers are loose tulips, lavender sprigs, cherry blossoms, simple roses made from spirals, poppies, daisies, wildflower meadows and wet-on-wet blooms. Each one relies on a single brush shape, such as a press-and-lift petal or a dabbed bud, rather than detailed drawing. Use 100% cotton or heavy (140 lb) paper, a size 8 round brush, and three or four colors, and let layers dry between details.
Flowers are the classic starting point for watercolor, and for good reason. Petals are naturally soft-edged and irregular, which suits the way watercolor flows, and a flower that turns out lopsided still looks like a flower. The challenge for beginners is knowing which flowers to start with and which brush movements make them.
This guide gives you 15 beginner watercolor painting ideas with flowers, ordered from simplest to more involved, with step-by-step instructions for each, the four brush strokes that make most petals, a starter supply list and fixes for the problems everyone runs into. If you are completely new to painting in general, our painting for beginners guide covers the fundamentals of materials, color and practice routines.
What You Need to Start
| Supply | Recommendation | Why |
|---|---|---|
| Paper | 140 lb (300 gsm) cold-press, ideally 100% cotton | Holds water without buckling badly; cotton allows smoother washes |
| Brushes | Round size 8 or 10, plus a size 2 or 4 for details | A good round makes both broad petals and fine stems |
| Paint | A small pan or tube set | Student sets are fine to start |
| Colors to prioritize | A rose or magenta, a yellow, a blue, a green (or mix it), a brown | Covers most flowers |
| Palette | White ceramic plate or plastic palette with wells | To mix and judge colors |
| Extras | Two water jars, paper towels, pencil, masking tape | Clean rinsing water and control |
Tape the paper to a board on all four sides to reduce buckling. Keep one water jar for rinsing and one clean jar for wetting paper and mixing.
Four Brush Strokes That Make Most Flowers
Practice these on scrap paper for ten minutes before trying any project.
- Press and lift: touch the tip of a loaded round brush to the paper, press down so the belly flattens, then lift as you pull back. This makes a teardrop-shaped petal or leaf in one movement.
- Dab: touch the brush tip down and lift straight up for small buds, berries and lavender florets.
- C-stroke: paint a curved C shape with varying pressure. Overlapping C-strokes build roses and peonies.
- Line pull: using only the tip, pull a thin line for stems, using your whole arm for long smooth curves.
Understand Water: The Key Watercolor Skill
Most beginner frustration comes from water balance rather than drawing skill.
- Wet-on-wet: paint onto damp paper. Color spreads and blurs softly. Great for backgrounds and dreamy blooms.
- Wet-on-dry: paint onto dry paper. Edges stay crisp. Great for petals, stems and details.
- Shine test: look at the paper at an angle. A glossy shine means very wet (paint will spread a lot). A dull, damp look means color will soften but not run far. Completely dry paper gives sharp edges.
15 Beginner Watercolor Painting Ideas With Flowers
1. Lavender sprigs
Pull thin green stems. Along the top third of each stem, dab small purple florets with the brush tip, more densely toward the top. Add a little blue to some dabs for variation. This is one of the easiest flowers because it is all dabs and lines.
2. Simple tulips
Paint a cup-shaped petal in the center with a press-and-lift stroke, then add a petal on each side, slightly overlapping. Let the edges touch while wet so colors merge. Add a long stem and two blade-like leaves.
3. Cherry blossom branch
Paint a brown branch with uneven pressure so it thickens and thins. When dry, add five-petal flowers using small press-and-lift strokes in pale pink, leaving a tiny gap in the center. Dot the centers with darker pink.
4. Daisies
Paint a yellow circle for the center. Around it, paint thin gray-blue or very pale yellow petals, leaving white paper between them. White daisies are made by painting shadows rather than petals, which is a useful watercolor lesson.
5. Spiral roses
Start with a small dark comma in the center. Add C-strokes around it, getting larger and paler as you move outward by adding more water. Leave small white gaps between strokes. Add two or three leaves.
6. Poppies
Paint four or five broad, slightly ruffled red petals with wavy edges. While still damp, drop a darker red at the base of each petal. Once dry, add a dark center and a few thin stems with hairy texture.
7. Wet-on-wet blooms
Wet a circle of paper with clean water. Drop in two related colors, such as pink and purple, and let them blend. When nearly dry, add a darker center. Add stems and leaves on dry paper. Wet on wet watercolor flowers for beginners are forgiving because there are no hard edges to perfect.
8. Forget-me-nots
Paint clusters of tiny five-petal blue flowers with yellow centers. Vary the blue with touches of purple. Small sizes make mistakes nearly invisible.
9. Wildflower meadow
Paint a soft green wash along the bottom of the paper. While it is damp, add vertical strokes of darker green. When dry, dot in flowers in pink, yellow, purple and white across the meadow, smaller toward the top to suggest distance.
10. Leafy wreath
Lightly draw a circle with a pencil or trace a bowl. Paint leaves along the line using press-and-lift strokes in two or three greens, with occasional berries or small flowers. Erase the pencil when dry. Wreaths make great cards.
11. Sunflower
Paint yellow press-and-lift petals radiating around a circle. Let dry. Paint the center in brown, dabbing darker brown dots for seed texture. Add a darker yellow-orange at the petal bases.
12. Hydrangea cluster
Wet a rounded area. Dab clusters of four-petal flowers in blues and purples, letting some blend. When dry, add a few crisper flowers on top for definition.
13. Bluebells
Paint arching stems with small bell-shaped flowers hanging from one side. Each bell is a short press-and-lift stroke with a tiny flared edge.
14. Peony
Build a large flower from many loose C-strokes in pink, darker at the center and paler at the edges. Leave white gaps to separate petals. This is more advanced but very rewarding.
15. Floral letter or name
Write a letter lightly in pencil and decorate the shape with small leaves and flowers. It makes a personal gift.
How to Paint Flowers With Watercolor for Beginners: A Practice Routine
- Warm up: 5 minutes of brush strokes on scrap paper.
- One flower type, ten times: paint a single flower ten times on one sheet. Repetition teaches more than ten different flowers once.
- Change one variable: paint the same flower wet-on-wet and wet-on-dry, side by side.
- Combine: arrange three flower types into a small composition.
- Review: note which petals look best and why.
Watercolor Pencil Flowers for Beginners
Watercolor pencils offer more control and are a gentle introduction for people who feel nervous with loose paint.
- Draw the flower outline lightly with the pencil.
- Color the petals, pressing harder at the base of each petal and lighter at the tips.
- Brush over the colored areas with a damp brush. The pigment dissolves and blends into a watercolor look.
- When dry, add crisp details with the dry pencil, such as veins and stamens.
Watercolor pencil ideas for beginners include tulips, daisies and leafy wreaths, since they benefit from drawn outlines.
Color Mixing for Flowers
| Target color | Mix | Use |
|---|---|---|
| Natural leaf green | Blue + yellow + a touch of red or brown | Leaves, stems |
| Spring green | Lemon yellow + a little blue | New growth, light leaves |
| Lavender | Magenta or rose + blue + water | Lavender, bluebells, shadows |
| Coral | Rose + yellow | Poppies, roses, tulips |
| Petal shadow gray | Blue + a touch of orange or brown, very diluted | Shadows on white flowers |
Mixing greens rather than using tube green straight usually gives more natural-looking leaves.
Common Beginner Problems and Fixes
| Problem | Cause | Fix |
|---|---|---|
| Blooms or “cauliflowers” in petals | Adding wet paint into an area that is half dry | Work while fully wet or wait until fully dry |
| Colors turn muddy | Overmixing or too many layers | Use fewer colors; let layers dry; rinse brush well |
| Paper buckles | Thin paper or too much water | Use 140 lb paper and tape the edges |
| Petals merge into a blob | Painting next to a wet petal | Skip every other petal, then fill in once dry |
| Flowers look stiff | Over-careful outlines | Paint loosely, use larger brushes, leave white gaps |
| Colors dry too pale | Watercolor dries lighter | Mix stronger than you think you need |
Interested in floral subjects in acrylic too? Our ideas for flower painting for beginners cover simple projects in other media.
Simple Compositions for Floral Paintings
Once single flowers feel comfortable, arranging them well makes a small painting look finished.
- Diagonal spray: a few stems sweeping from one bottom corner toward the opposite top corner. Diagonals feel lively.
- Bouquet in a vase: a loose cluster of three to five flowers above a simple vase shape. Let some stems lean out of the cluster for movement.
- Crescent: flowers and leaves arranged along a curve, leaving the center open for lettering on a card.
- Single stem: one tall flower placed off-center with plenty of white space. Minimal and elegant.
- Border: small flowers along the bottom edge or around all four sides, suitable for stationery.
A useful rule: choose one flower to be the largest and most detailed, and keep the rest smaller and looser. That gives the eye a place to land.
Tips by Skill Level
Absolute beginners
Spend a week on lavender, tulips and leaves only. Focus on the press-and-lift stroke and on judging how wet the paper is.
Improving beginners
Add roses, poppies and wreaths. Experiment with dropping a second color into wet petals for natural variation.
Ready for more
Try peonies, hydrangeas and full bouquets, and paint the same composition twice, once loose and once more detailed, to find your style.
Tips for Looser, Livelier Flowers
- Use the largest brush you can for the size of the flower. Small brushes encourage fussy painting.
- Leave white paper. Small gaps between petals act as highlights and keep flowers fresh.
- Vary petal sizes and colors. Real flowers are never perfectly uniform.
- Paint in odd numbers. Groups of three or five flowers usually look more natural than pairs.
- Stop sooner. Many watercolor flowers are spoiled by one extra layer.
Once you are comfortable with flowers, branch out with our list of easy watercolor ideas for beginners, covering landscapes, skies and simple objects.
FAQs
What is the easiest flower to paint in watercolor?
Lavender, tulips and simple five-petal blossoms are among the easiest. Lavender is mostly dabs and lines, and tulips need only three press-and-lift petals.
What paper is best for beginner watercolor flowers?
140 lb (300 gsm) cold-press paper. 100% cotton paper gives smoother washes and better blending, but good-quality cellulose paper is fine for practice.
How do you paint wet on wet watercolor flowers for beginners?
Wet a flower-shaped area with clean water, drop in one or two colors and let them blend. When it loses its shine, add a darker center. Paint stems and leaves on dry paper for contrast.
Why do my watercolor flowers look muddy?
Usually from overmixing, too many layers or dirty rinse water. Use fewer colors, change your water often and let each layer dry fully before adding another.
Do I need expensive paint to paint flowers?
No. Student-grade paints are fine for learning. Paper quality makes a bigger difference than paint quality for beginners.
Are watercolor pencils good for beginners?
Yes. They offer the control of drawing with the soft look of watercolor once activated with water, which makes them less intimidating.
Final Thoughts
Start with lavender, tulips and cherry blossoms, practice the four brush strokes, and paint each flower many times before moving on. Watercolor rewards repetition and restraint more than talent. When you are ready to build on these skills with a structured approach to materials and technique, our beginner painting essentials guide is a good next step.




One Comment