
Bubble wrap painting crafts bring together art, fun, and creativity in a way that’s both simple and exciting. If you’ve ever popped those little air bubbles while unpacking a box, you already know how satisfying bubble wrap can be. But did you know you can use it to make vibrant, textured paintings?
This craft is perfect for all ages, from young kids to adults looking for a relaxing project. It’s mess-friendly, easy to customize, and doesn’t require expensive materials. Whether you’re planning a rainy-day activity, a classroom project, or just want to try something new, bubble wrap painting crafts are a fantastic choice.
In this guide, you’ll learn everything you need to know about bubble wrap painting crafts: what supplies to gather, how to prepare your workspace, detailed step-by-step instructions, creative variations, common mistakes, and tips for success. By the end, you’ll feel confident creating your own unique art pieces with bubble wrap.
What Is Bubble Wrap Painting?
Bubble wrap painting is an art technique that uses bubble wrap as a printing tool. Instead of using brushes or sponges, you apply paint onto the bumpy side of bubble wrap. When you press it onto paper or canvas, it leaves behind a dotted, textured pattern. The effect is lively and playful, making it perfect for backgrounds, abstract art, or even detailed designs.
This method helps develop fine motor skills in children and encourages experimentation with color and pattern. It’s also popular in sensory art activities because of the tactile nature of bubble wrap. Adults enjoy it too, especially for creating backgrounds in mixed-media art or unique wrapping paper.
Materials Needed
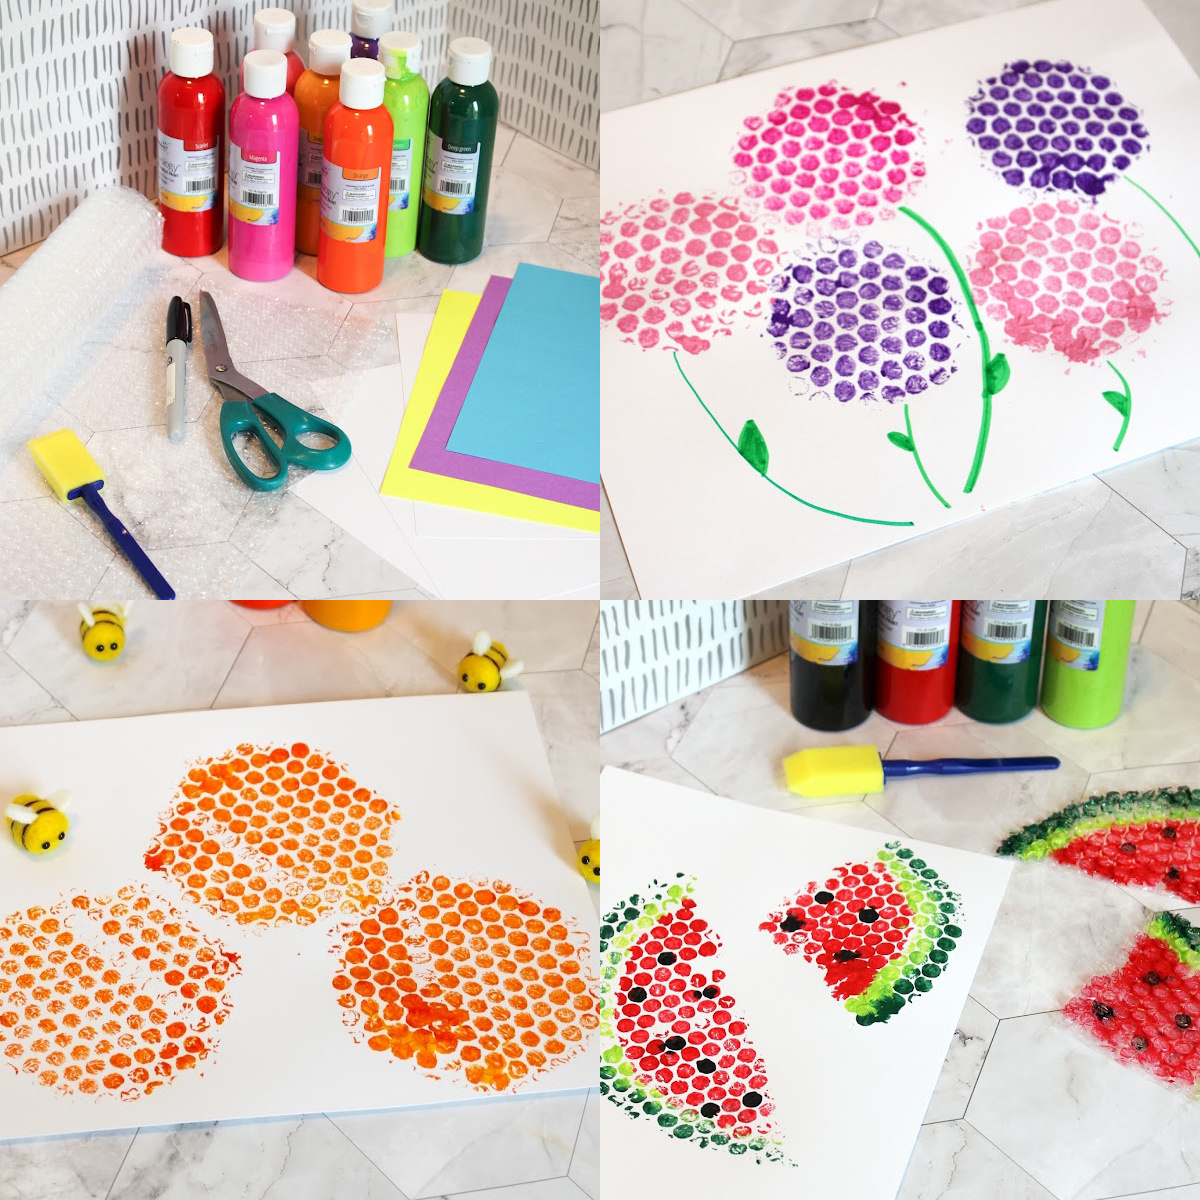
You don’t need many supplies for bubble wrap painting, and most can be found at home or in art stores. Here’s a checklist to get started:
- Bubble wrap: Any size works, but small bubbles create finer textures and large bubbles give bolder prints.
- Acrylic or tempera paint: Water-based paints are ideal for easy cleanup.
- Paper or canvas: White construction paper, cardstock, or even recycled cardboard.
- Paintbrush or roller: For spreading paint onto the bubble wrap.
- Palette or plate: To hold and mix paint.
- Apron or old clothes: Painting can get messy.
- Protective covering: Newspaper or plastic sheet for your workspace.
- Scissors: To cut bubble wrap into desired shapes.
- Tape (optional): To secure bubble wrap or paper.
Most beginners forget to protect their work area or wear an apron, leading to unnecessary messes. Always set up your space before starting.
Credit: diycandy.com
Preparing Your Workspace
Setting up your area before painting makes the process smoother and more enjoyable. Here’s how:
- Cover the table: Lay down newspaper, an old tablecloth, or a plastic sheet.
- Arrange materials: Place paints, brushes, and paper within easy reach.
- Wear old clothes: Paint can stain, so dress accordingly.
- Cut bubble wrap: Trim pieces to different shapes or sizes. Circles, squares, or even themed shapes like hearts or stars.
- Test your paint: Some paints are thicker than others. If needed, add a few drops of water to thin out acrylics for better coverage.
One non-obvious tip is to keep a damp cloth nearby for quick cleanups. Also, use a tray with raised edges to prevent paint from dripping onto the floor.
Step-by-step Guide To Bubble Wrap Painting
Let’s walk through the basic process of creating bubble wrap art. These steps will give you a solid foundation, but feel free to experiment as you gain confidence.
1. Choose And Prepare Your Bubble Wrap
Cut your bubble wrap into manageable pieces—about the size of your hand works well for most projects. For more detailed designs, cut smaller shapes. If you want to cover a large area, leave the bubble wrap in larger sheets.
2. Select And Prepare Paints
Pour small amounts of paint onto your palette. If you plan to blend colors, put them side by side. For younger kids, stick to three or four colors to avoid muddy results. Adults or older children can experiment with color mixing.
3. Apply Paint To Bubble Wrap
Use a paintbrush or small roller to spread paint across the bubble side of the wrap. Apply a thin, even layer—too much paint can fill the bubbles and lose the dotted effect. For multi-color prints, dab different colors onto separate sections of the wrap.
4. Press Bubble Wrap Onto Paper
Place the painted side of the bubble wrap onto your paper or canvas. Press gently but firmly, making sure all bubbles make contact. You can use your hands or a clean roller to apply even pressure. Hold for a few seconds, then peel the wrap off slowly.
5. Repeat And Layer
For more complex designs, let each layer dry before adding new colors or patterns. Overlapping prints can create depth and interesting effects. Clean the bubble wrap with a damp cloth before switching colors to avoid mixing.
6. Add Details
Once your background is dry, add extra touches with a brush or marker. Draw outlines, add highlights, or glue on decorations like glitter or sequins.
7. Drying And Display
Let your artwork dry completely before handling. Acrylic paint usually dries in 20-30 minutes, while tempera paint may take a bit longer. Hang up your finished piece or use it as a card, wrapping paper, or wall art.

Credit: www.youtube.com
Creative Ideas And Variations
Bubble wrap painting is more than just pressing paint onto paper. Try these creative twists to keep your projects fresh and exciting:
- Shape printing: Cut bubble wrap into animal shapes, letters, or geometric patterns. Kids love printing their initials or favorite animals.
- Layered landscapes: Use blue and green for a water-and-grass effect, or layer warm colors for a sunset background.
- Greeting cards: Fold sturdy cardstock, print bubble wrap patterns, and add a message for a handmade card.
- Gift wrap: Create large sheets of printed paper to use as unique gift wrap. Choose colors to match holidays or special occasions.
- Mixed media: Combine bubble wrap prints with stamps, stickers, or other textures for a mixed-media collage.
- Fabric printing: Try fabric paint on tote bags or t-shirts. Make sure to place cardboard inside to prevent bleed-through.
- Seasonal crafts: Use themed colors and shapes. For example, orange and black for Halloween, or green and red for Christmas.
A common mistake is using too much paint or not cleaning the bubble wrap between colors, which can lead to smudged or muddy results. For clean, crisp prints, keep paint layers thin and rinse your tools often.
Common Mistakes And How To Avoid Them
Even simple crafts have their challenges. Here are some common mistakes in bubble wrap painting and tips to avoid them:
- Too much paint: Thick paint fills the bubbles and loses the dotted texture. Use a thin layer for the best effect.
- Not enough pressure: If you don’t press evenly, some bubbles won’t print. Use your palm or a roller for even results.
- Wrong type of paint: Some paints don’t stick well to bubble wrap. Stick with acrylic or tempera for best results.
- Skipping workspace prep: Paint splatters can stain furniture and floors. Always cover your area and wear protective clothing.
- Not letting layers dry: Overlapping wet paint can cause colors to mix unintentionally. Let each layer dry before adding more.
One tip beginners miss is practicing on scrap paper first. This helps you test color combinations and pressure before working on your final piece.
Bubble Wrap Painting For Different Ages
Bubble wrap painting can be adapted for all age groups. Here’s how to tailor the activity:
| Age Group | Recommended Paints | Project Ideas |
|---|---|---|
| Preschoolers | Washable tempera | Simple patterns, greeting cards |
| Elementary Kids | Tempera, acrylic | Animal shapes, layered art |
| Teens & Adults | Acrylic, fabric paint | Mixed media, home decor |
For young children, always supervise and use non-toxic, washable paints. Older kids and adults can experiment with more advanced techniques and materials.
Choosing The Best Paint And Paper
Not all paints and papers give the same results. Here’s a comparison to help you pick:
| Paint Type | Pros | Cons |
|---|---|---|
| Acrylic | Bright colors, fast drying, good coverage | Can stain clothes, needs quick cleanup |
| Tempera | Washable, safe for kids, easy to mix | Less vibrant on dark paper |
| Fabric Paint | Works on cloth, permanent | More expensive, not washable |
For paper, use thicker options like cardstock or watercolor paper. Thin paper can wrinkle or tear with wet paint.
Practical Tips For Better Results
- Test prints: Practice on scraps to master the right amount of paint and pressure.
- Try metallic or neon paints: These add a unique touch and stand out, especially on dark backgrounds.
- Secure bubble wrap: Tape bubble wrap to a small block or piece of cardboard for easier stamping.
- Vary bubble sizes: Mix small and large bubble wrap for different textures in the same artwork.
- Protect finished art: Spray a clear sealant for durability if you want to keep your piece long-term.
One advanced tip: for a “reverse” effect, paint your design on the paper, then print with clear or white paint using bubble wrap over it. This creates a layered look with interesting color play.
Using Bubble Wrap Painting In Learning And Therapy
Bubble wrap painting isn’t just fun—it’s also used in education and art therapy. The repetitive stamping motion helps develop fine motor skills in children. The tactile sensation can be calming for kids and adults with sensory needs. Many teachers use bubble wrap art projects to teach about patterns, colors, and shapes.
In art therapy, bubble wrap painting encourages self-expression without the pressure of making “perfect” art. The process is playful, which helps reduce stress and boost creativity. For more on the benefits of art in therapy, check out this Psychology Today article.
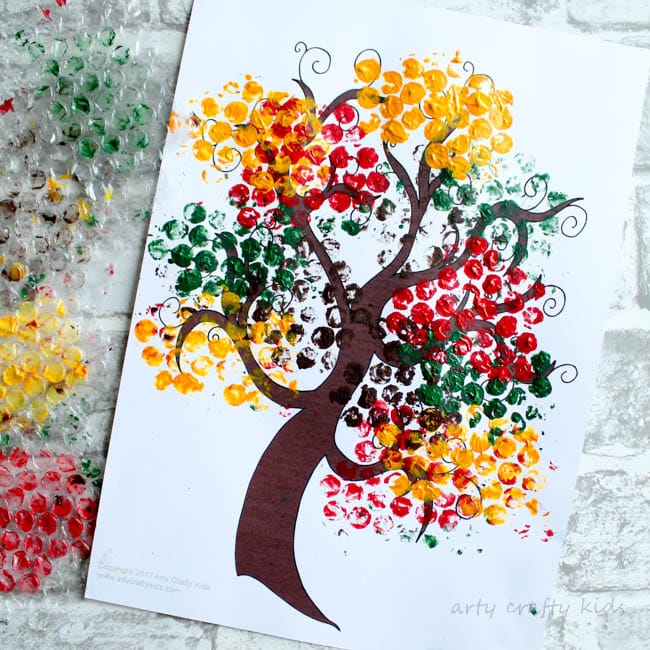
Credit: www.artycraftykids.com
Bubble Wrap Painting Project Examples
Here are a few project ideas you can try at home or in the classroom:
- Underwater scene: Paint blue and green bubble wrap for water and seaweed, then add fish or shells with markers.
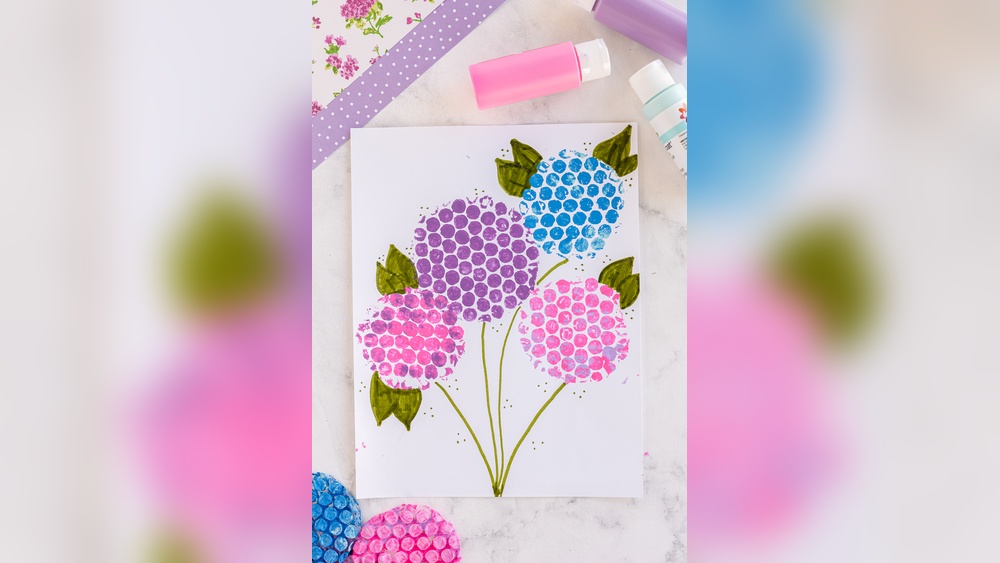
- Spring flowers: Print colorful circles for flower heads, then use a brush to add stems and leaves.
- Galaxy effect: Use black paper, print with metallic or white paint, then dot stars with a toothbrush.
- Holiday ornaments: Cut bubble wrap into circles, print with festive colors, and hang as decorations.
These projects are great for group activities, parties, or solo crafting.
Cleaning Up After Bubble Wrap Painting
Cleanup is usually quick if you prepare ahead:
- Wash brushes, palettes, and bubble wrap with warm water and soap.
- Wipe tables and chairs with a damp cloth.
- Let painted bubble wrap air dry if you want to reuse it.
- Dispose of used newspapers or coverings properly.
If paint gets on clothes, rinse with cold water before washing. Acrylic paint is harder to remove once dry, so act fast.
Frequently Asked Questions
What Types Of Paint Work Best For Bubble Wrap Painting?
Acrylic and tempera paints are the best choices. Acrylics give bright, fast-drying results, while tempera is washable and safer for young kids. Fabric paint works for printing on cloth.
Can I Reuse Bubble Wrap For Multiple Projects?
Yes, as long as you wash and dry it after each use. Over time, paint can build up and fill the bubbles, so replace bubble wrap when prints become less clear.
Is Bubble Wrap Painting Safe For Young Children?
It’s generally safe, but always supervise. Use non-toxic, washable paints and keep small pieces of bubble wrap away from toddlers to prevent choking.
How Do I Prevent Colors From Mixing Or Getting Muddy?
Clean bubble wrap and brushes between colors. Let each layer dry before adding new ones. Use fewer colors for simpler, brighter prints.
Can I Use Bubble Wrap Painting On Surfaces Other Than Paper?
Definitely! Try canvas, cardboard, fabric, or even wood. Just match your paint type to the surface for best results.
Bubble wrap painting crafts are a joyful way to explore art, experiment with color, and create something beautiful from everyday materials. With a bit of preparation and creativity, anyone can enjoy this satisfying craft, whether at home, in school, or as part of a group activity.
Give it a try—the possibilities are endless!


