Looking for a fresh way to brighten up your space without spending a fortune? You’re about to discover how easy and fun it is to create stunning DIY paint chip wall art.
Imagine turning simple paint samples into vibrant, eye-catching designs that add personality to your walls. Whether you want a bold statement piece or a subtle splash of color, this project lets you customize your decor exactly how you want it.
Ready to unleash your creativity and impress everyone with your unique wall art? Keep reading, and I’ll guide you step-by-step through making your own paint chip masterpiece.
Materials Needed
Creating DIY paint chip wall art is a fun and affordable project. Gathering the right materials makes the process smooth and enjoyable. Prepare all needed items before starting your creative work.
Choosing Paint Chips
Select paint chips with colors that match your room style. Look for a variety of shades to add depth. Many hardware stores offer free paint chip samples. Pick chips with clean edges and vibrant hues. Consider mixing bold and soft colors for contrast.
Tools And Supplies
Basic tools include scissors or a craft knife to cut paint chips precisely. A ruler helps measure and align pieces accurately. Use a pencil to mark cutting lines. Grab a strong glue stick or craft adhesive for sticking chips. A sturdy backing board or canvas is needed to arrange your art. Optional items include a hole punch for round shapes and tweezers for detailed placement.

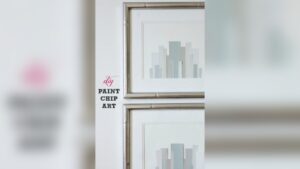
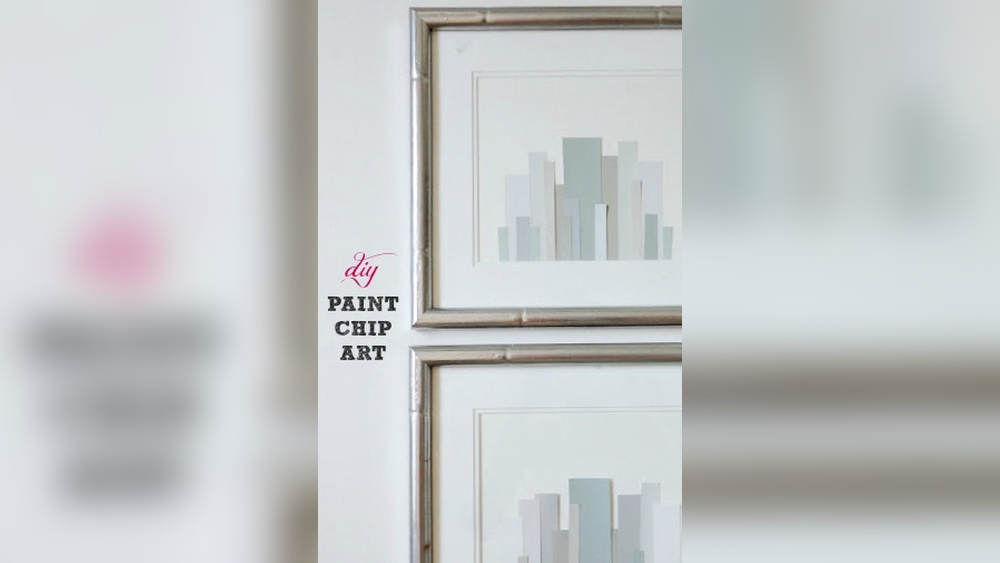
Credit: mostlymorgan.com
Preparing Your Workspace
Preparing your workspace is the first step to create beautiful paint chip wall art. A clean, organized area helps the process go smoothly. It also ensures your art piece looks neat and professional. Gather all materials and set up a comfortable space. Good lighting and enough room to spread out your supplies make a big difference.
Selecting The Surface
Choose a flat surface to build your paint chip art. Wood panels, canvas boards, or sturdy cardboard work well. Make sure the surface is clean and dry. This helps paint chips stick better. If desired, paint the surface with a base color before starting. Let it dry completely before adding paint chips.
Organizing Paint Chips
Sort paint chips by color, shade, or size. This makes it easier to find the right pieces while working. Lay them out on a table or tray. Group similar colors together to plan your design. Trim any uneven edges for a cleaner look. Keep your glue and tools nearby for quick access.
Design Ideas
Cutting and shaping paint chips is a key step in creating unique DIY wall art. This process allows you to turn simple paint samples into eye-catching shapes. You can use basic tools to craft different shapes that fit your design style. Careful cutting ensures clean edges and a professional look.
Using Punches And Scissors
Punches and scissors are easy tools to shape paint chips. Paper punches create perfect circles quickly. They come in various sizes and designs. Simply place the paint chip under the punch and press down firmly.
Scissors offer more control for custom shapes. Use sharp scissors for smooth cuts. Cut slowly along drawn lines to avoid jagged edges. Scissors work well for shapes like squares, rectangles, or freeform designs.
Creating Triangles And Hexagons
Triangles and hexagons add a modern look to paint chip art. Start by measuring and marking the shapes on the paint chip. Use a ruler to draw straight lines for accuracy.
Cut along the lines with scissors or a craft knife. Take your time to keep edges sharp and even. Hexagons fit together without gaps, making a neat pattern. Triangles can create dynamic, geometric designs.
Cutting And Shaping Paint Chips
Applying paint chips to the wall is the key step in creating your DIY paint chip wall art. This part brings your design to life. Careful planning and the right materials ensure a smooth and lasting finish. Follow simple steps to make your art stand out and stay secure.
Layout Planning
Start by deciding the pattern and shape for your paint chips. Arrange them on a flat surface first to see how they look. Measure the wall space to match your layout size. Mark light guidelines on the wall using a pencil. This helps keep your design straight and balanced. Planning avoids mistakes and saves time during application.
Adhesive Options
Choose an adhesive that works well with paint chips and your wall type. Double-sided tape offers a clean and easy option for small chips. Craft glue or mod podge works best for a stronger hold. Use spray adhesive for quick and even coverage. Avoid adhesives that may damage your wall paint. Test a small area first to check adhesion and remove-ability.
Arranging And Securing Chips
Apply adhesive to each paint chip or directly on the wall area. Press each chip firmly in place following your layout lines. Work from one side to the other to keep the design neat. Overlap chips slightly for a textured effect or keep them spaced for a modern look. Allow adhesives to dry completely before touching. This ensures your art stays intact and looks professional.
Applying Paint Chips To The Wall
Adding texture and dimension to your DIY paint chip wall art brings life and interest to the piece. It moves the artwork beyond flat colors and simple shapes. Texture invites touch and creates shadows that change with light. Dimension gives your art a 3D effect, making it stand out on your wall.
These effects make your paint chip art feel more dynamic and unique. You can achieve this by layering paint chips and mixing different materials. The process is simple but adds a professional touch to your project.
Layering Techniques
Start by arranging paint chips in overlapping layers. Place some chips flat and others at slight angles. This builds depth and catches light differently on each chip.
Use glue sparingly to keep edges lifted for a natural look. Try stacking chips of different sizes and colors. This creates a rich, textured surface that draws the eye.
Layering also allows you to create patterns or shapes. Play with symmetry or randomness to find what fits your style best. The more layers you add, the more tactile your art becomes.
Incorporating Mixed Media
Combine paint chips with other materials like fabric scraps or textured paper. These elements add variety and enhance the tactile feel. Small beads, buttons, or dried leaves can also add interest.
Use different adhesives to attach mixed media pieces securely. Experiment with layering these materials under or over your paint chips. This creates a multi-dimensional effect that is rich and engaging.
Adding mixed media gives your artwork a personalized, handcrafted feel. It breaks up the uniformity of paint chips and adds unexpected textures. This method turns simple paint chip art into a true conversation piece.

Credit: mountainmodernlife.com
Adding Texture And Dimension
Creating DIY paint chip wall art can be fun and affordable. Using budget-friendly tips saves money and adds charm to your home. Simple strategies help you gather materials without spending much. These ideas make your project easy and enjoyable.
Sourcing Free Paint Chips
Paint chips are often free at local paint or hardware stores. Visit nearby stores and ask for samples or leftover chips. Many stores keep paint swatches for customers to take. Collect different colors to create a unique palette for your art.
Look for seasonal sales or clearance racks where stores discard extra paint chips. Check community boards or online groups for people giving away paint samples. This way, you get variety without paying. Keep the chips organized by color or size for easy use.
Using Recycled Materials
Reuse old frames, cardboard, or scrap wood as the base for your art. These materials are often available at home or from thrift shops. Painting the base with leftover paint adds a fresh background at no extra cost.
Use glue, tape, or mod podge from previous projects to attach paint chips. Avoid buying new supplies unless necessary. Small recycled containers can hold your craft tools and bits. Recycling helps reduce waste and saves money on materials.

Credit: www.youtube.com
Frequently Asked Questions
What Materials Do I Need For Diy Paint Chip Wall Art?
You need paint chips, scissors or a hole punch, glue, a wooden panel or canvas, and paint for the background. Optional tools include a ruler and pencil for precise placement.
How Do I Prepare Paint Chips For Wall Art?
Cut or punch out shapes like circles or triangles from paint chips. Organize them by color or size to create your desired pattern before gluing.
What’s The Best Surface For Paint Chip Wall Art?
A wooden panel or canvas works best. Paint the surface with a base color that complements your paint chips for a polished look.
How Do I Arrange Paint Chips On The Wall Art?
Lay out your paint chips in patterns or random designs. Measure spacing and alignment before gluing to ensure a neat, balanced arrangement.
Conclusion
Creating DIY paint chip wall art adds color and charm to any space. It’s an easy project that anyone can enjoy. Use simple materials and your creativity to make unique designs. This art style fits well in homes, offices, or creative studios.
Experiment with colors and shapes for fresh looks every time. Small efforts can bring big changes to your walls. Have fun crafting and expressing your personal style. Your wall will tell a colorful story made by your own hands.