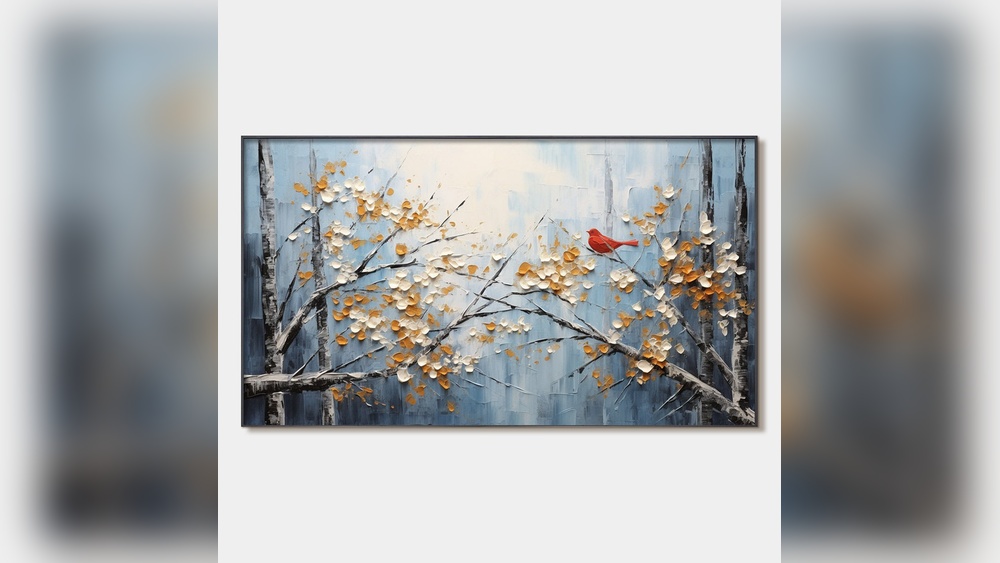
Painting a bird on a branch for wall art is one of those creative projects that feels both peaceful and rewarding. It turns an ordinary wall into a window to nature, inviting a sense of calm into any room. You don’t have to be a professional artist to make something beautiful; with the right guidance, anyone can create a stunning piece.
This article will show you how to paint a bird on a branch wall art, step by step, from gathering your materials to adding the final details. You’ll learn essential techniques, common mistakes to avoid, and some practical tips that most beginners miss.
Whether you want to brighten your home or give a handmade gift, this guide will help you every step of the way.
Choosing Your Bird And Branch Design
Before you start painting, decide what kind of bird and branch you want to paint. A simple design is best for beginners, but even experienced painters benefit from planning.
- Bird choice: Popular options include a sparrow, robin, or bluebird. These birds have clear shapes and colors, making them easier to paint.
- Branch style: Try a curved branch with a few leaves or blossoms. This adds movement and interest but keeps the focus on the bird.
- Reference image: Find a high-quality photo or illustration to use as a model. Avoid drawing from memory, as birds have unique features that are easy to miss.
Non-obvious insight: Choose a bird facing sideways. Side profiles are much easier to draw accurately than birds facing forward or at an angle.
Gathering Materials
Having the right materials makes painting more enjoyable and your results more professional. Here’s a list of what you’ll need:
- Canvas or wall: If you’re painting directly on a wall, make sure it’s clean and dry. For a portable option, use a primed canvas.
- Acrylic paints: They dry quickly and are easy to layer. Basic colors include white, black, blue, yellow, red, brown, and green.
- Brushes: Get a mix of sizes—small round brushes for details, medium flat brushes for branches, and a large brush for backgrounds.
- Palette: For mixing colors.
- Pencil and eraser: For sketching your outline.
- Painter’s tape: To mask off areas and create clean edges (especially helpful on walls).
- Cup of water: For cleaning brushes.
- Paper towels or rags: For wiping brushes and correcting mistakes.
- Varnish (optional): Adds protection and shine to your finished piece.
Practical tip: Use student-grade acrylics if you’re on a budget. They perform well for wall art and are widely available.

Credit: www.amazon.com
Preparing The Surface
A clean, smooth surface helps your paint stick and look even.
- For walls: Wash the area with mild soap and water. Fill any cracks or holes with spackle and sand smooth.
- For canvas: Make sure the canvas is primed (most store-bought canvases are ready to use). Lightly dust the surface.
Non-obvious insight: If you’re painting on a colored wall, consider painting a white rectangle as a base layer. This makes colors pop and prevents the wall color from showing through.
Sketching The Bird And Branch
Now, lightly sketch your design with a pencil. Focus on big shapes, not details.
- Draw the branch first: Start from one side and curve it slightly. Add one or two offshoots.
- Sketch the bird: Place it so it sits naturally on the branch. Start with a circle for the body, an oval for the head, and a triangle for the tail.
- Add leaves or blossoms: Keep them simple—just a few for accent.
Erase and adjust until you like the layout. Don’t worry about perfection; the sketch is just a guide.

Credit: www.walmart.com
Background Painting
Painting the background first makes the rest of the process easier and cleaner.
- Mix a soft color: Light blue or pale green are popular choices for a sky or natural backdrop.
- Use a large brush: Cover the area around your sketch, being careful not to paint inside the bird or branch outlines.
- Let dry: Acrylic paint dries fast—wait 10–15 minutes before moving on.
Data table: Popular Background Colors and Their Effects
| Color | Mood/Effect | Best For |
|---|---|---|
| Light Blue | Calm, airy | Daytime scenes |
| Pale Green | Fresh, natural | Spring/Summer themes |
| Cream or Beige | Warm, neutral | Modern interiors |
| Soft Gray | Minimalist, elegant | Monochrome art |
Painting The Branch
When the background is dry, paint the branch.
- Mix brown paint: Add a little black for a natural look.
- Use a medium flat brush: Paint along your branch outline with smooth strokes.
- Add texture: While the paint is wet, dab in darker and lighter browns for a bark effect. Don’t over-blend; let some roughness show.
- Paint leaves or blossoms: Use green for leaves, dabbing with a small round brush. For blossoms, use pink or white dots.
Practical tip: Don’t make the branch perfectly straight—real branches have slight bends and thickness changes.
Painting The Bird
Now for the most exciting part: bringing the bird to life.
Blocking In Main Colors
- Start with the body: Use a medium brush to fill in the base color, following your reference photo.
- Add the head and tail: Paint these parts using slightly different shades for depth.
- Let dry: Wait a few minutes before adding more layers.
Adding Details
- Wings and feathers: Use a small brush to paint wing shapes with thin, curved lines.
- Face: Carefully paint the beak, eye, and markings. The eye is usually a small black dot with a white highlight.
- Shading: Mix a little black or dark brown into your main color and add shadows under the belly, tail, and wings.
- Highlights: Use a touch of white or pale color to show sunlight on the bird’s back and head.
Data table: Common Birds and Their Key Colors
| Bird Species | Main Colors | Special Features |
|---|---|---|
| Sparrow | Brown, gray, black | Small beak, streaked chest |
| Robin | Red-orange, brown, white | Bright chest, round body |
| Bluebird | Blue, orange, white | Vivid blue wings |
Tips For Realism
- Look at your reference: Notice where the light and dark areas are.
- Don’t outline everything: In real life, bird feathers blend into each other. Use soft edges for a natural look.
- Layer colors: Acrylic paint dries fast, so you can add more color without making mud.
Non-obvious insight: Use a dry brush with almost no paint to gently “feather” edges and create a soft texture.
Final Touches
With the main painting done, it’s time to polish your work.
- Clean up edges: Use a small brush and background color to sharpen the outline if needed.
- Add final highlights: A tiny dot of pure white paint on the bird’s eye makes it look alive.
- Sign your art: Use a small brush and a dark color in one corner.
- Seal the painting: When completely dry (wait 24 hours), add a clear acrylic varnish for protection and a slight gloss.
Data table: Finishing Products for Acrylic Paintings
| Product | Purpose | Finish |
|---|---|---|
| Matte Varnish | Protect, reduce glare | Flat, non-shiny |
| Gloss Varnish | Protect, enhance color | Shiny |
| Spray Sealer | Quick, even coat | Varies |
Common Mistakes And How To Avoid Them
Many beginners make the same mistakes, but they’re easy to fix once you know what to watch for.
- Skipping the reference image: Guessing can lead to unnatural shapes and colors. Always use a good photo.
- Over-blending: Trying to make every color smooth can kill texture. Let some brush marks show, especially in feathers and bark.
- Painting too soon: Not waiting for layers to dry causes colors to mix and turn muddy. Be patient between steps.
- Ignoring scale: A bird that’s too big or small for the branch looks odd. Step back and check proportions as you go.
- Forgetting highlights: Without bright spots, your bird looks flat. Add a few last touches of light.
Practical tip: Photograph your painting with your phone and view it in black and white. This shows you where your darks and lights are, making it easier to adjust.
Displaying Your Bird On Branch Wall Art
Once your painting is finished and dry, display it proudly.
- On canvas: Hang with a picture hook or rest it on a shelf.
- On the wall: Peel off any painter’s tape for crisp edges. If needed, touch up the surrounding wall color.
- Lighting: Good lighting makes colors come alive. Use a soft white LED near your art.
If you want more inspiration or bird references, the Audubon Society has a huge collection of bird images and facts.

Credit: www.amazon.com
Frequently Asked Questions
What Type Of Paint Is Best For Wall Art?
Acrylic paint is the top choice for wall art because it dries quickly, is easy to clean, and sticks well to most surfaces. It also comes in many colors and finishes. For outdoor walls, use acrylics labeled for exterior use.
How Do I Make My Bird Look Realistic?
Study a reference image closely. Focus on the direction of feathers, shape of the beak, and where the light and shadows fall. Use layers to build up colors and don’t outline everything sharply.
Can I Paint On Wallpaper Or Textured Walls?
You can, but results may vary. Smooth walls are best. On wallpaper, test a small area first, as paint can sometimes peel or not stick well. If the wall is bumpy, use thicker paint and a rougher brush for better coverage.
What If I Make A Mistake?
Acrylic paint is forgiving. Let the mistake dry, then paint over it with the correct color. Use a damp rag to wipe away wet mistakes quickly. For pencil lines that show through, erase gently or paint another layer.
Do I Need To Seal My Painting?
Sealing isn’t required, but a clear varnish protects your painting from dust, sunlight, and scratches. It also makes colors look richer and can add a professional finish.
Painting a bird on a branch is more than just a fun project—it’s a way to bring a little nature into your everyday life. With the right approach and a bit of patience, you’ll be surprised at what you can create.
Enjoy the process and don’t be afraid to add your own style to your wall art masterpiece.