Are you ready to bring the wild beauty of a wolf to life on your canvas? Painting a wolf with acrylic paint might seem challenging at first, but with the right approach, you can create a striking piece that captures the spirit and power of this magnificent animal.
In this guide, you’ll discover simple steps and practical tips that make the process easy and enjoyable, even if you’re new to acrylics. By the end, you’ll not only have a stunning wolf painting but also the confidence to tackle more complex projects.
Let’s dive in and unlock your creative potential!
Materials Needed
Gathering the right materials makes painting a wolf with acrylic paint easier and more fun. Having quality supplies helps you create detailed and vibrant artwork. Below are the essential items you need to start your acrylic wolf painting.
Acrylic Paints
Choose a basic set of acrylic paints with primary colors. Include black, white, and various shades of gray for realistic wolf fur. Earth tones like brown and ochre add depth. Select paints that dry quickly and offer good coverage.
Brush Types
Use different brush sizes for fine details and broad strokes. A small round brush works well for fur and facial features. Flat brushes help fill large areas smoothly. Synthetic bristles are ideal for acrylic paint and easy to clean.
Canvas Selection
Pick a canvas with a medium texture to hold the paint well. A size of 12×16 inches is good for beginners. Stretched canvases or canvas boards both work. Make sure the surface is primed for acrylic paint.
Additional Supplies
Prepare a palette for mixing colors and a cup of water for rinsing brushes. Use paper towels to wipe brushes and correct mistakes. A pencil helps sketch the wolf outline before painting. A palette knife can be useful for mixing thick paint.
Preparing Your Workspace
Preparing your workspace is a crucial step before painting a wolf with acrylic paints. A well-organized and comfortable area helps you focus better. It also keeps your supplies within easy reach. Setting up your workspace right can improve your painting experience and results.
Setting Up Easel And Canvas
Place your easel in a stable spot. Make sure it is at eye level. Attach your canvas securely to avoid movement. Adjust the angle to reduce glare. This setup helps you see details clearly and paint smoothly.
Organizing Paints And Brushes
Arrange your acrylic paints by color or shade. Keep frequently used colors closest. Lay out brushes in order of size or type. Use containers or holders to keep brushes upright. This organization speeds up your workflow and prevents mess.
Lighting And Ventilation Tips
Use natural light if possible. Position your workspace near a window. If not, use a bright, white light source. Avoid harsh shadows on your canvas. Ensure good ventilation to avoid paint fumes. Open a window or use a fan for fresh air.
Sketching The Wolf
Sketching the wolf is the first step in creating a stunning acrylic painting. It helps set the foundation for your artwork. A good sketch captures the wolf’s form and spirit. This stage guides your painting and keeps proportions correct.
Start with a light pencil so you can erase and adjust as needed. Focus on shapes and lines before adding details. Keep your hand relaxed and your strokes gentle.
Basic Shapes And Proportions
Begin by drawing simple shapes to map out the wolf’s body. Use circles for the head and chest. Add ovals for the snout and hips. Connect these shapes with smooth lines for the neck and back. This method helps keep the wolf balanced and natural.
Measure the size of each shape carefully. The head should be smaller than the body but large enough to hold facial features. Check the length of the legs and tail. Adjust shapes to match the wolf’s pose and size.
Outlining Key Features
Next, focus on the wolf’s important details. Sketch the eyes, nose, and mouth on the head circle. Mark the ears on top of the head shape. These features bring life to your sketch. Draw the legs with simple lines and basic joints. Outline the tail with a flowing shape that matches the pose.
Keep your lines light and clean. Avoid heavy marks that can confuse later steps. Use reference images to capture the wolf’s unique look. Pay attention to the placement of the eyes and the shape of the ears.
Refining The Sketch
Now, improve the sketch by adding more accurate lines. Smooth out rough shapes and connect parts seamlessly. Define the fur edges lightly to show texture. Erase unnecessary lines that clutter the drawing.
Check proportions again and make small changes. Look at the sketch from a distance to see overall balance. This step prepares your canvas for painting. A clear, detailed sketch ensures your acrylic layers will fit perfectly.
Mixing Colors
Mixing colors is a key step in painting a wolf with acrylic paint. It helps capture the natural look of the wolf’s fur, shadows, and highlights. Using the right tones makes your painting more lifelike and vibrant.
Start by blending basic colors to get the shades you need. Adjust the mixes as you paint to match the wolf’s unique fur texture and lighting. This process allows you to build depth and detail step by step.
Creating Wolf Fur Tones
Begin with a base of white and gray for the wolf’s fur. Mix in small amounts of brown or beige for warm tones. Use blue or black for cooler gray shades. Test your mix on a palette before applying it to the canvas. Layer these tones for a soft, natural fur effect.
Mixing Shadow Shades
Shadows add depth and shape to your wolf painting. Combine dark gray, blue, and a touch of purple for rich shadow colors. Avoid pure black; it can look flat. Instead, create dark tones with color blends to keep shadows realistic and dynamic.
Highlight Colors
Highlights bring light and texture to the fur. Use white mixed with a hint of yellow or light beige for warm highlights. For cooler highlights, mix white with a tiny bit of blue. Apply highlights sparingly on raised fur areas and around the eyes to add sparkle and dimension.
Painting The Background
Painting the background sets the mood for your wolf artwork. A well-crafted background makes the wolf stand out. It also creates a sense of place and atmosphere. This part guides you through picking colors, laying base layers, and adding texture. Follow these steps for a strong foundation that enhances your wolf painting.
Choosing Background Colors
Select colors that fit the scene you want. Earth tones like greens and browns suit forest settings. Blues and grays work for snowy or night scenes. Use muted shades to keep the focus on the wolf. Test colors on a scrap paper to see how they blend. Avoid bright colors that can distract from your main subject.
Applying Base Layers
Start with a thin, even layer of paint over the entire background. Use a large flat brush for smooth coverage. Let this layer dry before adding more. This base helps later layers stick better. It also prevents the canvas from soaking up too much paint. Keep your strokes loose to avoid hard edges.
Adding Texture And Depth
Use different brush sizes and techniques to build texture. Dry brushing adds soft texture for foliage or rough ground. Stippling creates a speckled effect for leaves or snow. Layer darker shades behind lighter ones to add depth. Blend edges gently to avoid harsh lines. These details make the background lively and real.

Credit: www.youtube.com
Base Layer For The Wolf
Starting the base layer is a crucial step in painting a wolf with acrylics. This layer sets the foundation for the details and texture that will follow. It helps to define the wolf’s shape and tone early in the process. A good base layer guides the entire painting and makes the final work look more realistic and vibrant.
Focus on simple shapes and broad color areas. Avoid small details now. This approach makes the painting process smoother and more manageable.
Blocking In Main Fur Colors
Choose the main colors of the wolf’s fur. Use a large brush to cover big areas quickly. Apply these colors flatly to mark where light and dark fur will be. Keep the brush strokes loose and flowing. This step builds the base for the wolf’s texture and color pattern.
Establishing Light And Shadow
Observe the light source direction carefully. Paint the lighter fur areas with diluted lighter colors. Use darker tones to fill shadows and shaded parts. This contrast creates depth and volume in the wolf’s body. Avoid harsh edges; soft transitions work better for fur.
Maintaining Brush Control
Use steady hand movements to control the brush. Avoid pressing too hard; light strokes mimic fur strands well. Clean your brush often to keep colors pure. Work slowly and patiently to maintain accuracy. Good brush control helps to keep the base layer neat and well-defined.
Adding Details
Adding details brings your wolf painting to life. This step sharpens the features and makes the image realistic. Small touches create depth and character. Focus on key areas to enhance your artwork.
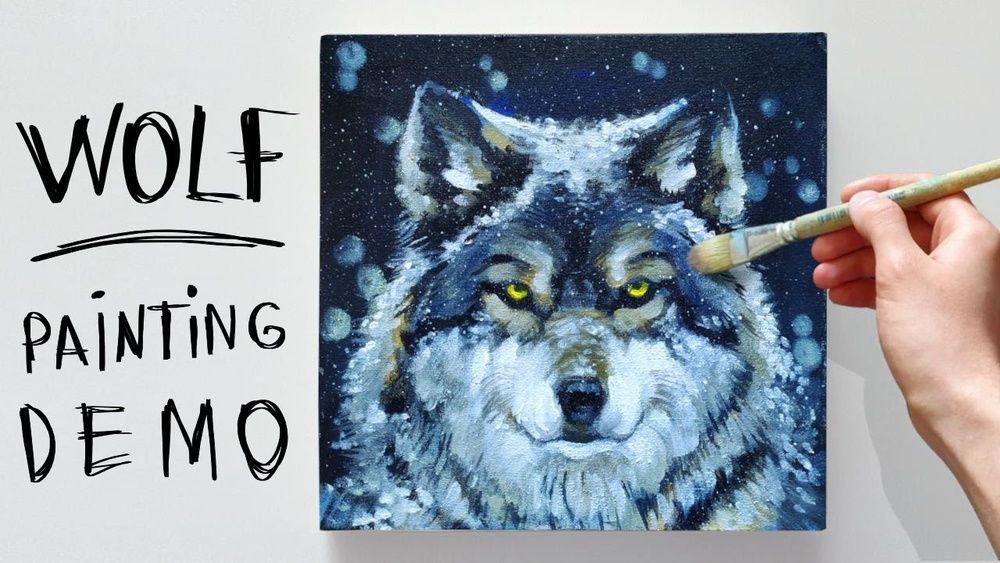
Painting Eyes And Nose
Start with the eyes. Use a small brush for precision. Paint the iris with a rich color. Add a tiny white dot to mimic light reflection. This gives the eyes a lively look. For the nose, use dark shades. Blend softly to show its shape. Highlight the wet shine on the nose tip.
Defining Fur Texture
Use fine brush strokes to paint fur. Follow the fur direction for natural flow. Layer different shades of gray, brown, or white. This adds volume and depth. Vary the stroke length to mimic real fur. Add some stray hairs for realism. Avoid uniform patterns to keep it organic.
Capturing Facial Expression
Focus on the wolf’s mouth and eyes. Slightly curve the mouth for a calm or alert look. Adjust eyebrow furrows to show mood. Use soft shadows around the face. These create emotion and focus. Small details make the expression believable and strong.
Credit: urartstudio.com
Enhancing Depth And Contrast
Enhancing depth and contrast brings your wolf painting to life. It creates a three-dimensional look. This makes the wolf appear more real and interesting. Using acrylic paint, you can build layers and use light and dark tones. This section shows how to add shadows, highlights, and soften edges effectively.
Layering Shadows
Start by applying thin layers of dark paint in shadow areas. Focus on places under the fur, around the eyes, and beneath the muzzle. Let each layer dry before adding the next. This builds rich, deep shadows without losing detail. Use a small brush to stay precise. Layering shadows adds volume and shape to the wolf’s face.
Highlighting Fur Highlights
Use a lighter color to paint highlights on the fur. Apply these strokes on areas where light hits directly. The nose bridge, cheekbones, and ears are good places. Use a fine brush to mimic the texture of fur. Adding highlights creates contrast and draws attention to the wolf’s features. It also gives a soft glow to the fur.
Softening Edges
Soft edges blend the wolf into the background. Use a dry brush or a clean, damp brush to gently blur hard lines. This technique helps create a natural transition between colors. It avoids a flat or harsh look. Softening edges makes the painting smoother and more lifelike. It also gives a sense of atmosphere around the wolf.
Finishing Touches
The finishing touches bring your acrylic wolf painting to life. These final steps refine the details and enhance realism. They give the artwork a polished, complete look. Focus on subtle additions that highlight the wolf’s character and texture. Small changes here can make a big difference in the overall impact of your painting.
Adding Whiskers And Fine Details
Use a thin brush or a fine liner brush for whiskers. Choose a light color like white or gray. Paint gentle, curved lines extending from the wolf’s muzzle. Add small strokes for fur texture around the eyes and ears. These details give the wolf a lifelike expression. Take your time for precision and avoid heavy paint here.
Final Color Adjustments
Check your painting from a distance for color balance. Adjust shadows and highlights to add depth. Use a dry brush to soften harsh edges. Lightly glaze over some areas to enrich colors. Blend colors smoothly for a natural fur effect. These tweaks help unify the painting and improve realism.
Sealing The Painting
Seal your acrylic painting to protect it from dust and fading. Use a clear acrylic varnish suitable for paintings. Apply thin, even coats with a clean brush. Let each layer dry completely before adding the next. A matte or satin finish enhances the painting’s look without shine. Proper sealing preserves your hard work for years.
Common Mistakes To Avoid
Painting a wolf with acrylics can be rewarding but tricky. Avoiding common mistakes saves time and improves results. These errors often happen to beginners and even some experienced artists.
Watch out for these common pitfalls. They affect the painting’s realism and overall look. Fixing them early keeps your artwork sharp and vibrant.
Overblending Colors
Overblending colors makes the wolf look dull and muddy. Acrylics dry fast, so blending too much can lose texture. Keep some sharp edges to show fur details. Use light strokes and layer colors gradually. This keeps the painting lively and natural.
Ignoring Light Source
Ignoring the light source flattens the wolf’s form. Decide where the light comes from before painting. Shadows and highlights create depth and shape. Paint shadows on the opposite side of the light. Highlights should appear on raised fur parts. This technique makes the wolf appear three-dimensional.
Using Incorrect Brush Strokes
Wrong brush strokes ruin fur texture and flow. Use short, quick strokes to mimic fur direction. Avoid long, smooth strokes that look fake. Different brush sizes help paint various fur lengths. A fan brush or liner brush works well for fine details. Brush strokes should follow the wolf’s natural fur pattern.
Tips For Practice And Improvement
Improving your acrylic wolf painting takes steady practice and focus. Small, thoughtful steps build skill over time. This section offers helpful tips to guide your practice and boost your painting abilities.
Studying Wolf References
Use clear photos of wolves to understand their shape and fur. Notice details like eye color, fur patterns, and muscle structure. Study different wolf poses to capture natural movement. Observe how light hits their fur for realistic shading. Keep these references nearby while painting for accuracy.
Experimenting With Techniques
Try various brush strokes to mimic wolf fur texture. Use dry brushing for soft, wispy fur effects. Blend colors directly on the canvas for smooth transitions. Test layering paint to create depth and volume. Explore mixing colors to find natural wolf tones. Practice these methods to discover what works best.
Building A Painting Routine
Set aside regular time for painting to improve steadily. Start with short sessions, then increase duration as comfort grows. Focus on one aspect each session, like eyes or fur texture. Keep your workspace organized to stay motivated. Track progress by saving your paintings to see improvement. Consistency makes skills stronger over time.

Credit: stepbysteppainting.net
Frequently Asked Questions
What Materials Do I Need To Paint A Wolf With Acrylics?
You need acrylic paints, brushes of various sizes, a canvas or paper, a palette, water, and paper towels. Optional items include a pencil for sketching and a reference photo of a wolf.
How Do I Start Painting A Wolf With Acrylic Paint?
Begin by sketching the wolf lightly on your canvas. Next, block in the main colors and shapes. Gradually add details, working from dark to light tones for depth.
What Techniques Work Best For Painting Wolf Fur?
Use short, quick brush strokes to mimic fur texture. Layer colors and blend softly to create realistic fur depth and direction. Dry brushing can add fine hair details.
How Long Does It Take To Paint A Wolf With Acrylics?
Painting time varies, but expect 2 to 5 hours depending on detail level. Acrylics dry quickly, allowing you to layer colors efficiently within this timeframe.
Conclusion
Painting a wolf with acrylics can be both fun and rewarding. Start with simple shapes and build your layers slowly. Focus on details like fur texture and eye expression. Use different brush strokes to create depth and realism. Practice often to improve your skills and confidence.
Enjoy the process and watch your wolf come to life. This art project suits beginners and experienced painters alike. Keep your workspace clean and your paints fresh for best results. Painting a wolf can be a great way to express creativity and learn new techniques.