
Decorating pumpkins is a fun and creative activity for kids, especially during fall and Halloween. Painting a pumpkin is much easier and less messy than carving, and it’s a safe option for younger children. With a little preparation and some simple tips, you can turn this into a joyful family project.
Whether you want to make silly faces, colorful patterns, or even cartoon characters, painting pumpkins lets children show their imagination without sharp tools. Let’s explore how to paint a pumpkin for kids in a way that’s easy, safe, and full of smiles.
Choosing The Right Pumpkin
The first step is picking a pumpkin that’s perfect for painting. Not every pumpkin is the same, and choosing wisely will make the process smoother for kids.
- Size matters: Smaller pumpkins are easier for little hands to handle and paint. A pumpkin between 4 to 8 inches across is usually best for children.
- Smooth surface: Look for pumpkins with a flat, smooth surface. This makes it easier to apply paint and reduces frustration.
- Sturdy stem: A strong stem gives kids something to hold while they paint, which helps prevent smudging.
- No bruises or rot: Avoid pumpkins with soft spots or mold. These can break apart easily and might be unsafe.
A good pumpkin can make the difference between a fun experience and a frustrating one. Remember, lighter colored pumpkins, like the white “Ghost” variety, show paint colors more vividly than the traditional deep orange pumpkins.
Gathering Painting Supplies
Having the right supplies ready before you start will keep kids focused and excited. Here’s a basic list of what you’ll need for a successful pumpkin painting session:
- Acrylic craft paints: These are safe for kids, dry quickly, and stick well to pumpkin skin.
- Paintbrushes: Use a mix of small, medium, and foam brushes for details and larger areas.
- Water cups: For rinsing brushes between colors.
- Paper towels or rags: For cleaning up spills and drying brushes.
- Palette or paper plates: To mix and hold paint.
- Aprons or old shirts: Protect clothes from accidental splashes.
- Newspaper or plastic tablecloth: Cover your work area to catch drips.
- Permanent markers: Useful for outlining designs before painting.
- Stick-on googly eyes, sequins, glitter, and stickers: Fun extras for decorating.
- Sealant spray (optional): Helps the paint last longer, especially if the pumpkin will be outside.
Supply Comparison
Here’s a quick comparison of common paint types and their kid-friendliness:
| Paint Type | Dries Fast | Safe for Kids | Waterproof |
|---|---|---|---|
| Acrylic Paint | Yes | Yes | Somewhat |
| Tempera Paint | Yes | Yes | No |
| Spray Paint | Yes | No | Yes |
Choose acrylic paint for the best mix of safety, color, and durability.

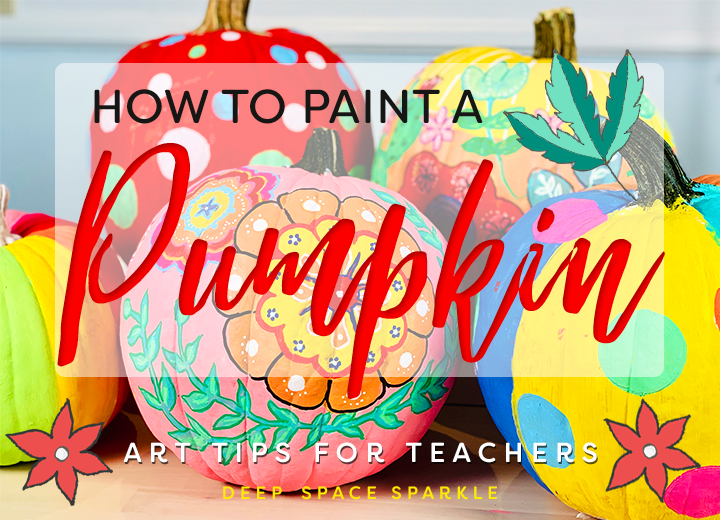
Credit: www.projectswithkids.com
Preparing The Pumpkin
Preparation is key for a smooth painting process. Pumpkins have a waxy skin that can stop paint from sticking well, so a few simple steps can help:
- Wash the pumpkin: Use water and a little mild soap. Dry it completely with a towel.
- Remove dirt and wax: Sometimes, pumpkins have a thin, shiny layer. Gently rub with a damp cloth to remove it.
- Let it dry: Even a little moisture can make paint peel. Make sure it’s totally dry before painting.
- Tape off areas: If you want to make stripes or shapes, use painter’s tape.
A well-prepared pumpkin helps the paint last and keeps colors bright.
Kid-friendly Painting Techniques
Now comes the fun part—painting! Young artists often want to dive right in, but a few simple techniques can help their creations shine.
Basic Techniques
- Base coats: Start with a single color covering the whole pumpkin. This makes designs stand out.
- Layering: Let each layer dry before adding another. This stops colors from mixing and making a mess.
- Dabbing: Use a sponge or foam brush to make texture, like animal fur or clouds.
- Stencils: For tricky shapes, hold a stencil against the pumpkin and paint inside.
- Outline with marker: Draw the design with a permanent marker first. This gives a guide for little hands.
Advanced Ideas For Older Kids
- Ombre effect: Blend two colors from dark to light for a cool look.
- Splatter painting: Dip a brush in paint and flick it for a fun, random pattern.
- Drip technique: Let paint run down the sides for a spooky or colorful effect.
Safety Tips
- Always supervise young children.
- Make sure paints are non-toxic.
- Wash hands after painting.
Fun Pumpkin Painting Ideas For Kids
Need inspiration? Here are some creative ideas that are popular with children:
- Silly faces: Paint big eyes, goofy mouths, and funny noses.
- Animals: Make a cat, dog, or owl by painting and gluing on ears and whiskers.
- Superheroes: Create your child’s favorite character with masks and logos.
- Monsters: Use bright colors, extra eyes, and big teeth for a playful monster.
- Unicorns: Paint the pumpkin white, add a gold horn (made from paper), and rainbow hair.
- Sports balls: Turn your pumpkin into a soccer ball, baseball, or basketball.
- Glitter pumpkins: Paint, then sprinkle with eco-friendly glitter for sparkle.
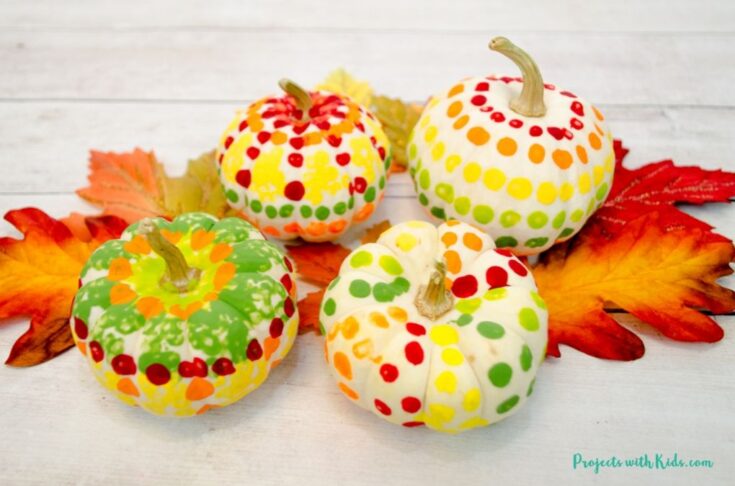
- Patterns and shapes: Try polka dots, stripes, or checkered designs.
- Cartoon faces: Use stickers for eyes and paint a simple smile.
Example: Silly Face Pumpkin
To make a silly face:
- Paint the whole pumpkin a base color (like yellow).
- Let it dry.
- Draw big eyes and a wide mouth with a black marker.
- Fill in the eyes with white paint, then add blue or green for the irises.
- Use red paint for a tongue or cheeks.
- Add stick-on googly eyes for extra fun.
Drying And Sealing The Painted Pumpkin
Paint dries faster than you think, but it’s important to let each layer set. Most acrylic paints dry in about 15–30 minutes. For thick coats, wait an hour.
- Dry in a cool, dry place: Avoid direct sunlight, which can crack or fade paint.
- Seal the design: A clear acrylic spray sealant helps protect art from rain or smudges. Only adults should use spray sealant, and always do this in a well-ventilated area or outside.
Sealing is optional if the pumpkin will stay indoors, but it’s helpful for outdoor displays.
Credit: www.projectswithkids.com
Cleaning Up After Painting
Painting is messy, but cleaning up doesn’t have to be hard:
- Wash brushes right after use with warm, soapy water.
- Throw away or wash palettes and water cups.
- Wipe tables and chairs with a damp cloth.
- Remove aprons and wash hands well.
Getting kids involved in clean-up teaches responsibility and makes the activity complete.
Storing And Displaying Painted Pumpkins
Painted pumpkins last longer than carved ones, usually 2–3 weeks, sometimes more. Here’s how to keep them looking their best:
- Keep in a cool place: Avoid heat, which makes them rot faster.
- Don’t stack: Painted areas can stick together and peel.
- Check for soft spots: If you see mold or rot, it’s time to throw the pumpkin away.
For display:
- Place on the porch, window sill, or as a table centerpiece.
- Use an old plate or tray under the pumpkin to catch moisture.
- Add leaves or mini pumpkins for extra decoration.
Credit: www.deepspacesparkle.com
Common Mistakes To Avoid
Even the best plans can go wrong. Here are mistakes beginners often make—and how to fix them:
- Not cleaning the pumpkin: Paint peels off dirty pumpkins. Always wash and dry first.
- Using the wrong paint: Water-based paints like watercolor won’t stick. Use acrylic or tempera.
- Painting too thick: Thick paint cracks and takes longer to dry. Use thin layers.
- Skipping drying time: Rushing leads to smears. Let each layer dry well.
- Painting over wet areas: Wait for one color to dry before adding another.
- No workspace protection: Paint can stain tables. Cover your area before starting.
Table: Common Problems And Solutions
| Problem | Cause | Solution |
|---|---|---|
| Paint peeling | Dirty or oily pumpkin | Wash and dry pumpkin before painting |
| Colors mixing | Painting layers too quickly | Let each layer dry fully |
| Paint cracking | Paint applied too thick | Use thin coats of paint |
| Design smudging | Touching wet paint | Dry in a safe spot, away from pets or kids |
Extra Tips For Parents And Teachers
Painting pumpkins can be part of a classroom lesson, playdate, or family night. Here are extra ideas:
- Theme it: Match pumpkins to a storybook or holiday.
- Use for counting: Number pumpkins for a math game.
- Photo booth: Create a pumpkin photo wall for kids to take pictures with their creations.
- Host a contest: Give simple prizes for funniest or most colorful pumpkin.
Non-obvious insight: Sometimes, kids get frustrated if their design doesn’t look “perfect.” Remind them that art is about having fun and being creative, not making a masterpiece. Also, painting the bottom of the pumpkin can help it last longer by blocking moisture.
Frequently Asked Questions
What Kind Of Paint Should Kids Use On Pumpkins?
Acrylic craft paint is the best for kids. It’s safe, dries fast, and gives bright colors. Tempera paint is also good for very young children, but it washes off easily, so it’s better for indoor pumpkins.
How Long Will A Painted Pumpkin Last?
Painted pumpkins can last 2–3 weeks or longer if kept in a cool, dry place. Unlike carved pumpkins, they don’t spoil quickly since the skin stays intact.
Can You Paint A Pumpkin Without Cleaning It First?
It’s not a good idea. Dirt and wax on the pumpkin’s skin can stop paint from sticking. Always wash and dry the pumpkin before starting.
Is It Safe For Toddlers To Paint Pumpkins?
Yes, if you use non-toxic paints and supervise them closely. Use large brushes and avoid small decorations that could be a choking hazard.
How Do You Keep Painted Pumpkins From Getting Ruined By Rain?
To protect your pumpkin outside, spray it with a clear acrylic sealant after the paint dries. Place it under a porch roof if possible. For more on safe painting supplies, check this Good Housekeeping guide.
Painting pumpkins with kids is all about enjoying the process and making memories. With a little planning and these tips, you’ll create colorful pumpkins and happy moments that last all season long.


