
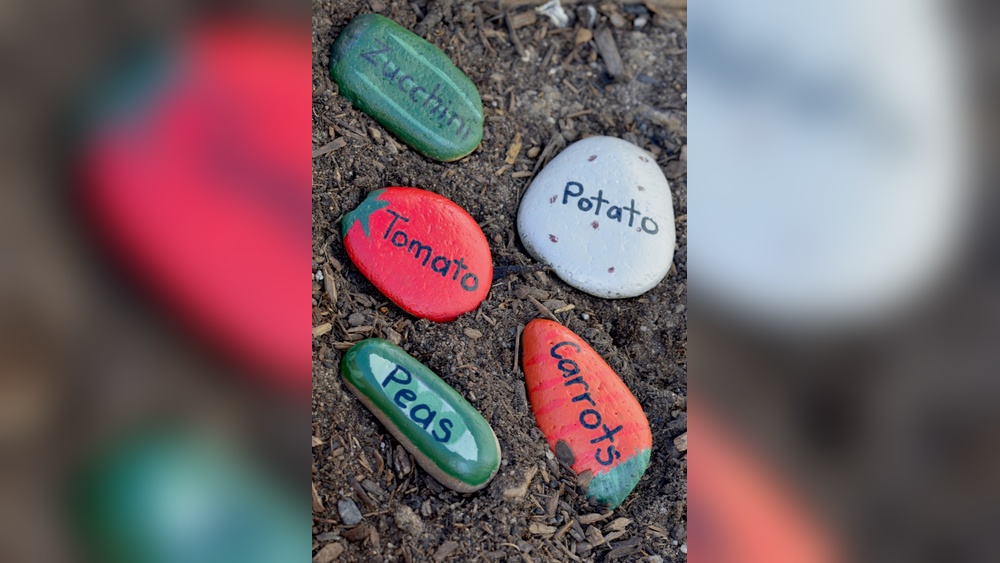
Quick answer: To paint DIY rocks for the garden, use smooth, non-porous stones, scrub and dry them thoroughly, apply an exterior-grade or primer base coat, paint your design in thin layers of outdoor or patio acrylic, let it dry at least 24 to 48 hours, and seal every side with two or three coats of a UV-resistant, exterior clear sealer. Place rocks on mulch or gravel rather than wet soil, and reseal once a year to keep colors bright.
A painted rock indoors only has to survive dust. A painted rock in the garden faces rain, frost, lawn sprinklers, mud, slugs and months of direct sun. That is why garden rocks often look great in May and faded or flaking by September. Learning how to paint DIY rocks for the garden is mostly about making paint last outdoors, and then about choosing designs that suit plants, paths and flower beds.
This guide covers the weatherproofing process step by step, the paints and sealers that hold up best, practical garden projects like plant markers and faux animals, and maintenance. For the general basics of rock painting tools and techniques, see our rock painting essentials guide.
Why Painted Garden Rocks Fade and Peel
Understanding the causes makes each prevention step make sense.
| Cause | What happens | Prevention |
|---|---|---|
| UV light | Pigments fade and some clear coats yellow or turn chalky | Lightfast paints, UV-resistant exterior sealer |
| Moisture in the stone | Water trapped under paint pushes it off | Dry rocks fully; seal all sides including the bottom |
| Freeze-thaw cycles | Water in pores expands, cracking paint | Choose dense stones; bring rocks in during hard winters |
| Abrasion | Mowers, rakes and foot traffic scrape paint | Place out of traffic paths; extra sealer coats |
| Soil contact | Constant dampness and organisms on the underside | Set rocks on gravel or mulch; seal bottoms |
Choosing Rocks That Last Outdoors
- Dense and smooth: river rocks and beach stones (where collecting is allowed) are usually hard and have a tight surface, which resists water.
- Avoid soft, porous stone: sandstone, chalky limestone and crumbly rocks absorb water and shed paint.
- Size for visibility: palm-sized and larger rocks are easier to see among plants. Very small rocks get lost in mulch.
- Flat bottoms: they sit steadily and are less likely to roll into wet soil.
A simple test: drip water on the rock. If it beads up or sits on the surface, the stone is fairly non-porous. If it soaks in immediately, it will need a primer and extra sealing, or choose another stone.
Best Paint for Garden Rocks
- Outdoor or patio acrylic paint: formulated to resist weather better than standard craft acrylic.
- Artist-grade acrylic: higher pigment load and usually better lightfastness ratings than budget craft paint. Check labels for lightfastness ratings where available.
- Acrylic paint pens: good for details and lettering; some are rated for outdoor use.
- Exterior house paint samples: inexpensive sample pots of exterior latex make durable base coats.
Standard craft acrylic can work outdoors if sealed very well, but it tends to fade faster in full sun.
Best Sealer for Outdoor Painted Rocks
| Sealer type | Pros | Cons |
|---|---|---|
| Exterior clear acrylic spray (UV-resistant) | Easy to apply evenly; dries fast | Needs ventilation; may need many coats |
| Water-based exterior polyurethane / spar varnish | Durable, good water resistance | Brushing can smear paint pens; test first |
| Outdoor decoupage-style sealer | Simple brush-on | Generally less durable in constant wet conditions |
| Two-part epoxy resin | Very thick, glossy, tough | Fiddly to apply; can yellow in sunlight unless UV-stabilized |
Whatever you choose, look for words like “exterior,” “outdoor” and “UV-resistant” on the label, and check that it is compatible with acrylic paint.
How to Paint DIY Rocks for the Garden: Step by Step
Step 1: Clean thoroughly
Scrub the rocks in warm, soapy water with a stiff brush to remove soil, algae and moss. Rinse well.
Step 2: Dry completely
This is the step people rush. Dense rocks may feel dry in an hour but still hold moisture inside. Let them dry indoors for at least 24 hours, longer in humid weather or for larger stones. A sunny windowsill or a spot near (not on) a warm vent helps. Paint sealed over moisture is the most common cause of peeling.
Step 3: Seal or prime the bare rock
Apply a coat of clear sealer or an exterior primer to the whole rock, including the bottom. This blocks moisture from wicking up through the stone and gives paint a better surface. White primer also makes colors brighter.
Step 4: Paint the base coat
Apply two thin coats of base color, letting each dry. Thin coats bond better and are less likely to crack than one thick coat.
Step 5: Paint the design
Add your design in layers, from background to foreground. Use paint pens for lettering and fine details.
Step 6: Let it cure
Wait at least 24 hours, and ideally 48 hours, before sealing. Acrylic feels dry quickly but continues to cure underneath.
Step 7: Seal every surface
Apply two or three thin coats of exterior UV-resistant sealer, letting each dry as directed. Seal the bottom too. If using spray, start with a light mist so paint pen lines do not bleed, then build up.
Step 8: Cure the sealer
Let sealed rocks sit indoors for the full cure time on the label, often a few days, before placing them outside. Fresh sealer exposed to rain can turn cloudy.
Garden Rock Project Ideas
Plant markers
Paint the plant name and a small illustration, such as a tomato, a basil leaf or a carrot, on flat rocks. Use a high-contrast combination such as white lettering on dark green. Place them at the front of each row or pot. For vegetable beds, choose rocks large enough that they will not disappear under leaves.
Faux garden creatures
Ladybugs, bees, snails, frogs and hedgehogs look charming peeking out from foliage. Rounded rocks make ladybugs and bees; long rocks suit snakes and caterpillars made from several stones in a row. Our step-by-step for painting ladybug rocks is a good first creature.
Rock caterpillar or snake border
Paint a series of graduated rocks in alternating colors, with a face on the first one. Line them up along the edge of a bed.
Mandala stepping accents
Large, flat rocks with dot mandalas look striking set into gravel. Keep them out of walking paths, or seal heavily if they will be stepped on, since foot traffic wears paint quickly.
Faux succulents
Paint small rounded rocks with layered petal shapes in sage, blue-green and pink to look like succulent rosettes. Group them in a shallow pot or planter for a no-water display.
Fairy garden houses and doors
Paint a tiny door and windows on an upright stone at the base of a tree or in a fairy garden. Add moss or small plants around it.
Inspirational garden stones
Words like “Grow,” “Bloom” or “Breathe” on larger rocks add a personal touch to a patio or meditation corner.
Memorial stones
A pet’s name and paw print, or a family member’s favorite flower, painted on a large smooth stone. Seal very well, since you will want it to last.
House number rocks
Large, flat rocks with bold numbers placed at the end of a driveway or front bed. Use reflective or very high-contrast paint so numbers are readable.
Painting Garden Rocks With Kids
Garden rocks are a great family activity. Kids can paint simple bugs and flowers while adults handle priming and sealing. Our ideas for painted rock critters for kids are sized for small hands and simple shapes.
- Use non-toxic acrylics or washable kids’ paints for the design, and let an adult apply the outdoor sealer.
- Choose bigger rocks so details are easier.
- Let children “plant” their creatures and check on them through the season.
Colors That Hold Up Best in Sun
Not all pigments fade at the same rate. In general, earth colors (ochres, siennas, umbers), many blues such as ultramarine and phthalo, and titanium white are known for good lightfastness. Some bright pinks, purples and fluorescent colors, particularly in budget craft lines, tend to fade more quickly in direct sun. Artist-grade paints often print a lightfastness rating on the tube or bottle, which is worth checking for rocks that will sit in full sun.
Practical choices for long-lasting garden rocks:
- Use fluorescent and neon paints only for shaded spots or seasonal pieces.
- Choose deeper, more saturated base colors, which show fading less obviously than pale tints.
- Black and white details, such as outlines and eyes, generally stay crisp for a long time.
- If a color matters to you, paint a test rock and leave it in your sunniest spot for a month to see how it changes.
Where to Place Painted Rocks in the Garden
- On mulch or gravel rather than bare soil, so the bottom stays drier.
- In partial shade if possible. Full sun fades colors faster.
- Away from mowers and string trimmers, which chip paint and can throw rocks dangerously.
- Not on lawns, where they can be hidden in grass and hit by mowing equipment.
- Near paths but not on them, so they are visible without being a tripping hazard.
- In pots and containers on top of soil, where they are seen easily and lifted for watering.
Maintenance and Winter Care
- Inspect each spring. Look for dullness, cracks or peeling.
- Clean gently with water and a soft brush. Avoid pressure washers.
- Reseal annually. A fresh coat of exterior sealer each year extends life significantly.
- Touch up paint where chipped. Let it cure before resealing.
- Bring delicate rocks indoors in regions with hard freezes. Freeze-thaw cycles crack paint, especially on stones that absorb any water.
A Simple Garden Rock Checklist
- Dense, smooth stone chosen and water-tested
- Scrubbed clean and dried for at least a full day
- All sides sealed or primed before painting
- Base and design painted in thin layers
- Paint cured 24 to 48 hours
- Two to three coats of exterior UV-resistant sealer, bottom included
- Sealer cured indoors before going outside
- Placed on mulch or gravel, away from mowers and paths
Common Mistakes
- Sealing only the top, leaving the bottom to absorb moisture.
- Painting rocks that are still damp inside.
- Using indoor-only sealers, which may turn cloudy or peel outside.
- Placing rocks directly on wet soil or in drainage paths.
- Choosing soft, porous stones that soak up water.
- Skipping annual resealing.
Tips by Skill Level
Beginners
Start with plant markers and simple bugs. Focus on mastering the dry-prime-paint-cure-seal sequence.
Intermediate
Create themed sets, like a family of hedgehogs or a full vegetable bed of matching markers, and experiment with exterior paints for base coats.
Advanced
Paint larger feature stones with detailed scenes or realistic animals, and try UV-stabilized resin finishes for a glass-like protective coat.
FAQs
What paint should I use for garden rocks?
Outdoor or patio acrylic paint, artist-grade acrylic with good lightfastness, or exterior latex samples for base coats. Seal any of them with an exterior UV-resistant clear coat.
How do you weatherproof painted rocks?
Dry the rocks completely, prime or seal them before painting, paint in thin layers, let the paint cure for 24 to 48 hours, then apply two or three thin coats of exterior sealer to every side, including the bottom.
How long do painted garden rocks last?
It varies with climate, sun exposure, paint and sealer. Well-sealed rocks in partial shade often stay bright for a year or more, and annual resealing can extend that considerably.
Why is the paint peeling off my garden rocks?
The most common causes are moisture trapped in the rock before painting, an unsealed bottom absorbing water, or an indoor sealer that breaks down outside.
Can painted rocks stay outside in winter?
Well-sealed dense rocks often survive mild winters. In areas with repeated hard freezes, bringing them indoors helps prevent cracking and peeling.
Is a DIY rock painting kit good for garden rocks?
Kits are fine for the painting part, but check that the included sealer is rated for outdoor use. If not, buy an exterior UV-resistant sealer separately.
Next Step
Garden rocks last when you treat them like outdoor furniture: dry, prime, paint thin, seal everything and refresh once a year. With that routine in place, plant markers, creatures and inspirational stones can brighten your beds for many seasons. For a deeper look at the paints, pens and sealers suited to stone, visit our guide to rock painting tools and techniques.





One Comment