
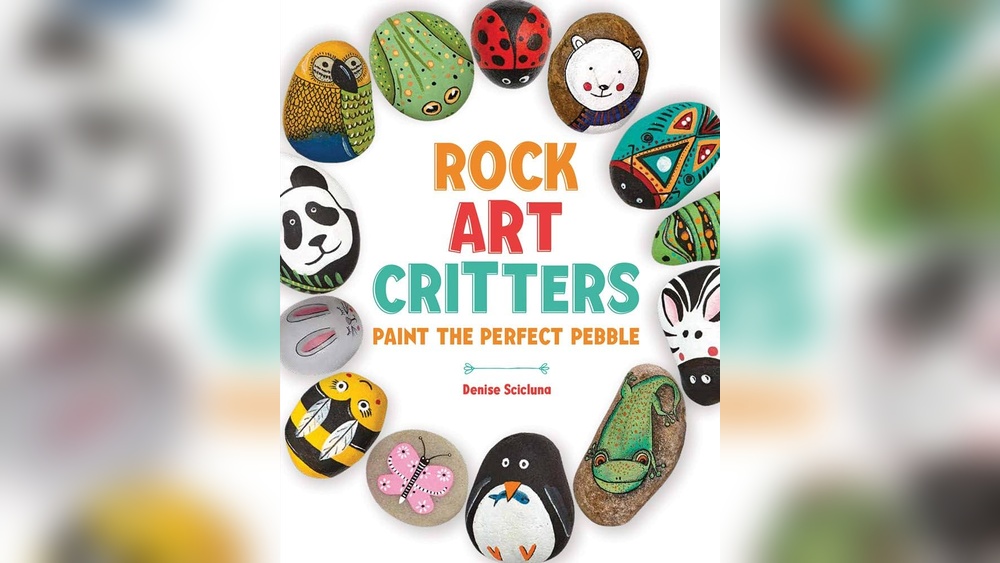
Quick answer: To make painted rock critters with kids, choose smooth rocks whose shape already hints at an animal, wash and dry them, paint a base coat in the critter’s main color with acrylic paint, let it dry, then add features like eyes, stripes, spots and ears with smaller brushes or paint pens. Seal the finished critter with a clear acrylic sealer if it will be handled a lot or kept outdoors.
A rock critter starts with a simple question: what animal does this rock look like? An oval stone becomes a ladybug, a fat round one becomes an owl, a long flat one turns into a fish. Children love the hunt for the right rock almost as much as the painting, and the finished critters are sturdy enough to play with, hide in the garden or give as gifts.
This guide explains how to make painted rock critters kids will love, from finding and preparing rocks to painting ten different animals, choosing paint, sealing and displaying. For a deeper look at supplies and techniques, our main guide to rock painting essentials covers paints, brushes and sealers in more detail.
Step 1: Find the Right Rocks
The best critter rocks are:
- Smooth. River rocks and beach stones are ideal. Rough, porous rocks soak up paint and make details hard.
- Flat on one side. So the critter sits without rolling.
- Palm-sized. Roughly 2 to 4 inches is easy for kids to hold and paint.
- Shaped like something. Look for ovals (ladybugs, beetles), rounds (owls, pigs), long shapes (fish, snakes, caterpillars) and triangles (foxes, cats).
You can collect rocks on walks where it is permitted, or buy bags of smooth river rocks at garden centers and craft stores. Note that collecting rocks is not allowed in many national and state parks, so check local rules first.
Matching rock shapes to critters
| Rock shape | Critter ideas |
|---|---|
| Oval, domed | Ladybug, beetle, turtle, mouse |
| Round | Owl, pig, frog, hedgehog, monster |
| Long and narrow | Fish, snake, caterpillar (several rocks in a row), crocodile |
| Triangular or teardrop | Fox, cat, penguin, bird |
| Flat and wide | Crab, bat, butterfly |
Step 2: Prepare the Rocks
- Wash. Scrub rocks in warm soapy water with an old toothbrush to remove dirt and algae.
- Dry completely. Let them air-dry for several hours or overnight. Paint does not stick well to damp stone.
- Prime (optional). A coat of white acrylic paint or gesso makes colors brighter, especially on dark rocks. Let it dry for 20 to 30 minutes.
- Sketch the design. Lightly draw the critter’s features with a pencil or a white chalk pencil. Kids can plan the face before committing to paint.
Best Paint for Painting Rocks With Kids
Paint choice depends on the child’s age and whether the critters will live indoors or outside.
| Paint type | Pros | Cons | Best for |
|---|---|---|---|
| Acrylic craft paint | Bright, opaque, durable on stone, wide color range | Not easily washable once dry; stains clothes | Ages 5 and up with supervision |
| Acrylic paint pens | Great control for details; less mess | Need priming and shaking; tips can wear | Eyes, outlines, patterns; ages 6 and up |
| Washable tempera | Easy cleanup; good for toddlers | Chips and flakes; washes off in rain | Indoor play rocks for young children |
| Outdoor or patio paint | Weather-resistant | Often stronger odor; check label for age guidance | Garden critters, with adult use |
For most families, water-based acrylic craft paint plus a couple of paint pens gives the best balance of brightness and durability. Read labels for safety and age guidance, and have kids wear old clothes or a smock. To compare specific options, see the supply section of our guide to rock painting supplies and techniques.
Other Supplies
- Brushes: a flat brush around 1/2 inch for base coats, a small round brush for details, a fine liner brush
- Dotting tools, cotton swabs or the back end of a brush for perfect eyes and spots
- Paint pens in black and white (the two most useful)
- Paper plates for palettes, water cups and paper towels
- Clear acrylic sealer (brush-on or spray) for finishing
- Optional: googly eyes, craft glue, felt for ears and tails
How to Paint Rocks for Kids: Basic Critter Method
- Base coat. Paint the whole top surface in the critter’s main color. Two thin coats look smoother than one thick coat. Let each dry for 15 to 30 minutes.
- Big shapes. Add large areas like a belly, wings, a shell pattern or a face patch.
- Eyes. Dot a white circle with a dotting tool or cotton swab, let it dry, then add a smaller black dot. A tiny white dot on top of the black adds a sparkle that brings critters to life.
- Details. Add stripes, spots, whiskers, smiles and outlines with a fine brush or paint pen.
- Dry fully. Leave the rock for several hours, ideally overnight, before sealing.
- Seal. Apply clear acrylic sealer in a ventilated area following the product instructions. Sealing is done by an adult if using a spray.
Easy Rock Painting Ideas for Kids: 10 Critters
1. Ladybug
Paint an oval rock red. Add a black half-circle head at one end, a black line down the middle of the back, and black dots on each side. White dot eyes finish it. Our step-by-step ladybug rock painting covers this critter in detail.
2. Owl
Paint a round rock brown or gray. Add two large white circles for eyes with black pupils, an orange triangle beak and V-shaped feather marks on the belly.
3. Fish
Paint a long rock bright blue or orange. Add a triangle tail at one end, a big eye at the other, and curved scale lines or dots along the body.
4. Turtle
Paint a domed rock green. Use a darker green to outline hexagon shell sections. Paint a head, four feet and a tail on a flat stone underneath, or glue on felt pieces.
5. Bumblebee
Paint a small oval yellow, add black stripes, white wings near one end and a smiley face.
6. Hedgehog
Paint the rock brown, leaving a pointed face area in tan at one end. Add short black dashes all over the brown section for spines and a black dot nose.
7. Frog
Paint a round rock green. Add two bulging white eyes near the top with black pupils, a wide smile and darker green spots.
8. Pig
Paint a round rock pink. Add a larger pink oval snout with two dark nostrils, small triangle ears and dot eyes.
9. Caterpillar
Line up five or six small round rocks. Paint each in alternating greens or rainbow colors. Give the first one a face and antennae. Kids can arrange the segments in a wiggly line in the garden.
10. Monster
Any shape works. Paint a wild base color, add one, two or five eyes, sharp teeth and spots. Monsters are great for kids who want total freedom.
Fun Extras: Texture, Glow and Dots
Once children are comfortable with the basic method, a few simple effects make critters more interesting:
- Dotted patterns: Rows of tiny dots made with a toothpick or the tip of a brush handle give owls feathery chests and turtles patterned shells.
- Glow-in-the-dark paint: A coat of glow paint over eyes or spots makes critters that light up at bedtime. It usually shows best over white or pale colors and needs light exposure to charge.
- Metallic accents: A touch of gold or silver on a beetle’s back or a fish’s scales catches the light.
- Dry-brush fur: For older kids, a nearly dry brush dragged lightly over a dry base color leaves streaky, fur-like texture on hedgehogs, foxes or mice.
- Felt and pom-pom add-ons: Glue felt ears, pipe cleaner antennae or a pom-pom tail for younger children who enjoy mixed materials.
Rock Critters by Age
| Age | Approach | Paint |
|---|---|---|
| 3 to 4 | Single-color base, stick-on googly eyes, simple dots | Washable tempera; adult seals if keeping |
| 5 to 7 | Ladybugs, bees, fish, monsters with dotted eyes | Acrylic with supervision; chunky paint pens |
| 8 to 10 | Owls, hedgehogs, turtles, multi-rock caterpillars | Acrylics and fine paint pens |
| 11 and up | Detailed patterns, shading, realistic animals | Acrylics, liner brushes, dotting tools |
Small rocks can be a choking hazard for young children, so choose rocks larger than a child’s mouth for toddlers, and keep supervision close.
Rock Painting Kit for Kids: What to Look For
Ready-made kits can be convenient, especially for gifts or group activities. Rather than recommending a particular kit here, these are the features worth checking:
- Rock quality: smooth, flat rocks of a usable size, rather than small, rough pebbles.
- Paint type: acrylic for durability, or washable paint for younger children.
- Age range: kits labeled for ages 3 to 5 usually use simpler designs and washable paint, while kits for ages 6 to 12 or 8 to 12 often include paint pens and more rocks.
- Brushes and tools: at least one fine brush; dotting tools are a bonus.
- Sealer: some kits include a varnish; many do not.
- Extras: glow-in-the-dark paint, googly eyes or stickers add fun but are not essential.
- Quantity: for a party, look for kits with enough rocks for each child, such as kits sized for 10 kids.
Building your own kit is often cheaper and lets you choose better rocks: a bag of smooth river stones, six to eight acrylic colors including black and white, two paint pens, three brushes and a sealer cover most critter projects for a whole family.
Sealing and Weatherproofing
- Indoor critters that are handled often benefit from a brush-on clear acrylic sealer, matte or gloss.
- Outdoor critters need a sealer labeled for outdoor use. Apply two or three thin coats, letting each dry according to the product label.
- Let paint cure before sealing. Many paints feel dry within an hour but benefit from 24 hours before a topcoat.
- Spray sealers should be applied by adults outdoors or in a well-ventilated space.
- Test on one rock first. Some sealers can make paint pen lines run if applied heavily.
Common Mistakes and Fixes
| Mistake | Result | Fix |
|---|---|---|
| Painting dirty or damp rocks | Paint peels or flakes | Wash and dry thoroughly first |
| One thick base coat | Streaky, gummy finish; slow drying | Two thin coats, drying between |
| Adding details on wet paint | Colors smear together | Wait until the base is dry to the touch |
| Skipping primer on dark rocks | Dull colors | Prime with white first |
| Using tempera for outdoor rocks | Washes off in rain | Use acrylic and an outdoor sealer |
What to Do With Rock Critters
- Garden friends: Tuck them under plants, along paths or around a fairy garden. Our guide on painting rocks for the garden has more outdoor ideas.
- Story stones: Paint a set of critters and use them to tell stories, with children picking stones from a bag to decide what happens next.
- Kindness rocks: Paint a critter with a kind word on the back and leave it where community rock-hiding is welcomed.
- Paperweights and gifts: Sealed critters make sturdy gifts for teachers and grandparents.
- Counting and sorting: Younger kids can sort critters by color or count spots.
FAQs
What is the best paint for painting rocks with kids?
Water-based acrylic craft paint is the most common choice because it is bright and durable on stone. Paint pens help with details. For toddlers, washable tempera is easier but chips and washes off, so it suits indoor play rocks only.
How do you paint rocks for kids step by step?
Wash and dry the rock, paint a base coat in two thin layers, add big shapes, then eyes and details with small brushes or paint pens. Let it dry fully and seal with a clear acrylic sealer.
Do painted rocks need to be sealed?
Sealing is recommended for rocks that will be handled often or kept outdoors. A clear acrylic sealer protects paint from chipping and weather. Indoor display rocks can go without, but they may scratch over time.
What are easy rock painting ideas for kids?
Ladybugs, bees, fish, frogs, owls, monsters and caterpillars made from several rocks are all easy starting points. Pick a rock whose shape already looks like the animal.
What age can kids paint rocks?
Children around three can paint rocks with washable paint and stick-on eyes. From about five, kids can use acrylic paint with supervision and add more detail.
Where can I get rocks for painting?
Garden centers and craft stores sell bags of smooth river rocks. You can also collect rocks where permitted, but many parks prohibit removing stones, so check local rules.
Final Thoughts
Painted rock critters combine a scavenger hunt, a painting project and a toy in one activity. Find rocks with personality, prep them well, build up base coats and details in thin layers and seal anything that will live outdoors. To choose paints, pens and sealers suited to your kids, visit our complete rock painting essentials guide.




One Comment