
Painting a fish can be a fun and creative activity for children. With simple steps, the right materials, and a bit of guidance, kids can easily make their own colorful fish paintings. This process not only helps children express their imagination, but it also improves their hand-eye coordination and confidence in art.
As a friendly mentor, this guide will show you how to paint a fish for kids in an easy and enjoyable way, making sure every child can follow along, even if they are beginners.
Why Painting A Fish Is Great For Kids
Painting a fish is more than just a craft. It is a wonderful way for children to learn about colors, shapes, and patterns. Fish come in many forms and shades, so kids can use their creativity. This activity is also perfect for group settings, such as classrooms or family art time, because everyone can make their fish look unique.
Many parents and teachers notice that when children paint animals like fish, they pay attention to details such as fins, tails, and scales. This helps improve their observation skills. Plus, kids feel proud when they see the finished fish on display.
Whether you want a quick art project or a more detailed painting, this guide will help you from start to finish.
Materials Needed For Easy Fish Painting
Before starting, you need to gather some materials. Using the right supplies makes painting easier and more enjoyable for kids. Here is a list of recommended items:
- Paper: White drawing paper or watercolor paper works best. Choose a size that is easy for kids to handle, like 9×12 inches.
- Pencil: For sketching the basic fish shape.
- Eraser: In case mistakes happen during the sketch.
- Paints: Washable poster paints, tempera, or watercolors. Acrylics are also fine but can be harder to wash out.
- Brushes: A medium brush for filling in color and a smaller brush for details.
- Water Cup: For rinsing brushes.
- Palette or Plate: For mixing paint.
- Paper Towels or Cloth: To clean up spills or wipe brushes.
- Apron or Old Shirt: To protect clothing.
- Black Marker: For outlining (optional but helpful for clear lines).
Some parents also like to use colored pencils or crayons for extra details. Make sure all materials are safe and non-toxic, especially for young children.
Comparison Of Common Painting Surfaces
To help you choose the best surface for your child’s fish painting, here is a quick comparison:
| Surface | Pros | Cons |
|---|---|---|
| Drawing Paper | Easy to find, cheap, works for most paints | May wrinkle with too much water |
| Watercolor Paper | Holds water well, strong, good for blending | More expensive |
| Cardstock | Thicker, less wrinkling, easy to cut | May not hold watercolor as well |
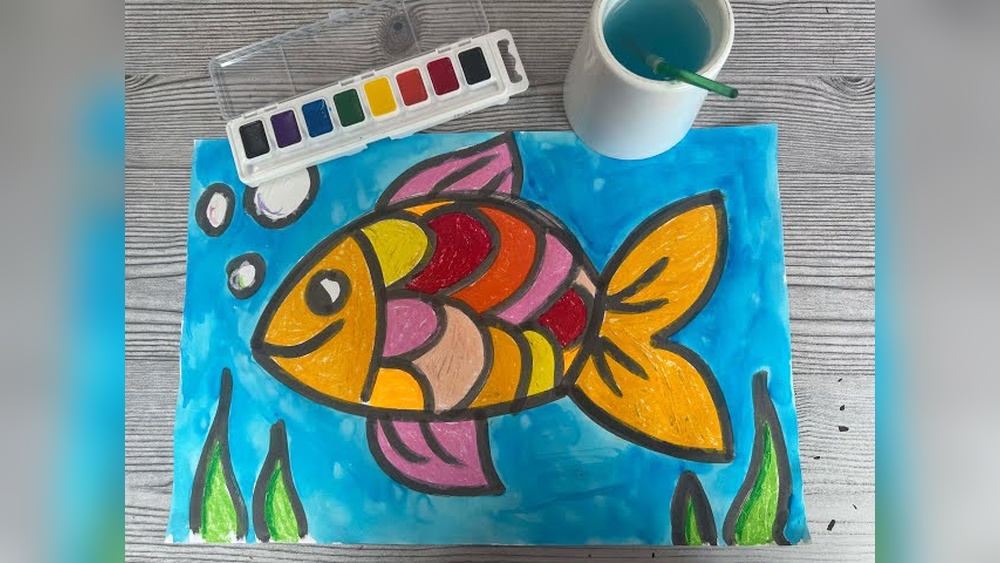
Credit: www.simpleeverydaymom.com
Step-by-step Guide: How To Paint A Fish For Kids
Kids often learn best when steps are clear and simple. Here is a detailed, easy-to-follow method for painting a fish.
Step 1: Draw The Fish Shape
Start by drawing a simple fish outline. Guide children to draw a horizontal oval for the fish’s body. Add a triangle at one end for the tail. Then, draw a small circle for the eye and a curved line for the mouth.
Encourage kids to keep the shapes big and simple—details can come later.
Tip: If freehand drawing is difficult, use a light pencil or try tracing a fish shape from a template.
Step 2: Add Fins And Details
Next, add the top fin and bottom fin. These can be drawn as small triangles or wavy lines on the fish’s back and belly. Kids can add stripes or spots, depending on the type of fish they want to paint.
Show them pictures of real fish for inspiration—this can spark more ideas.
Non-obvious insight: Letting kids decide where to place fins and patterns helps them feel ownership of their art. It’s okay if the fish looks a little funny—unique fish are the most memorable!
Step 3: Outline The Drawing
Once the pencil sketch is ready, go over the lines with a black marker or a darker pencil. This makes the fish stand out and helps kids stay inside the lines when painting. If you use a marker, make sure it is waterproof so it does not bleed into the paint.
Step 4: Paint The Fish’s Body
Now, it’s time to add color. Let kids choose their favorite bright colors. Start by painting the body with a medium brush. Remind children to rinse their brush when changing colors. If using watercolors, show how adding more water creates lighter colors.
Practical tip: Show kids how to paint in one direction (left to right or top to bottom) for smoother color and fewer streaks.
Step 5: Paint The Fins And Tail
Switch to a smaller brush for the fins and tail. Use a different color or shade to make these parts stand out from the body. For example, if the body is orange, the tail could be yellow or blue. Explain that real fish often have contrasting or patterned fins.
Non-obvious insight: Mixing a little white paint into any color makes it softer and helps with blending. Kids can experiment with this technique to create their own shades.
Step 6: Add Patterns And Details
When the main colors are dry, add patterns like dots, stripes, or zigzags. Use the small brush or even the tip of a cotton swab for dots. Show kids how these details can make each fish unique.
Step 7: Paint The Eye And Mouth
Use black or dark blue for the eye. Add a small white dot for a shiny look. The mouth can be a simple curved line. For a happier look, curve the line upward.
Step 8: Paint The Background (optional)
If there is time, kids can paint water, seaweed, or bubbles around the fish. Light blue or green is perfect for an ocean background. Remind kids to let the fish dry first before painting the background to avoid smearing.
Step 9: Let It Dry
Place the painting flat in a safe spot and let it dry fully. This usually takes 15–30 minutes, depending on the paint and paper.
Step 10: Display The Artwork
Show off the finished fish by hanging it on the wall or the fridge. Kids love seeing their art on display—it encourages them to keep creating.
Creative Ideas To Make Fish Painting More Fun
Kids enjoy art the most when they can experiment. Here are some creative twists to try:
- Use sponges to dab on color and create a textured effect.
- Try painting with fingers for sensory fun, especially with younger children.
- Cut out the fish after painting and glue it onto a larger paper with other ocean animals.
- Add glitter or shiny stickers for scales.
- Use bubble wrap dipped in paint to make bubbly backgrounds.
These ideas help keep the painting process fresh and exciting, especially for kids who enjoy trying new things.
Common Mistakes And How To Avoid Them
Even simple art projects have common pitfalls. Here are some mistakes children (and adults) often make, and how to fix them:
- Using too much water: Paper can wrinkle or tear. Use thicker paper if kids like using lots of water, or show them how to tap off extra water from the brush.
- Rushing the outline: A messy outline makes it harder to paint neatly. Encourage kids to slow down and trace carefully with the marker.
- Mixing all colors together: This can make the painting look muddy. Teach kids to clean their brush between colors and try blending only two colors at a time.
- Painting over wet paint: This often leads to smears. Remind kids to wait a few minutes between colors or use a hairdryer on low to speed drying.
- Forgetting to rinse brushes: Dry or dirty brushes can ruin the painting. Show children how to swish the brush in water and gently dry it with a towel.
Kids learn best when they feel free to make mistakes. Share these tips in a positive way, so painting stays fun.
Comparing Different Paint Types For Kids’ Fish Paintings
Choosing the right paint can make a big difference. Here’s a comparison:
| Paint Type | Best For | Cleanup | Cost |
|---|---|---|---|
| Watercolor | Soft blends, light effects | Easy | Low |
| Tempera | Bright colors, fast drying | Medium | Medium |
| Acrylic | Bold colors, lasting art | Hard (can stain) | Medium-High |
For most easy fish paintings, watercolor or tempera is best. They are safe, affordable, and easy to clean.

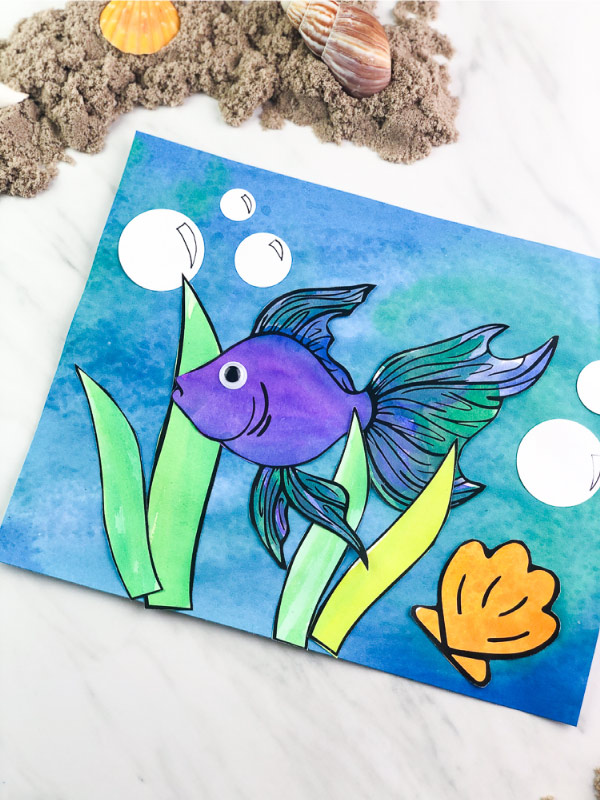
Credit: www.artbykarenwolfe.com
How To Adapt The Fish Painting For Different Ages
A good art project should fit the child’s age and ability. Here are some adjustments:
- Ages 3–5: Let them paint with fingers or big brushes. Keep the fish shape simple and use thick paper.
- Ages 6–8: Show how to add patterns and use different brush sizes. Encourage them to experiment with backgrounds.
- Ages 9 and up: Teach blending colors and adding more details, such as scales or realistic fins. Challenge them to paint a whole underwater scene.
Younger kids may need help with drawing and cleaning up. Older kids can handle more steps and will enjoy adding their own twist to the project.
Benefits Of Painting Fish For Kids
Painting fish is not just about making art. It has real benefits for children:
- Fine motor skills: Using brushes and drawing shapes improves hand control.
- Color recognition: Mixing and choosing colors is a fun way to learn.
- Confidence: Kids feel proud of their finished fish.
- Relaxation: Painting can be calming and help focus attention.
- Creativity: Each fish can look different—there are no wrong choices.
These skills help children in school and everyday life, making art a valuable activity.

Credit: www.artbykarenwolfe.com
Display And Share Your Fish Art
Once your child has finished their fish painting, consider these ways to show it off:
- Frame the painting and hang it in a special place.
- Take a photo and share it with family or friends.
- Make a gallery on a wall with several fish paintings.
- Turn the fish art into a card for someone’s birthday or a school project.
Displaying children’s art boosts their self-esteem and shows that you value their creativity.
Additional Resources For Easy Fish Painting
If you want more ideas or printable templates, many websites offer free resources. For example, the Crayola Fish Art Craft page has helpful guides and inspiration.
Remember, the best fish painting comes from your child’s imagination—encourage them to try new things and have fun.
Frequently Asked Questions
What Is The Easiest Way To Draw A Fish For Kids?
Start with a simple oval for the body and a triangle for the tail. Add a circle for the eye and a curved line for the mouth. Keep shapes large and basic. This helps kids paint easily without getting frustrated by tiny details.
Can I Use Markers Instead Of Paint For A Fish Painting?
Yes, markers are a good alternative for young children or when you want a quick, mess-free project. Kids can color the fish and background, then add details with a black marker. Markers work best on thick paper to avoid bleeding through.
How Do I Stop The Paper From Wrinkling When Painting?
Use thicker paper like watercolor paper or cardstock. Show kids how to use less water, or gently tape the paper edges to the table to keep it flat. Letting each color dry before adding more helps prevent wrinkles too.
What Are Some Good Color Combinations For A Fish Painting?
Bright pairs like orange and blue, red and yellow, or green and purple look great. Encourage kids to use their favorite colors—fish in nature have all kinds of surprising patterns.
How Can I Make The Fish Painting Project Last Longer?
Add extra steps, like painting an ocean background, making a whole underwater scene, or turning the fish into a collage. You can also have kids paint several small fish and glue them together for a group artwork.
Painting a fish is a simple but rewarding project for kids of all ages. With easy steps, the right materials, and lots of encouragement, every child can create a work of art they are proud of. Make it fun, let mistakes happen, and celebrate every colorful fish!


