
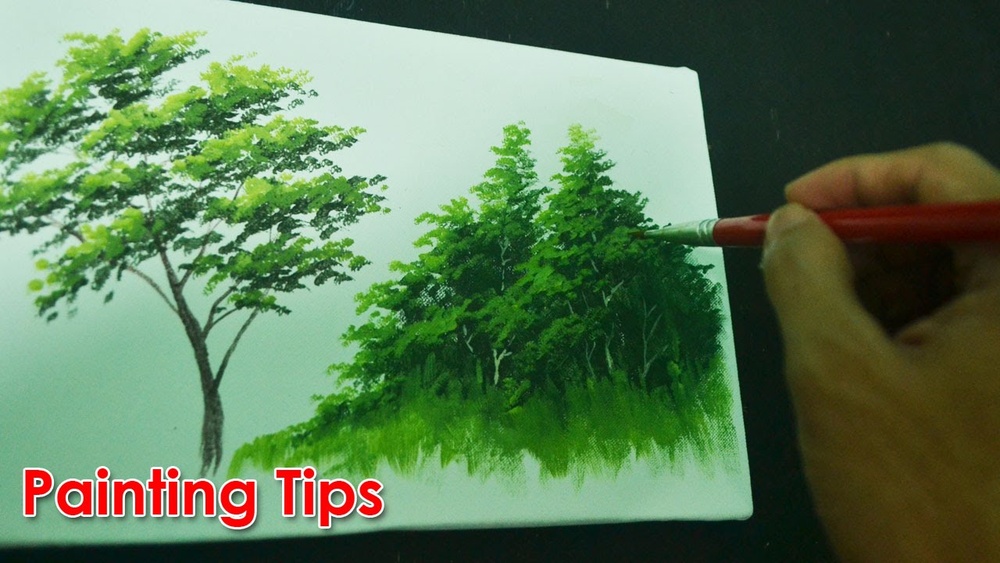
Quick answer: To paint leaves with acrylic paint, block in each leaf shape with a mid-tone green using a filbert or round brush, then split it along the central vein: one half slightly darker, the other slightly lighter, depending on the light direction. Add the midrib with a liner, a few side veins, and a highlight along the lit edge. For trees and foliage masses, paint clusters of leaves as shapes in three values (dark, mid, light) rather than painting every leaf individually.
Leaves appear in nearly every kind of painting, from botanical studies to landscapes and floral still lifes. Yet many painters find their leaves look like flat green stickers. The fix is usually not more detail. It is better shape, better color variety and a clear sense of which way each leaf is facing.
This guide shows how to paint leaves with acrylic paint at every scale: single leaves, sprigs and branches, autumn leaves, tropical leaves, and masses of foliage on trees and bushes.
Leaf Anatomy for Painters
You only need a few terms to paint leaves well:
- Blade: the flat, broad part of the leaf.
- Midrib: the central vein running from stem to tip.
- Veins: smaller lines branching from the midrib.
- Petiole: the small stalk attaching the leaf to the stem.
- Margin: the edge of the leaf, which may be smooth, toothed or lobed.
Most leaves are not perfectly flat. They fold slightly along the midrib, so one half catches more light than the other. They also twist, curl at the tips and sometimes flip to show their lighter underside. Painting those changes is what creates dimension.
Common Leaf Shapes
| Shape | Examples | Best brush |
|---|---|---|
| Oval / elliptical | Beech, rose, many shrubs | Filbert (one or two strokes) |
| Lance / narrow | Willow, olive, eucalyptus | Round or liner |
| Heart | Linden, redbud, pothos | Filbert or round, two curved strokes |
| Lobed | Oak, maple | Round, building lobes individually |
| Palmate / fan | Fan palm, horse chestnut | Round and liner for leaflets |
| Large, split | Monstera, banana | Flat or large filbert, with knife for splits |
Supplies
- Acrylic colors: phthalo green or sap green, ultramarine blue, cadmium yellow medium, lemon yellow, yellow ochre, burnt sienna, burnt umber, cadmium red, titanium white
- Brushes: size 4, 6 and 8 filberts; size 2 and 4 rounds; size 0 liner; a small flat or angle brush; an old fan brush for foliage masses
- Stay-wet palette and spray bottle
- Canvas panel, acrylic paper or primed wood
Greens are one of the hardest color families to keep lively. Tube greens can look artificial, and weak yellows make mixed greens dull. A reliable set of primaries with strong tinting strength helps. Our guide to acrylic paint sets with strong, mixable primaries compares lines by pigment load and mixing behavior.
Mixing Natural Greens
The fastest way to make leaves look natural is to stop using green straight from the tube. Mix a variety of greens on your palette:
| Green | Mix | Use |
|---|---|---|
| Deep shadow green | Phthalo green + burnt umber or alizarin | Leaf undersides, inner foliage shadows |
| Cool mid green | Ultramarine + cadmium yellow | Leaves in shade, distant foliage |
| Warm mid green | Sap green + yellow ochre | Main body of sunlit leaves |
| Bright light green | Lemon yellow + a touch of phthalo green + white | Sunlit edges, new growth |
| Olive / sage | Sap green + burnt sienna or a little red, + white | Dusty foliage, olive, sage, eucalyptus |
| Blue-gray green | Ultramarine + yellow ochre + white | Eucalyptus, distant trees |
A very useful trick: to darken a green, add its complement (a red like alizarin) or burnt umber rather than black. Black tends to make greens look dirty and olive in an unpleasant way.
How to Paint Leaves With Acrylic Paint: Single Leaf Step-by-Step
This sequence paints a simple oval leaf lit from the upper left. Practice it a few times before moving to branches.
Step 1: Sketch the Shape
Draw a long oval with a pointed tip. Add a slightly curved midrib from the stem end to the tip. A curve looks more natural than a straight line.
Step 2: Block In the Mid-Tone
With a filbert and warm mid green, fill the whole leaf. Use strokes that follow the direction of the side veins, angling outward from the midrib toward the edges.
Step 3: Shade One Half
While still damp, paint the half of the leaf farther from the light in a slightly darker, cooler green. Blend lightly where it meets the midrib, but keep the change visible. This single step creates the folded, 3D effect.
Step 4: Lighten the Other Half
Add a lighter, warmer green to the lit half, concentrating it near the outer edge and toward the tip.
Step 5: Midrib
Using a liner and a light, yellowish green, paint the midrib. Make it thicker at the base and taper it to nothing near the tip.
Step 6: Side Veins
Add a few side veins branching from the midrib toward the edges, curving slightly toward the tip. Keep them subtle and partially broken. On the shadow half, veins can be slightly darker than the leaf rather than lighter.
Step 7: Edge Highlight and Shadow
Run a thin highlight along part of the lit edge. Add a cast shadow beneath the leaf if it sits on a surface or overlaps another leaf.
Leaves That Turn and Twist
Real leaves rarely sit face-on. Painting a few turned leaves adds instant realism:
- Foreshortened leaf: appears shorter and wider when tipped toward or away from you.
- Curled tip: show a small sliver of the lighter, often grayer underside where the tip curls over.
- Side view: a leaf seen edge-on becomes a thin curved line or sliver.
- Twisted leaf: one half faces up and is lit; the other half twists to show the underside.
Leaf undersides are usually lighter and cooler or grayer than the tops, with more prominent veins.
Leaf Edges and Margins
The margin often identifies a plant more quickly than its color. Smooth-edged leaves can be painted with a single clean stroke. Toothed leaves, such as rose, elm or nettle, need a series of tiny zigzags along the edge, painted with the tip of a small round after the blade is dry; keep the teeth small and slightly irregular. Lobed leaves like oak and maple are easier if you paint each lobe as a separate mini-leaf radiating from the center, then connect them.
Painting Branches and Sprigs
- Paint the stem or branch first with a liner or small round, tapering toward the end.
- Place leaves alternately or opposite along the stem, depending on the plant, attached by short petioles.
- Make leaves near the tip smaller and newer, often lighter green.
- Overlap some leaves and vary their angles. Paint the back leaves first, slightly darker and cooler, then the front leaves with more contrast.
How to Paint Autumn Leaves
Fall leaves offer warm, rich color that acrylic handles well.
- Maple: five pointed lobes. Block in with cadmium orange, shade with cadmium red and burnt sienna, highlight with yellow.
- Oak: rounded or pointed lobes in browns, russets and deep reds.
- Birch or aspen: small, round-toothed leaves in bright gold.
Mix colors on the leaf itself: start with yellow at one edge, blending into orange and red toward the other. Leave a few traces of green near the veins for realism. Add small dark spots or brown edges for character.
For transparent, glowing autumn color, thin glazes of fluid acrylic over a yellow base can work well. Our Daler-Rowney fluid acrylic review covers how fluid paints glaze compared with heavy body tubes.
Tropical Leaves
Large tropical leaves, such as monstera, banana and palm, are bold design elements. Use bigger brushes and simpler value structures.
- Monstera: paint the heart-shaped leaf in a deep green, then cut in the splits and holes with background color. Add a strong midrib and curving side veins.
- Banana leaf: long, wide blades with parallel veins and torn edges. Use a flat brush for long strokes.
- Palm frond: a central rib with many narrow leaflets, painted with a liner or round in quick, tapered strokes.
Painting Foliage Masses on Trees and Bushes
In landscapes, painting individual leaves is rarely necessary. Instead:
- Block the shape: paint the overall silhouette of the foliage in a mid-tone green.
- Dark clusters: dab darker green into the lower and inner areas, where leaves shade each other.
- Light clusters: dab lighter green on the top and lit side of each clump with a filbert, round or old fan brush.
- Sky holes: paint a few gaps of sky color through the foliage so the tree feels airy.
- Edge leaves: paint a handful of individual leaf shapes only along the outer edges, where the eye notices them.
Leaves in Different Light
Leaves are thin, so light behaves on them in ways that solid objects do not. Two effects are worth painting deliberately:
- Backlighting: When the sun sits behind a leaf, light passes through the blade and the leaf glows a warm, saturated yellow-green. Veins appear as darker lines against the glow. Paint backlit leaves with lemon yellow and a little green, keep them free of white, and surround them with darker shapes so they shine.
- Glossy reflection: Waxy leaves, such as magnolia, ivy or citrus, reflect the sky. Their highlights are often pale blue-gray rather than light green, and they appear as sharp-edged shapes rather than soft gradations.
Matte leaves, such as sage or lamb’s ear, scatter light softly and show almost no shiny highlights. Matching the highlight type to the leaf surface is a small detail that makes plant identification easy for the viewer.
A Practice Sequence for Leaves
- Stroke drills: Fill a sheet with single filbert leaves in one stroke, pressing down and lifting toward the tip.
- Two-value leaves: Paint ten leaves using only a dark and a light green, splitting each along the midrib.
- Turned leaves: Paint the same leaf face-on, foreshortened, curled and edge-on.
- Branch study: Combine leaves on a stem with overlaps and back-to-front value changes.
- Foliage mass: Paint a small bush in three values without painting a single individual leaf, then add edge leaves only.
Working through these in order builds the brush control and the observational habits that make larger paintings faster.
Common Mistakes
- One flat green. Use at least three values and both warm and cool greens.
- Symmetrical leaves. Leaves are slightly asymmetrical and often fold or twist.
- Overpainted veins. Thick, bright, complete veins look like diagrams. Keep veins subtle and broken.
- Every leaf facing forward. Vary angles and include turned and foreshortened leaves.
- Black for shadows. Use dark greens, umber or complementary reds.
- Painting every leaf on a tree. Group leaves into masses and detail only the edges.
Related Reading
- How to Paint a Hot Air Balloon Acrylic: Easy Step-by-Step
- How to Do Loose Floral Acrylic Painting: Easy Step-by-Step
- How to Paint a Cactus With Acrylic Paint: Easy Step-by-Step
- How to Paint a Fox With Acrylic Paint: Easy Step-by-Step
- How to Paint Feathers With Acrylic Paint: Easy Step-by-Step
- How to Paint a Mushroom With Acrylics: Easy Step-by-Step
- How to Paint a Moon With Acrylic Paint: Easy Step-by-Step
- How to Paint Bubbles With Acrylic Paint: Easy Step-by-Step
- How to Paint a Frog With Acrylic Paint: Easy Step-by-Step
- How to Paint a Rainbow With Acrylic Paint: Easy Step-by-Step
FAQs
What brush is best for painting leaves in acrylic?
A filbert brush is the most versatile because it can form a full leaf shape in one or two strokes. Use a round brush for pointed or narrow leaves, a liner for veins and stems, and a fan brush for foliage masses.
How do I mix realistic leaf greens?
Mix greens from blue and yellow, and adjust them with yellow ochre, burnt sienna or a touch of red. Create several variations, from cool deep greens to warm bright yellow-greens, instead of using one tube green.
How do I make painted leaves look 3D?
Divide each leaf along the midrib into a lighter half and a darker half, add a highlight on the lit edge and cast shadows where leaves overlap. Turning and curling some leaves also adds depth.
Should I paint veins on every leaf?
No. Paint veins on foreground or focal leaves only. Background and distant leaves look more natural without them.
How do I paint leaves on a tree without painting each one?
Paint the foliage as a large shape, then dab darker and lighter clusters to suggest groups of leaves. Add individual leaf shapes only along the outer edges and in the foreground.
How do I paint autumn leaves with acrylics?
Start with a yellow or orange base, blend in reds and browns while damp, keep a few hints of green near the veins and add darker spots or edges for character.
Final Thoughts
Painting leaves with acrylic paint gets much easier when you think in terms of shape, light direction and color variety rather than detail. Split each leaf into light and shadow halves, mix several greens, keep veins subtle and simplify foliage masses into clusters.
Mixed greens depend on strong blues and yellows, so paint quality plays a real role here. To build a palette that mixes natural greens, explore our comparison of top acrylic paint brands for landscape and botanical work.




