
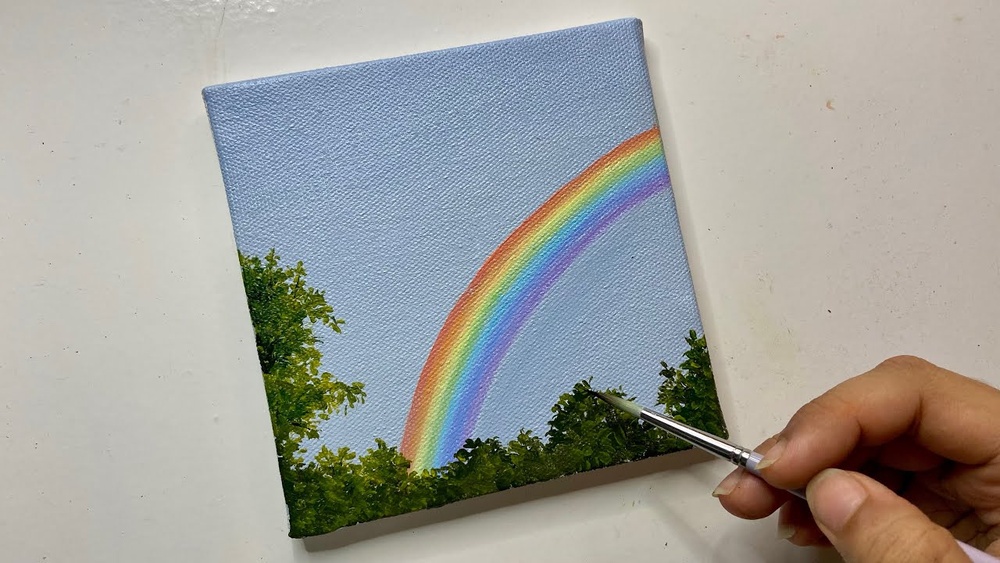
Quick answer: To paint a rainbow with acrylic paint, mark a center point below the canvas, draw evenly spaced arcs with a string compass, then paint bands from the outside in: red, orange, yellow, green, blue and violet. Blend each band into its neighbor while both are still wet, using a soft flat brush and a slow-drying medium. For a realistic sky rainbow, glaze thin, transparent bands over a dry sky instead of painting opaque stripes.
A rainbow seems like the simplest subject in painting: six stripes of color in a curve. In practice it exposes every weakness at once. Arcs wobble, bands end up different widths, the green turns olive, and the purple comes out gray-brown. Most of those problems have mechanical causes, and they’re easy to fix once you know them.
This guide covers two approaches to how to paint a rainbow with acrylic paint. The first is a bold, graphic rainbow with crisp or softly blended bands, the kind you’d paint for a nursery, a card or a decorative canvas. The second is a translucent rainbow in a landscape sky, which looks like light rather than paint.
Why Rainbows Go Wrong in Acrylic
Three properties of acrylic paint explain most failed rainbows.
Fast drying. A thin layer of acrylic can set in 10 to 20 minutes, and the edge of a stroke dries even faster. If you paint the whole red band, then the whole orange band, the red is often too dry to blend by the time you reach it. Working in short sections solves this.
Pigment temperature. Not every red, yellow and blue mixes cleanly. A warm, orange-leaning red like cadmium red light mixed with a green-leaning blue gives a dull, brownish purple. Clean secondaries come from choosing primaries that lean toward each other, which we’ll cover in the palette section.
Opacity differences. Yellows are often semi-transparent, while some reds and blues are much stronger. Paint the yellow band over a dark ground and it may disappear. A white or very light base under the rainbow keeps the yellow bright.
What You’ll Need
- Canvas, canvas panel or heavy mixed-media paper (300 gsm or heavier). An 11×14 or 12×16 inch surface gives each band enough width to blend.
- Pencil, a length of string and a pushpin or tape, for drawing arcs.
- A 1/2-inch or 3/4-inch soft synthetic flat brush for bands, plus a 1-inch flat or mop brush for skies.
- Painter’s tape (optional, for hard-edged graphic rainbows).
- Slow-dry medium or a misting bottle.
- Glazing medium (for the realistic method).
- Paper towels and two water jars, one for rinsing warm colors and one for cool colors.
Choosing rainbow colors that mix cleanly
You can buy six tube colors, or mix the secondaries from three primaries plus white. Mixing teaches more, but only if the primaries are chosen carefully.
| Band | Tube option | Mixing option |
|---|---|---|
| Red | Cadmium red medium or pyrrole red | Use straight from the tube |
| Orange | Cadmium orange or pyrrole orange | Warm red + warm yellow (about 1:2) |
| Yellow | Cadmium yellow light or hansa yellow medium | Use straight |
| Green | Phthalo green + yellow, or a premixed permanent green light | Lemon yellow + phthalo blue (start 4:1) |
| Blue | Phthalo blue or cerulean | Use straight, tinted slightly with white |
| Violet | Dioxazine purple | Quinacridone magenta + ultramarine blue |
The violet is the band that fails most often. A cool, pink-leaning red (quinacridone magenta) plus a warm, red-leaning blue (ultramarine) gives a clean purple. Cadmium red plus phthalo blue gives mud. Low-pigment craft paints make this worse because there’s less color to begin with and the mix grays out quickly. If you’ve had trouble getting bright secondaries, our comparison of the best acrylic paint brands for clean, vivid color mixing explains which pigment loads and lines tend to stay brighter.
Many people search for the “rainbow order” as ROYGBIV, with indigo between blue and violet. In paint, indigo and violet are usually merged into one band because they’re so close. Six bands read as a complete rainbow; seven can look striped and crowded on a small canvas.
Method 1: A Bold Decorative Rainbow, Step by Step
Step 1: Prepare the background
Paint the whole canvas in your background color first. A soft sky blue, a pale cream or plain white all work. If your background is dark, paint the rainbow area with two coats of white first so the colors stay true. Let the base dry completely, around 30 minutes.
Step 2: Draw evenly spaced arcs
This step decides whether your rainbow looks polished or homemade. Freehand arcs almost always drift.
- Pick a center point. For a classic arch, it sits on the bottom edge of the canvas, or even below it, taped to your table.
- Tie a pencil to a string. Hold the string at the center point with a pushpin or your thumb.
- Swing the pencil to draw the outermost arc (this will be the outer edge of red).
- Shorten the string by the band width, such as 3/4 inch on a 12×16 canvas, and draw the next arc. Repeat until you have seven arcs, which create six bands.
Mark the band width on the string with a pen each time so every band matches. Equal band widths are what make a rainbow look intentional.
Step 3: Paint from the outside in
Start with red, the outer band, and work inward toward violet. This order matches a primary rainbow in nature and means each new color is painted next to a band you just finished.
Load the flat brush generously and pull it along the arc in one long, continuous stroke where possible. Rotate the canvas as you go so your hand moves in a comfortable curve. Short, choppy strokes leave visible joins.
Step 4: Blend the borders (for a soft rainbow)
Work in sections about one-third of the arc long. Paint red and orange in that section, then while both are wet, run a clean, slightly damp brush along the line between them, using light back-and-forth strokes parallel to the arc. Move on to the next section, then come back for orange-yellow.
Use about 10 to 20 percent slow-dry medium in each color to stretch your working time. Mist the canvas lightly if the paint starts to drag.
Step 5: For crisp stripes, use tape or a steady hand
A graphic rainbow with sharp edges looks modern and clean. Paint every other band first (red, yellow, blue), let them dry for at least an hour, and then paint the remaining bands. That way you never have two wet edges touching.
Curved tape lines are tricky, but thin vinyl striping tape bends around gentle arcs. Seal the tape edge with a thin coat of the background color or matte medium before painting to stop bleeding.
Step 6: Second coat and clean edges
Most yellows and some oranges need a second coat. Once the first layer is dry, repaint any patchy bands. Then use a small round brush and the background color to tidy the outer edge of the red and the inner edge of the violet.
Method 2: A Realistic Rainbow in a Landscape
A real rainbow is light passing through a curtain of rain. It’s transparent, the sky behind it stays visible, and its colors are softer than any tube of paint. Painting it with opaque bands makes it look like a sticker. Glazing is the answer.
Step 1: Paint the sky and landscape first
Rainbows appear when the sun is behind the viewer and rain is in front, so the sky inside the arc is often slightly lighter than the sky outside it. Paint a darker, stormy gray-blue sky (ultramarine, burnt umber and white) with a slightly lighter area inside where the bow will sit. Finish the landscape below and let everything dry for at least an hour.
Step 2: Mix transparent glazes
Mix each rainbow color with glazing medium at roughly one part paint to five or more parts medium. You want a tinted, see-through layer. Test on a scrap painted with the same sky color.
Fluid acrylics are convenient here because they already have a thin, pourable consistency and disperse evenly in medium without leaving clumps. Our Daler-Rowney fluid acrylic paint review looks at how one fluid line behaves in glazes and washes if you’re curious how this paint type differs from heavy body.
Step 3: Glaze the bands
Using a soft, wide brush, glaze each band in one pass, red on the outside. Feather the outer edge of red and the inner edge of violet so they dissolve into the sky. Let each glaze dry before adding a second pass to bands that need more intensity, usually yellow and green.
Step 4: Make the rainbow fade naturally
Real rainbows rarely show the full arc with even intensity. They fade where the rain thins or where they meet the land. Wipe back the ends with a damp cloth while the glaze is still wet, or scumble a little sky color over them once dry.
Painting a double rainbow
A secondary rainbow sits outside the main one, is fainter, and has its colors reversed (violet on the outside, red on the inside). The sky between the two bows is noticeably darker, a band known as Alexander’s dark band. Painting that darker strip between the arcs makes a double rainbow far more convincing.
Easy Rainbow Ideas for Kids and Beginners
- Cloud-anchored rainbow: a short arc that starts and ends in fluffy white clouds. The clouds hide wobbly band ends.
- Boho rainbow: muted earth-tone bands (terracotta, mustard, sage, dusty pink) with small gaps between each band. No blending required.
- Rainbow dot art: dots arranged in arcs with the end of a brush handle.
- Rainbow sponge painting: load a kitchen sponge cut into strips with all six colors side by side, then drag it in one curved pass. Great for younger children.
Troubleshooting Your Rainbow
| Problem | Cause | Fix |
|---|---|---|
| Muddy brown purple | Warm red mixed with green-leaning blue | Use magenta + ultramarine, or a tube dioxazine purple |
| Olive green | Warm yellow plus warm blue | Use lemon yellow + phthalo blue |
| Streaky yellow | Semi-transparent pigment over a dark ground | White underlayer, then two thin coats |
| Hard ridges between bands | First band dried before blending | Work in short sections; add slow-dry medium |
| Uneven band widths | Freehand arcs | Use a string compass with marked lengths |
| Rainbow looks pasted on the sky | Opaque paint in a realistic scene | Glaze transparent layers; soften the ends |
Common Mistakes
- Rinsing poorly between colors. A brush with traces of blue will turn the yellow band green. Keep separate rinse water for warm and cool colors, and wipe the brush dry before loading a new color.
- Overworking the blend. Three to five light passes along the border is enough. More passes lift the paint and leave a dull, streaky band.
- Getting the order wrong. In a primary rainbow, red is always on the outside of the curve. It’s a small detail, but viewers notice when it’s reversed.
- Making the arc too flat or too tall. A center point below the canvas edge gives a gentle, natural arch; a center point well inside the canvas gives a tight, cartoonish semicircle. Choose on purpose.
FAQs
What order do you paint rainbow colors?
From the outside of the arc to the inside: red, orange, yellow, green, blue and violet. Painting in that order lets you blend each new band into the one you just finished.
How do you blend rainbow colors with acrylic paint?
Paint two neighboring bands, then while both are still wet, sweep a clean, damp flat brush lightly along the border, parallel to the arc. Work in short sections and add a slow-dry medium so the paint stays workable long enough.
What three colors make a rainbow?
You can mix a rainbow from a warm red, a cool magenta, a lemon yellow, a phthalo blue and an ultramarine blue. With only three primaries, choose magenta, lemon yellow and phthalo (cyan-like) blue, which mix the cleanest secondaries, though your red and orange will be slightly less fiery.
How do I paint a rainbow on a dark background?
Paint the rainbow shape in two coats of white first and let it dry. Then paint the colors over the white. Without that base, yellow and orange in particular will look dull and patchy.
How do I make a rainbow look see-through in a landscape?
Mix each color with a large amount of glazing medium so it becomes transparent, and glaze it over a finished, dry sky. Fade the ends of the arc and keep the sky inside the bow a little lighter than outside it.
Can I use acrylic paint for a rainbow on a wall or rock?
Yes. Acrylic adheres well to primed walls, wood and stone. For outdoor pieces, seal the dry painting with a clear exterior varnish to protect the colors from UV and moisture.
Final Thoughts
A good rainbow comes down to three habits: measure your arcs, choose primaries that mix clean secondaries, and blend in short sections before the paint sets. Once those are in place, the same technique carries over to sunsets, color wheels and any gradient you want to paint.
Because rainbows show every hue side by side, they’re also the quickest way to judge whether your paints are up to the job. If the bands come out dull no matter how carefully you mix, see our guide to choosing acrylic paint with stronger, cleaner pigments for brands worth considering.





2 Comments