
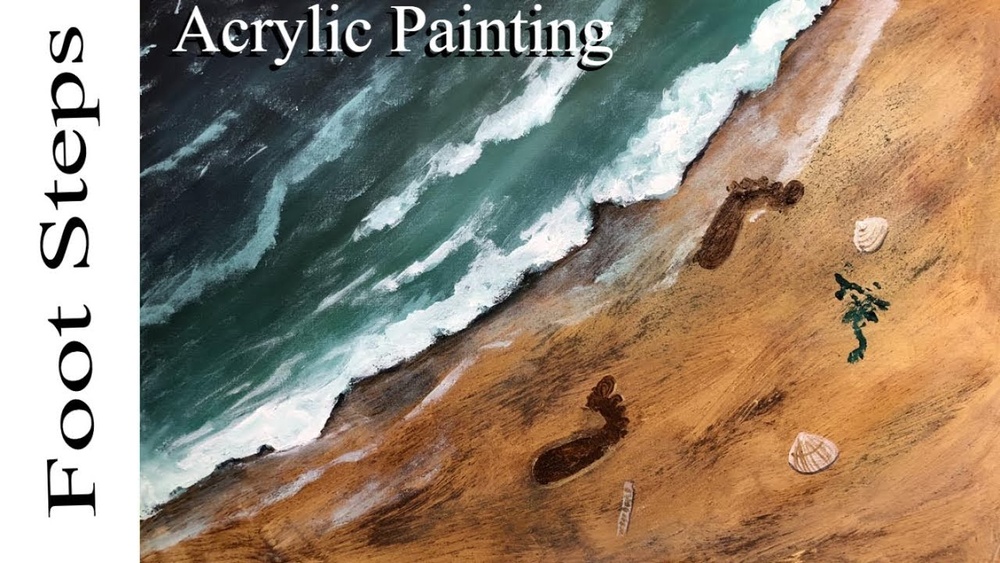
Quick answer: To paint footprints with acrylic paint, brush a thin, even coat of non-toxic acrylic onto the sole of the foot with a soft foam brush, then press the foot flat onto paper or canvas, heel first and rolling to the toes, and lift straight up. Wash the foot right away with soap and warm water. If you want to paint footprints as a subject, such as tracks in sand, paint each print as a shallow depression: a shadow on the side away from the light and a highlight on the opposite rim.
“Footprints” means two different projects to most painters. One is the keepsake craft: a child’s or baby’s foot stamped in paint and turned into art. The other is painting footprints as part of a scene, like a trail across a beach or through snow. Both use acrylic, and both go wrong in predictable ways.
This guide covers both. The first half explains how to paint footprints with acrylic paint as stamped keepsakes, including skin safety, clean prints and design ideas. The second half shows how to paint realistic footprints in sand and snow.
Part 1: Footprint Keepsakes With Acrylic Paint
Is Acrylic Paint Safe on Skin?
Acrylic paint is designed for surfaces, not skin. Many craft acrylics are labeled non-toxic (look for the ACMI “AP” seal in the US), which means they are considered safe for normal art use, but that is not the same as being formulated for body contact. For brief contact, such as a quick footprint followed by immediate washing, many parents use non-toxic acrylics without issue.
Some sensible precautions:
- Use only paint labeled non-toxic. Avoid artist pigments with cadmium or cobalt warnings on the label.
- Do a small patch test on the skin if the child has sensitive skin or eczema, and skip the project if there is any redness.
- Never let paint dry on the foot; acrylic becomes a plastic film and is harder to remove.
- For newborns, many parents choose washable tempera or a dedicated baby-safe inkless print kit instead.
- Keep paint away from hands and mouths during and after printing.
If you are unsure, washable kids’ paint makes a softer, less permanent print and is a gentler choice. Acrylic gives a more durable, vivid result on canvas or wood.
What You Need
| Item | Notes |
|---|---|
| Non-toxic acrylic paint | Craft or student grade in bold colors; 1 to 2 colors per print |
| Foam brush or soft 1-inch flat brush | Foam gives the most even coat; bristles can leave streaks |
| Surface | Cardstock, heavy mixed-media paper, stretched canvas, canvas panel or primed wood |
| Practice paper | Several sheets of scrap for test prints |
| Baby wipes, warm soapy water and a towel | Have these within arm’s reach before you start |
| Helper | One person holds the child; one handles paint and paper |
| Optional | Paint pen or fine brush for lettering, clear varnish |
Paint consistency matters a lot for crisp footprints. Paint that is too thin pools and blurs the creases; paint that is too thick fills the skin lines and leaves a solid blob. Mid-viscosity craft or student acrylics usually sit in the right range. For an overview of how paint lines differ in body and coverage, see our guide to choosing acrylic paint by viscosity and pigment strength.
How to Paint Footprints With Acrylic Paint Step by Step
- Set up first. Tape the paper or place the canvas on a hard, flat surface at a comfortable height. Lay out wipes and a towel. Squeeze a small amount of paint onto a plate.
- Check the foot. The sole should be clean and dry. Lotion or moisture prevents paint from sticking evenly.
- Apply a thin coat. With a foam brush, cover the whole sole, including toes, in a thin, even layer. You should still see skin texture through the paint. Babies often curl their toes; gently straighten them and paint quickly.
- Press heel first. Hold the ankle, place the heel down, then lower the foot so the arch and ball touch, and finally press the toes down. For small babies, it often works better to bring the paper to the foot: hold a board with paper and press it up against the sole.
- Apply gentle pressure. Press lightly on the top of the foot and each toe for a second or two. Do not let the foot slide.
- Lift straight up. Peeling or rolling the foot off smears the print.
- Wash immediately. Wipe off excess, then wash with soap and warm water.
- Dry flat. Let the print dry for at least an hour on paper and longer on canvas before handling or adding details.
Why Prints Come Out Blurry (and How to Fix It)
| Problem | Likely cause | Fix |
|---|---|---|
| Solid blob, no skin lines | Too much paint | Apply a thinner coat; blot once on scrap paper before printing |
| Patchy, missing areas | Too little paint or foot not pressed flat | Re-coat evenly; press gently along the arch |
| Smeared or doubled print | Foot slid or wiggled | Have a helper hold the leg; bring paper to the foot |
| Toes missing | Toes curled | Paint toes last, straighten them, and press each one |
| Paint beading up | Lotion or oily skin | Wash and dry the foot before painting |
Do several test prints on scrap paper before going to the final surface. The second or third print is often the cleanest because the paint layer has evened out.
Footprint Art Ideas
A plain footprint becomes a design with a few painted additions once it dries.
- Butterfly: Two footprints, heels touching, angled out to form wings. Paint a body and antennae between them.
- Penguin: One black footprint with the toes at the bottom; add a white belly, eyes and orange feet.
- Ghost: A white print on dark paper, heel up; add eyes and a mouth.
- Reindeer: A brown print with the heel down; add antlers between the toes and a red nose at the heel.
- Christmas tree: Several green prints stacked, getting smaller toward the top.
- Heart: Two footprints arranged in a “V” so the inner edges form a heart.
- Family canvas: Each family member’s footprint in a different color, overlapping from largest to smallest.
- Growth series: One print per year on matching canvases or a single long board.
Finishing and Preserving
Add names, dates and ages with a fine round brush or an acrylic paint pen after the print dries completely. On canvas or wood, a thin coat of clear acrylic varnish protects the print from dust and fading; wait at least 24 hours before varnishing, longer if the paint went on thick. Framing paper prints behind glass keeps them flat and clean.
Part 2: Painting Footprints in Sand and Snow
When footprints are part of a landscape, you are not stamping a shape. You are painting a dent in a surface. That means light and shadow, not outline.
How Light Shapes a Footprint
A footprint is a shallow pocket. When light comes from one side:
- The inner wall closest to the light falls into shadow, because it faces away from the light.
- The inner wall farthest from the light catches light, because it faces toward it.
- The displaced sand or snow around the rim forms a small raised edge with its own highlight and cast shadow.
Get that light-side, shadow-side logic consistent and footprints read as depressions. Reverse it and they look like raised bumps.
Footprints in Sand: Step by Step
- Paint the beach. Lay in the sand with yellow ochre, white and a touch of burnt sienna, slightly darker and more saturated in the foreground. Let it dry.
- Plan the trail. Lightly sketch a line of oval shapes along a gentle curve. Prints get smaller and closer together as they recede, and they alternate left and right.
- Paint the shadow side. Mix sand color with a little ultramarine and burnt umber for a cool shadow. Paint a crescent inside each oval on the side nearest the light source.
- Add the lit wall. On the opposite inner edge, paint a thin crescent of lighter sand color.
- Define the heel and toes. Up close, suggest a deeper heel pocket and a row of small toe dents. Distant prints only need the shadow crescent.
- Raise the rim. Add a light stroke along the outer rim on the side facing the light and a soft cast shadow outside the rim on the other side.
- Add texture. Spatter tiny dots of light and dark sand color across the beach to break up smoothness.
For wet sand near the waterline, prints are darker and may hold a thin sheen of reflected sky. Paint them in a slightly darker, cooler sand tone, with a small streak of pale blue-gray at the bottom of the deepest prints.
Footprints in Snow
Snow follows the same light logic, but shadows are distinctly blue or violet, especially on clear days. Paint snow in white with a slight warm tint on lit surfaces, then use a pale ultramarine-and-white mix for the shadow side of each print. Fresh snow forms crisper, deeper prints; older, compacted snow gives shallower, softer ones. Add a few small clumps of displaced snow around the rims for realism.
Perspective Tips for Footprint Trails
- Prints in the foreground are larger, wider and more detailed.
- Distant prints shrink and become thin horizontal dashes.
- The spacing between prints also shrinks with distance.
- A curving trail leads the eye into the painting better than a straight line.
Choosing Colors and Layouts for Keepsake Prints
A footprint has a strong, simple silhouette, so color and placement do most of the design work. High-contrast pairs read best: a dark navy or black print on white or cream, a white print on a dark canvas, or a saturated color on a pale neutral. Pastels on white often look washed out once dry, because thin paint layers dry a little lighter and more transparent than they look wet.
Leave generous margins. A single baby footprint on an 8×10 canvas looks intentional when it sits slightly above center with room below for a name and date. For sibling or family pieces, plan placement with pencil marks first, and print the largest foot first so smaller prints can overlap it without smearing.
If you want a background color, paint it first and let it dry fully, ideally overnight, before printing. A tacky background can grab the skin and lift paint, and it is far harder to wash off the foot afterward.
Common Mistakes
- Outlining printed footprints with a dark line. In scenes, edges are defined by light and shadow, not outlines.
- Inconsistent light direction. Every print in the scene should be lit from the same side.
- Thick paint on feet. In keepsake prints, heavy paint fills creases and erases detail.
- Rushing with a squirmy child. Pick a calm moment, such as after a nap or during a feed.
- Varnishing too soon. Trapped moisture can cloud the finish.
Related Reading
FAQs
Can you use acrylic paint for baby footprints?
Many parents use non-toxic acrylic for a quick footprint and wash it off immediately. Acrylic is not formulated for skin, so patch test sensitive skin, avoid pigments with warning labels, and consider washable tempera or an inkless print kit for newborns.
How do you get acrylic paint off a baby’s foot?
Wipe off excess paint right away with a baby wipe, then wash with mild soap and warm water before the paint dries. Dried acrylic peels more slowly; soaking in warm water and gently rubbing usually loosens it.
What is the best surface for footprint art?
Heavy cardstock or mixed-media paper is easiest for first attempts. Stretched canvas gives a gift-ready result but is slightly springy, so place a book or board underneath it to provide support when pressing.
How do I make footprints look sunken in a painting?
Paint a shadow on the inner side of the print closest to the light source and a highlight on the opposite inner edge. Add a light rim around the outside to suggest displaced sand or snow.
How long does acrylic footprint art take to dry?
Thin prints on paper are usually touch-dry within 30 to 60 minutes. Allow longer on canvas, and wait at least 24 hours before varnishing.
Why are my footprints smudged?
Smudges usually come from the foot sliding during contact or from peeling it away at an angle. Hold the leg steady, press briefly and lift straight up.
Next Step
Whether you are making a keepsake or painting a beach trail, clean footprints come down to control: a thin, even coat and steady contact for prints, and consistent light and shadow for painted tracks. Practice on scrap paper first and the final piece will come out much cleaner.
The right paint makes both projects easier, since coverage and consistency vary a lot between brands. Browse our comparison of reliable acrylic paints for crafts and fine art to choose colors that print crisply and stay bright over time.




