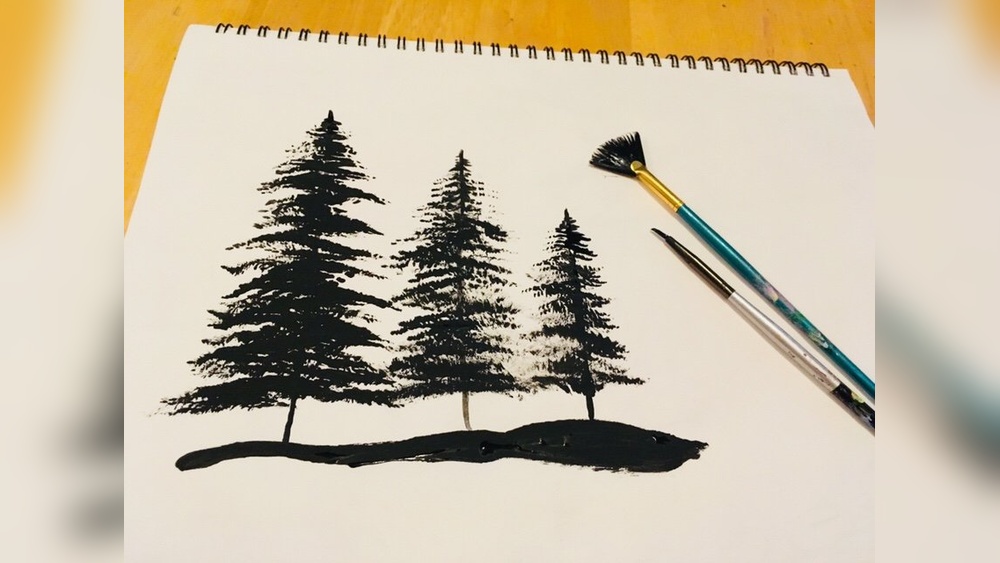
If you’ve ever admired the peaceful beauty of pine trees and wished you could capture that charm on canvas, you’re in the right place. Painting pine trees with acrylic paint might sound tricky, but with the right approach, you can create stunning, lifelike trees that bring your artwork to life.
Whether you’re a beginner or looking to improve your technique, this guide will walk you through easy steps and key tips to help you paint pine trees that stand out. Get ready to discover simple brush strokes, perfect color choices, and layering secrets that will make your pine trees look vibrant and full of depth.
Keep reading, and soon you’ll be painting pine trees with confidence and style!
Materials Needed
Gathering the right materials sets the foundation for painting pine trees. Each tool plays a role in creating texture and depth. This section covers essential supplies for your acrylic painting project.
Acrylic Paint Colors
Choose a palette with various greens to capture pine foliage. Include dark green, forest green, and light green for highlights. Add brown and black for the trunk and shadow areas. White helps to mix lighter tones and create contrast. Using a limited color range keeps your painting harmonious.
Brush Types
Select brushes that help create natural pine shapes. A stiff fan brush works well for needles and foliage texture. Flat brushes are perfect for broad strokes and trunk shapes. Round brushes help with details and fine branches. Different brush sizes allow control over layers and details.
Canvas And Palette
Use a primed canvas or acrylic paper for smooth paint application. A medium-sized canvas offers enough space for tree details. Choose a palette that is easy to clean and mix colors on. Disposable palettes or palette pads save time and keep colors fresh. Having enough space to blend paints improves color transitions.
Preparing The Canvas
Preparing the canvas is the first step in painting pine trees with acrylic paint. A well-prepared canvas ensures your paint sticks properly and lasts longer. It also helps you create a smooth and even surface for your artwork.
Taking time to prepare the canvas improves the quality of your painting. This stage includes applying primer and sketching the trunk. Both steps set the foundation for a beautiful pine tree painting.
Applying Primer
Start by applying a layer of primer to your canvas. Primer seals the surface and prevents the paint from soaking in unevenly. Use a wide, flat brush to spread the primer evenly. Let it dry completely before moving to the next step. A white or light-colored primer works best for acrylic paints. It brightens the colors and makes them more vibrant.
Sketching The Trunk
Use a pencil to lightly sketch the pine tree trunk on the primed canvas. Keep the lines simple and thin. Focus on the trunk’s shape and position first. Draw a vertical line that is slightly wider at the base. This helps show the tree’s natural form. Avoid adding details yet. The sketch will guide your painting and keep proportions correct.
Painting The Trunk
The trunk forms the backbone of your pine tree painting. It adds strength and realism. Painting the trunk requires attention to color and texture. This part sets the tone for the entire tree. Use acrylic paint to build layers and depth. The following steps guide you through painting a natural-looking trunk.
Mixing Base Colors
Start by mixing a base color using burnt sienna and raw umber. These earth tones create a warm, natural look. Add a touch of black to darken the mix slightly. Test the color on a scrap paper before applying. Use a medium-sized flat brush to paint the trunk’s main shape. Apply the paint evenly to cover the area. Avoid overly thick layers; thin coats work better for texture.
Creating Texture And Shadows
After the base dries, add texture with a dry brush technique. Use a smaller brush with less paint to create rough bark strokes. Mix darker shades by adding more black or dark brown. Paint vertical lines to mimic the bark’s natural grooves. Introduce shadows on one side of the trunk to add depth. Use lighter colors on the opposite side for highlights. This contrast makes the trunk appear three-dimensional and realistic.
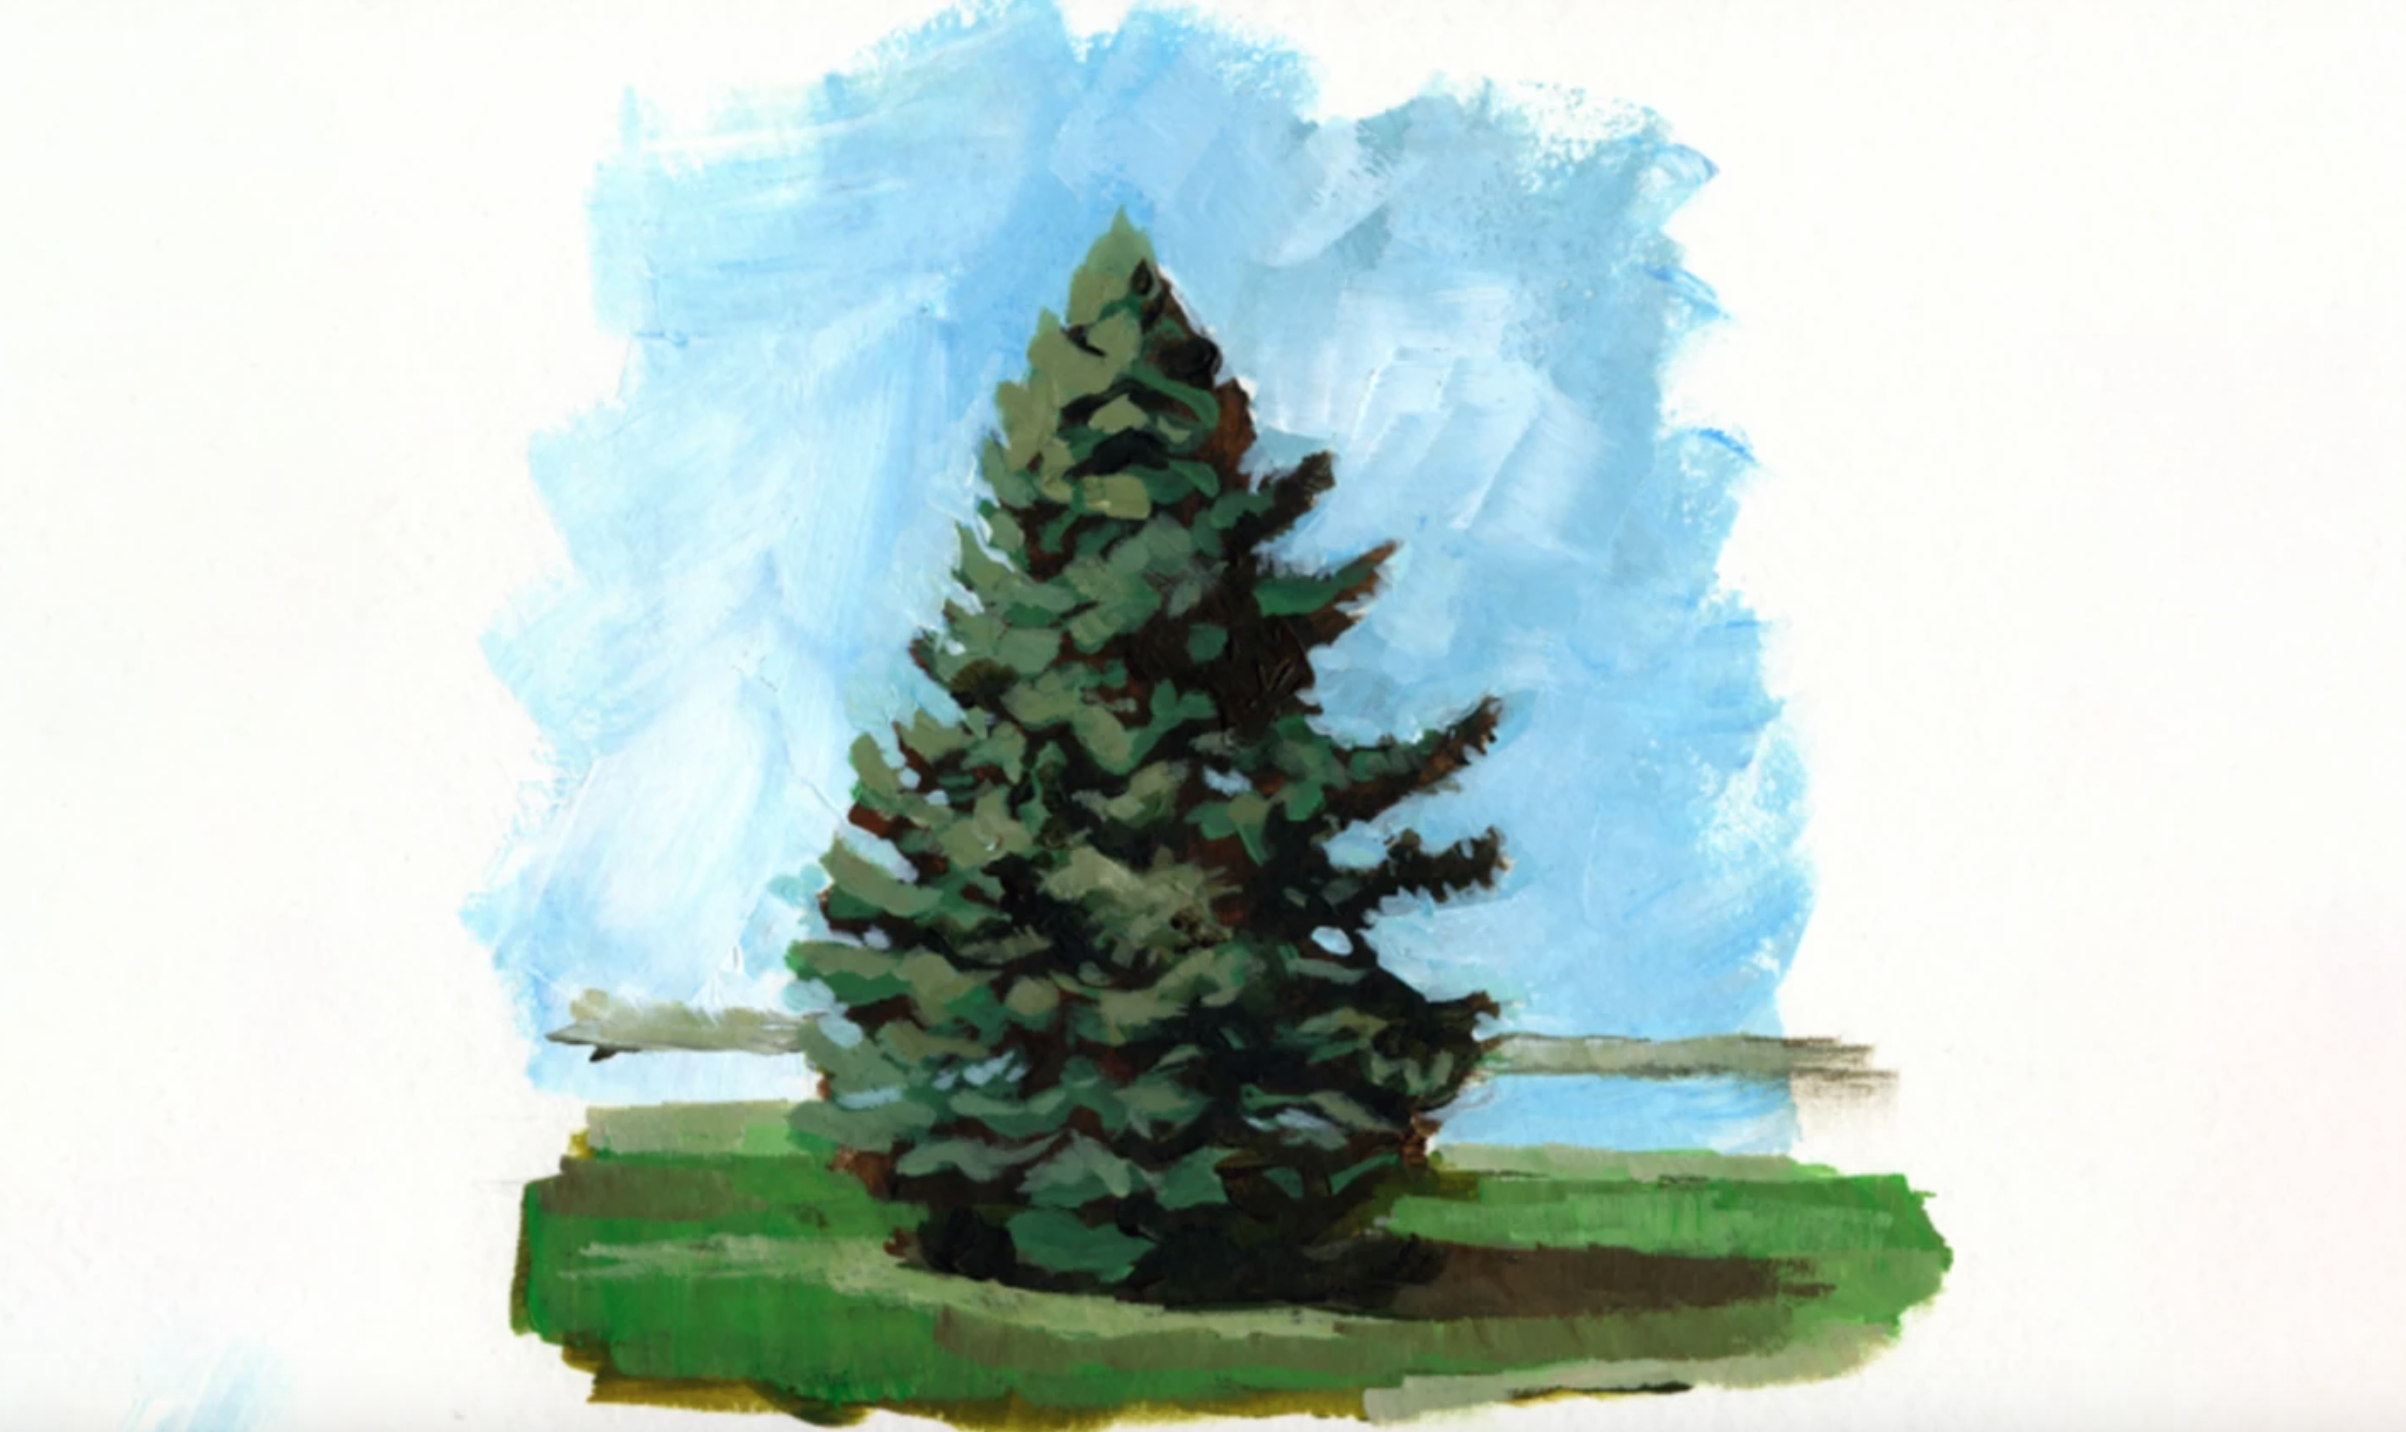
Building The Foliage
Building the foliage of a pine tree with acrylic paint requires careful layering of colors. Each layer adds depth and texture to the tree’s look. Start with dark greens to form the base. Then add midtone shades to create volume. Finish by highlighting with lighter greens to show light and dimension. This step-by-step approach brings the pine tree to life on your canvas.
Layering Dark Greens
Begin by applying dark green paint to outline the pine tree’s shape. Use a stiff brush to dab the paint in short, quick strokes. This mimics the look of dense pine needles. Cover the entire foliage area but leave space for lighter colors later. Dark greens create shadows and set the foundation for your tree.
Adding Midtone Shades
Next, add midtone green shades on top of the dark base. Use a slightly smaller brush and softer strokes. Apply these colors to areas that catch some light. Blend gently with the dark green to avoid harsh lines. This step adds fullness and makes the foliage look natural and rich.
Highlighting With Light Greens
Finally, use light green paint to highlight the edges of the pine needles. Focus on areas facing the light source. Use a fine brush or even a dry brush technique for subtle highlights. These bright touches give your pine tree a fresh, vibrant appearance and enhance its three-dimensional feel.
Brush Techniques
Brush techniques shape the look of your pine tree painting. Each stroke adds texture and depth. Using different brush movements creates varied effects on pine needles and branches. Practice each method to find what works best for your style.
Tapping And Stippling
Tapping means gently pressing the brush onto the canvas. Use a stiff fan brush or a round brush for this. This technique creates a cluster of small dots that look like pine needles. Stippling is similar but uses quick, light dabs. Both add texture and volume to the tree.
Short Upward Strokes
Short upward strokes mimic the sharp, pointed pine needles. Use a small flat or round brush. Start near the branch base and pull the brush upward in short bursts. This method builds layers of needles that appear natural and dense. Vary the length to add realism.
Drooping Lower Branches
Lower branches of pine trees often droop slightly downward. Use longer, curved strokes to paint these. A flat brush angled downward helps create the drooping effect. Paint the lower branches wider and less dense than upper ones. This adds balance and a realistic shape to your tree.

Credit: www.youtube.com
Shaping The Tree
Shaping the tree is a crucial step in painting pine trees with acrylics. It sets the foundation for a natural and believable look. Proper shaping creates the tree’s volume and form before adding details. Focus on the general outline first. This approach helps maintain simplicity and clarity in your painting.
Work slowly and build the shape layer by layer. This method gives the tree depth and interest. Use your brush to create broad strokes that mimic the tree’s overall form. Avoid rushing into fine details early on. Let the shape guide your next steps.
Forming The Conical Shape
Start by painting a simple cone shape for the pine tree. This shape represents the tree’s natural taper from wide base to narrow top. Use dark green shades for the base layer to anchor the tree on the canvas. Keep brush strokes angled slightly downward to suggest branches.
Make the cone wider at the bottom and narrow towards the top. This creates a strong silhouette. Use a fan or flat brush for smooth edges. The conical shape should feel balanced and stable. This shape is the backbone of your pine tree painting.
Leaving Gaps For Depth
Allow small gaps between brush strokes to add depth and texture. These gaps represent spaces between branches and needles. Use lighter green tones around the edges to enhance this effect. Do not cover the entire cone solidly with paint.
Leaving gaps helps the tree look three-dimensional. It lets the background color peek through, creating shadows. This technique adds realism without complex detailing. Paint in layers, increasing gap size as you go from dark to light.
Adding Final Details
Adding final details brings your pine tree painting to life. This step gives depth and realism. Focus on small touches that catch the eye. Use subtle colors and fine brush strokes. These details create texture and enhance the natural look.
Sunlight Highlights
Sunlight adds warmth and brightness to pine trees. Use a light yellow or pale green color. Apply gently on the side facing the light. Use a small, soft brush for this task. Paint thin strokes along the edges of branches. Avoid covering the whole branch with highlights. Keep the strokes short and light. This technique creates a glowing effect.
Snow Effects
Snow makes pine trees look magical and fresh. Use pure white or a mix of white and light blue. Dab the paint on the tips of branches. Use a stiff brush or a small sponge for texture. Create uneven patches to mimic natural snow. Do not cover the whole tree with snow. Let some green show through for contrast. This adds realism and beauty to your painting.
Credit: www.craftsy.com
Common Mistakes To Avoid
Painting pine trees with acrylic paint can be rewarding but tricky. Many beginners make simple errors that affect the final look. Avoiding these common mistakes helps create more natural and appealing trees. Focus on the overall shape and layering rather than rushing into details.
Skipping Large Shapes
Start with big shapes before adding details. Large shapes form the tree’s main structure. Without them, the tree looks flat and unrealistic. Use broad brushstrokes to block in dark green areas for foliage. This step builds depth and volume. It also guides where branches and needles will go.
Ignoring large shapes leads to confusion and messy paint. Paint the tree’s silhouette first. This gives a solid base to work on. Paint the trunk and main branches as simple shapes. Then add smaller branches and pine needles over them.
Overworking Details Early
Do not paint tiny details too soon. Adding fine needles or twigs before the tree’s shape dries can cause smudges. It also makes the painting look cluttered. Wait until the base layers are dry. This ensures clean, crisp details on top.
Focus on light and shadow first. Use different green shades to show depth. After the paint dries, add highlights and fine strokes. This method keeps the tree lively and fresh. Overworking early details can make the tree stiff and unnatural.
Tips For Realism
Creating realistic pine trees with acrylic paint takes patience and smart techniques. The key is to build depth and texture. Small details make your tree look natural and alive.
Use layers, paint with speed, and pick the right brush. These tips help your pine trees stand out on the canvas.
Using Multiple Layers
Start with a dark green base. Let it dry before adding lighter greens on top. Each layer adds depth and complexity.
Use thin paint layers. This keeps branches from looking flat. Build up colors slowly for a natural feel.
Include some shadow areas under branches. This shows the tree’s shape and form clearly.
Working Quickly
Acrylic paint dries fast. Work fast to blend colors while wet. This creates smooth transitions.
Don’t wait too long between layers. Wet edges help mix colors softly. It makes the tree look alive.
Keep your brush strokes loose and natural. This mimics the randomness of pine needles and branches.
Choosing The Right Brush
Use fan brushes for pine needles. They spread paint in thin, fine lines. This helps create texture.
Flat brushes work well for larger branches and trunks. They cover space quickly with clean strokes.
Detail brushes add small highlights and shadows. Use these for final touches and fine lines.

Credit: stepbysteppainting.net
Frequently Asked Questions
Can You Paint Pine Wood With Acrylic Paint?
Yes, you can paint pine wood with acrylic paint. It adheres well, offers vibrant colors, and creates a durable finish.
What Are Common Tree Painting Mistakes?
Common tree painting mistakes include neglecting basic shapes, over-detailing too soon, using flat colors, ignoring light and shadow, and poor brush stroke techniques.
How To Make A Pine Tree In Painting?
Sketch a narrow trunk with dark brown paint. Use a stiff fan brush to tap dark green foliage from top down. Layer lighter greens for highlights and add shadows. Shape the tree conical, leaving gaps for depth. Finish with light green highlights on the sunlit side.
Can I Paint Pine Wood Without Primer?
Yes, you can paint pine wood without primer, but primer improves paint adhesion and prevents blotchy finishes. Use primer for a smoother, longer-lasting result.
Conclusion
Painting pine trees with acrylics brings nature to your canvas simply. Begin with broad shapes before adding small details. Use dark to light greens for depth and highlights. Keep brush strokes short and gentle for texture. Practice helps you improve your technique every time.
Enjoy the process and see your pine trees come alive. This method suits beginners and experienced painters alike. Let your creativity grow with each painted pine tree.