
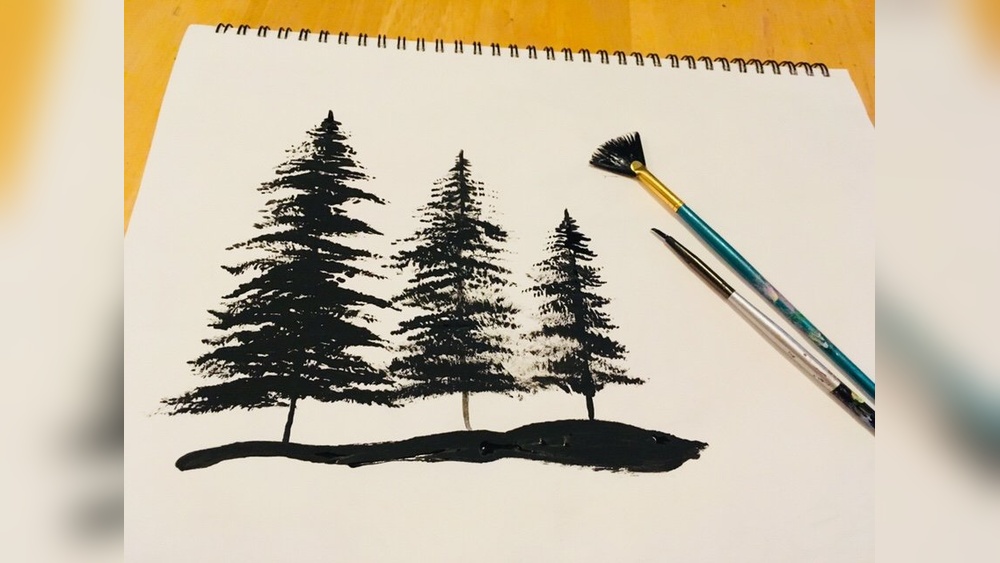
Quick answer: To paint pine trees with acrylic paint, start with a thin, vertical trunk line that tapers toward the top, then add branches as short, downward-angled strokes or taps, small at the top and wider toward the bottom. A fan brush tapped sideways or a small round brush pulled outward and down works well. Paint branches first in a dark green, then add lighter green on the side facing the light. Distant pines should be lighter, bluer and simpler; foreground pines darker and more detailed.
Pine trees are a staple of landscape painting, and they are one of the first trees most acrylic painters learn. Their shape is simple, a tall cone with layered branches, but that simplicity makes mistakes obvious. A pine that looks like a perfect green triangle or a Christmas tree drawing reads as decoration rather than nature.
This guide explains how to paint pine trees with acrylic paint at every distance: individual trees with a fan brush and a round brush, forests, distant tree lines, snowy pines and pines at sunset. It also covers the most common mistakes and how to avoid them.
Understanding Pine Tree Structure
Before picking up a brush, notice how real pines are built:
- Trunk: straight and central, tapering to a point at the top. Often visible between lower branches.
- Branches: grow outward from the trunk in tiers. Upper branches are short and angle upward or outward; lower branches are longer and droop downward under their own weight.
- Silhouette: roughly conical, but irregular, with gaps where sky shows through and uneven branch lengths.
- Top: a narrow leader shoot, sometimes slightly bent.
- Needles: at painting distance, these merge into clumps of texture rather than individual lines.
Note that “pine tree” in painting usually covers conifers generally, including firs and spruces, which have the classic cone shape. True pines are often more open and irregular, especially older ones. Painting a few irregular trees among cone-shaped ones adds realism.
Supplies
| Item | Recommendation | Why |
|---|---|---|
| Greens | Phthalo green or sap green | Base for dark conifer greens |
| Darkeners | Burnt umber, ultramarine blue, alizarin crimson | Deep, natural shadow greens without black |
| Lighteners | Cadmium yellow, yellow ochre, titanium white | Sunlit branch tips |
| Fan brush | Size 4 to 8, synthetic, stiffish bristles | Fast, textured branches |
| Round brushes | Size 2 and 4 | Controlled branches and smaller trees |
| Liner | Size 0 or 1 | Trunks, top leader, distant trees |
| Palette knife | Small, pointed | Alternative for crisp trunks and textured branches |
Dark conifer greens use phthalo-based mixes heavily, and phthalo is a very strong pigment; a little goes a long way. Paint lines differ in how intense and transparent their greens are. For help choosing, see our guide to acrylic paints with deep, rich greens.
Mixing Pine Tree Greens
| Mix | Recipe | Use |
|---|---|---|
| Deep pine | Phthalo green + burnt umber (or alizarin) | Base layer, shadow side, foreground trees |
| Mid pine | Sap green + a little ultramarine + yellow ochre | Middle layer of branches |
| Sunlit tips | Sap green + cadmium yellow + a touch of white | Highlights on lit side |
| Distant blue-green | Deep pine + ultramarine + lots of white | Far tree lines |
| Sunset tint | Mid pine + a little cadmium orange | Warm light at golden hour |
How to Paint Pine Trees With Acrylic Paint: Fan Brush Method
The fan brush is the most popular tool for painting pine trees with acrylics for beginners because it creates many needle-like marks at once.
Step 1: Paint the Trunk
With a liner and thinned dark brown or deep pine, paint a straight vertical line from the base to the top. Press slightly harder at the bottom so it tapers upward.
Step 2: Load the Fan Brush
Dip just the tip of the fan brush into deep pine mix and tap off excess. The bristles should be slightly separated, not clumped. Too much paint makes solid blobs.
Step 3: Paint the Top
Hold the brush vertically and lightly touch the tip down at the top of the trunk to create a narrow point. Keep it very thin.
Step 4: Tap in Branches
Turn the brush so the fan is horizontal or angled slightly downward. Starting near the top, touch the corner of the brush to the trunk and tap or pull outward and slightly down to form short branches on each side. Work your way down, making each tier gradually wider. Leave small gaps between some tiers.
Step 5: Bottom Branches
Near the base, make branches longer and more downward-drooping. Let some branches overlap the trunk and others leave it exposed.
Step 6: Add Highlights
Once the dark layer is dry or tacky, load the fan brush lightly with mid pine and then sunlit tips. Tap these only on the side facing the light and on the upper edges of each branch tier. Leave plenty of dark showing.
Round Brush Method for More Control
A round brush gives more varied, natural-looking branches, especially for larger foreground trees.
- Paint the trunk with a liner.
- With a size 2 or 4 round and deep pine, paint branches as short, downward-arching strokes radiating from the trunk. Make strokes jagged and irregular by wiggling the brush slightly.
- Build tiers from top to bottom, increasing branch length.
- Stipple the edges of branches with the brush tip to suggest needle clumps.
- Add mid and light greens on the lit side with smaller, broken strokes.
How to Paint Trees in the Distance Acrylic
Distant pines should take seconds each, not minutes. Detail in the distance confuses depth.
- Color: mix your pine green with ultramarine and white until it is only a few steps darker than the sky.
- Shape: simple, narrow spikes painted with a liner or the edge of a small flat: a vertical line, then a few tiny side-to-side wiggles widening toward the bottom.
- Group: paint them in clusters of varied heights, overlapping and touching.
- Edges: keep them soft; mist or glaze a little sky color over their bases.
For a three-layer forest, paint the farthest tree line in the palest mix, glaze a thin mist over it, paint a mid-distance line slightly darker, then paint a few detailed foreground pines in your darkest values.
How to Paint Snowy Pine Trees
- Paint the pine tree as usual in dark green and let it dry completely.
- Mix white with a tiny touch of ultramarine for shadowed snow and white with a touch of yellow ochre for sunlit snow.
- Using a fan brush, small filbert or palette knife, lay snow along the top of each branch tier, letting it sit like clumps and drifts. Keep the underside of branches dark.
- Use cool snow on the shadow side and warm snow on the lit side.
- Add a few small snow clumps on lower branches and a drift at the base.
Snow on pine branches should be concentrated on the upper surfaces. Painting white everywhere makes the tree look frosted rather than snow-laden.
Painting Trees in Acrylic: Other Common Shapes
Many searches for pine tree techniques come from painters building whole landscapes, so it helps to know how other trees differ in structure. The same principles of trunk first, branches second, dark before light still apply.
| Tree type | Silhouette | Brushwork |
|---|---|---|
| Pine / fir / spruce | Tall cone with tiered, drooping branches | Fan brush taps or short downward round strokes |
| Deciduous (oak, maple) | Rounded crown on a thick, branching trunk | Stippled foliage clumps with an old round or sponge; visible sky holes |
| Birch | Slender white trunks, light airy foliage | Knife-scraped white trunks with dark marks; dabbed small leaves |
| Palm | Tall curving trunk, radiating fronds | Liner for trunk rings; long tapered round strokes for fronds |
| Bare winter tree | Branching network, no foliage | Liner with thinned paint; branches taper and divide toward the tips |
Placing Pine Trees in a Composition
Pines are strong verticals, and a row of evenly spaced, equal-height trees looks like a fence. Group them in clusters of three, five or seven with varied heights. Let one tree be clearly tallest and place it off-center. Overlap trees so some are partly hidden. If the painting has a lake, reflect the foreground pines in slightly darker, softer shapes broken by a few horizontal strokes of water color. A single tall pine near one edge of a canvas can also frame a view, guiding the eye toward mountains or a sunset beyond it.
Pine Trees at Sunset and Night
At sunset, pines often become near-silhouettes against a glowing sky. Paint them in very dark green or blue-black, with only a few warm orange or red touches on the edges facing the sun. At night, paint them as solid dark shapes against a lighter sky, with perhaps a faint blue rim of moonlight.
Acrylic Tree Painting for Beginners: Practice Plan
- Session 1: Paint 10 small pine trees with a fan brush on scrap paper, varying size and shape.
- Session 2: Paint the same with a round brush. Compare the results.
- Session 3: Paint a three-layer forest: distant, middle and foreground.
- Session 4: Add snow or sunset lighting to a forest scene.
Using inks or fluid acrylics with a liner brush makes very fine distant trees easier. Our acrylic ink review discusses how inks perform in thin line work.
Caring for Your Fan Brush
Fan brushes clog easily because acrylic dries in the base of the bristles, which makes them splay unevenly and print blobs instead of needles. Rinse the brush frequently during painting rather than only at the end, and never let it sit loaded with paint for more than a few minutes. After the session, wash it with mild soap, reshape the fan with your fingers and let it dry flat. A slightly worn fan brush with a few uneven bristles is actually useful for pine texture, so keep an old one aside for that purpose.
How to Oil Paint Pine Trees vs. Acrylic
The basic structure and brushwork are the same in oil and acrylic. The main difference is drying time. Oil stays wet for hours or days, which allows wet-in-wet highlights directly into dark branches. With acrylic, you usually let the dark layer dry or become tacky before adding highlights, otherwise the colors mix and turn muddy. Acrylic’s speed is an advantage for layering forests quickly.
Common Mistakes When Painting Pine Trees
- Perfect triangles. Real pines are irregular, with uneven branches and gaps.
- Branches pointing up. Lower branches droop downward; only top branches angle up.
- Too much paint on the fan brush. Produces solid smudges instead of needle texture.
- Highlights everywhere. Keep highlights to one side and the upper edges.
- Same size and spacing. Vary tree heights and cluster them.
- Distant trees too dark or detailed. Lighten and simplify them.
- Using black for shadows. Mix dark greens with umber, alizarin or ultramarine instead.
Related Reading
FAQs
How to paint a pine tree easy?
Paint a thin vertical trunk, then tap short branches on each side with a fan brush, starting small at the top and getting wider toward the bottom. Add a few lighter green taps on one side for highlights.
What brush is best for pine trees in acrylic?
A fan brush is fastest for textured branches, while a small round brush gives more control and natural variation. A liner brush is ideal for trunks and distant trees.
How do I paint pine trees with acrylics for beginners?
Start with the fan brush method on scrap paper. Practice tapping branches with very little paint, keep lower branches drooping and add highlights only on one side.
What colors make pine tree green?
Phthalo green or sap green darkened with burnt umber or alizarin crimson makes a deep pine green. Add yellow and white for sunlit tips, and ultramarine plus white for distant trees.
How do I paint trees in the distance?
Use lighter, bluer greens close to the sky value, paint simple narrow shapes with a liner and keep edges soft. Avoid branch detail.
How do I add snow to painted pine trees?
After the green is dry, add white clumps along the top surfaces of each branch tier, using cool blue-white on the shadow side and warm white on the sunlit side.
Final Thoughts
Painting pine trees with acrylic paint is all about rhythm and restraint: a tapering trunk, irregular tiers of drooping branches, light on one side, and less detail with distance. Once you can paint a convincing single pine, forests, snowy scenes and sunset silhouettes follow quickly.
Deep, transparent greens are the backbone of conifer painting. When you are choosing tubes, see our ranking of top acrylic paint brands for landscape greens.





One Comment