If you want to bring your digital art to life with smooth blends and seamless transitions, mastering the Smudge Tool in Procreate is a game-changer. Whether you’re aiming for soft shading, realistic textures, or creative effects, this simple tool can transform your work instantly.
In this guide, you’ll discover how to use the Smudge Tool step-by-step, unlock its full potential, and avoid common mistakes that slow down your progress. Get ready to elevate your Procreate skills and create artwork that truly stands out—let’s dive in!
Credit: www.youtube.com
Smudge Tool Basics
The Smudge Tool in Procreate helps blend colors and soften edges. It mimics the effect of smudging real paint or pencil on paper. Using it well can add depth and smoothness to your artwork.
Understanding the basics of the Smudge Tool lets you control your strokes better. You can create subtle transitions or dramatic blends depending on your needs. The tool is easy to use once you know the key settings.
Activating The Smudge Tool
To start, tap the Smudge Tool icon. It looks like a pointing finger in the toolbar. This activates the tool and lets you use it on your canvas. You can smudge any layer or color you have drawn.
Tap the icon again to switch back to other tools. Remember, the Smudge Tool only works on existing paint or color on your canvas.
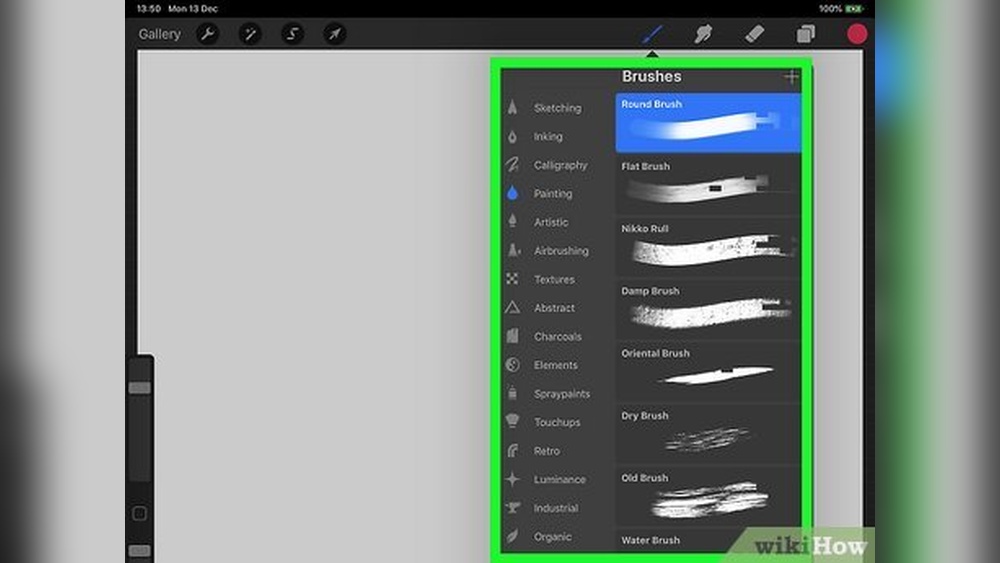
Choosing The Right Brush
The Smudge Tool uses brushes from the Brush Library. Tap the Smudge icon again to open brush options. Pick a brush that fits your style.
Soft brushes create smooth blends. Hard brushes keep textures and details. Experiment with different brushes to find the best effect.
Adjusting Size And Strength
Change the brush size by sliding the size control on the left. Larger sizes cover more area but may be less precise. Smaller sizes give you fine control.
Adjust strength to control how much the colors mix. Lower strength blends slowly and gently. Higher strength smudges colors quickly and strongly. Find the right balance for your artwork.
Techniques For Blending
Blending colors smoothly creates depth and realism in digital art. The Smudge Tool in Procreate offers several blending techniques. These methods help you control how colors mix and flow on your canvas. Understanding these techniques improves your artwork’s finish and texture.
Soft Blending With Low Opacity
Use a low opacity setting for gentle color transitions. This technique softly merges colors without harsh lines. It works well for subtle shading and light gradients. Set the Smudge Tool’s strength low to keep colors delicate. Move the tool slowly to build soft layers gradually.
Bold Smudging With High Pressure
Apply high pressure for strong color mixing effects. This method creates bold, vivid blends with intense color flow. It suits areas needing dramatic texture or deeper shadows. Increase the Smudge Tool’s opacity and press firmly on the screen. Quick, confident strokes help push colors together sharply.
Using Circular And Back-and-forth Strokes
Combine circular and back-and-forth motions to blend with control. Circular strokes swirl colors smoothly, ideal for rounded shapes and curves. Back-and-forth strokes spread colors linearly, good for edges and flat surfaces. Switching between these strokes adds variety and natural feel to blending. Experiment to find the best stroke for each part of your artwork.
Customizing Smudge Brushes
Customizing smudge brushes in Procreate lets you create unique blending effects. This flexibility improves your artwork’s texture and depth. Each setting changes how colors mix and move on the canvas. Adjusting these options helps you find the perfect smudge style for your project.
Adjusting Brush Spacing
Brush spacing controls how close the brush marks are. Lower spacing creates smoother blends with less visible brush strokes. Higher spacing shows more texture and detail. You can change spacing in the brush settings under “Stroke.” Try different values to see how spacing affects the smudge.
Modifying Smudge Pull Settings
Smudge pull adjusts how far the colors stretch when you drag the brush. A high pull value makes colors flow longer, creating soft transitions. A low pull keeps the smudge tight and controlled. Adjust this in the brush settings to match the style you want for blending edges or details.
Creating Custom Smudge Brushes
Procreate allows you to design your own smudge brushes from scratch. Start by duplicating an existing smudge brush. Then change the shape, grain, and dynamics for unique effects. Save your custom brush for easy access later. This helps keep your workflow smooth and your blends consistent.

Credit: designbundles.net
Layer Management Tips
Managing layers effectively boosts your smudging work in Procreate. Proper layer control keeps your artwork clean and flexible. It also protects original colors and details during blending. Use these tips to organize layers and make smudging easier.
Blending On Separate Layers
Create a new layer for smudging instead of working directly on the original layer. This keeps your base artwork safe from accidental changes. You can blend colors on this separate layer and adjust its opacity for subtle effects. This method allows easy correction without losing your original strokes. It also helps in comparing before and after smudging with a quick toggle of the layer visibility.
Using Clipping Masks For Targeted Blending
Clipping masks restrict smudging effects to specific areas. Place a smudge layer above the base layer and clip it to the base. This limits blending to the visible pixels of the base layer only. Use this to blend shadows, highlights, or details without affecting the entire artwork. Clipping masks keep your smudging precise and clean. They help maintain sharp edges while smoothing only selected parts.
Common Smudge Effects
The Smudge tool in Procreate offers various effects that enhance digital art. It helps blend colors smoothly or create unique textures. These common smudge effects add depth and realism to your artwork. Understanding how to use them can improve your drawing and painting skills.
Smooth Gradient Transitions
Smooth gradient transitions blend colors gently. Use a soft brush with low pressure for this effect. Drag the Smudge tool lightly across colors to merge them. This creates a natural fade from one color to another. It works well for skies, skin, and backgrounds. Adjust the brush size for more control over blending.
Textured Smudge Effects
Textured smudge effects add roughness or detail to your art. Choose brushes with grainy or patterned tips in the Smudge library. Smudge over your strokes to mix colors without losing texture. This method suits rocks, fabric, and hair. Vary the pressure to keep some original brush marks visible. It adds an organic feel to digital paintings.
Simulating Wet Paint
Simulating wet paint creates a fluid, fresh look. Use a wet brush from the Smudge tool settings. Smudge colors while they are still bright and thick. This mimics the way paint spreads on a canvas. Work quickly for best results, as wet paint looks smooth but lively. This effect is ideal for flowers, water, and abstract art.
Troubleshooting Smudge Issues
Troubleshooting smudge issues in Procreate helps create better blending results. Sometimes smudges look rough or uneven. Other times, strokes don’t blend as smoothly as expected. Adjusting settings and techniques improves your artwork. This section guides you through common smudge problems and fixes.
When Blending Looks Harsh
Harsh blending happens when colors don’t mix softly. It creates sharp edges instead of smooth transitions. This occurs if the smudge strength is too high. Lowering the smudge strength softens the effect. Also, check your brush type. Some brushes produce rough smudges. Use softer brushes for gentle blending. Try smudging slowly to avoid dragging colors harshly. Small, circular motions help mix colors evenly.
Improving Smoothness
Smooth blending takes practice and control. Adjust your finger or Apple Pencil pressure. Light pressure blends colors gently. Heavy pressure moves colors too quickly, causing roughness. Try smudging in layers instead of one pass. Multiple light strokes create smoother results. Zoom in on your work for better control. Work on small areas at a time to avoid uneven smudging. Patience helps achieve perfect smoothness.
Optimizing Brush Settings
Brush settings greatly affect smudge quality. Open the Brush Library and select the Smudge tool. Adjust brush size for detailed or broad strokes. Small brushes work well for fine details. Change the spacing to control how the brush applies smudge. Lower spacing gives a continuous effect. Increase the streamline setting to smooth brush movement. Experiment with different brushes designed for smudging. Customize settings until you find what works best.
Advanced Smudge Applications
The Smudge Tool in Procreate offers more than basic blending. Advanced techniques help artists create rich textures and smooth transitions. These methods bring depth and realism to your digital art. Experiment with different brushes and settings for unique effects. Below are some ways to use the Smudge Tool beyond simple blending.
Blending Colors Like Oil Paint
Use the Smudge Tool to mimic the look of oil paint. Start with thick, vibrant colors on your canvas. Smudge gently in small circles to blend edges softly. This technique creates smooth color transitions with a textured feel. Adjust the brush size and strength to control the blending effect. The result is a natural, painterly style that adds warmth and depth.
Combining Smudge With Other Tools
Pair the Smudge Tool with brushes and erasers for detailed effects. After painting, use the Smudge Tool to soften harsh lines or blend colors. Switch to the eraser to clean edges or add highlights. This combination enhances the realism of your artwork. Experiment with layers to smudge only certain parts. It helps create complex, layered looks with ease.
Using Smudge In Calligraphy And Lettering
The Smudge Tool adds smooth curves and flow to lettering. After drawing letters, use smudging to blend strokes subtly. This softens rigid edges and adds style to your calligraphy. Adjust brush strength to keep control over the effect. Smudging can also create shadow and depth in letters. It improves the overall polish and professionalism of your designs.

Credit: www.wikihow.com
Frequently Asked Questions
How To Use The Blending Tool On Procreate?
Tap the Smudge tool icon in Procreate’s toolbar. Choose a blending brush from the Brush Library. Drag your finger or stylus over colors to blend smoothly. Adjust brush size and strength for desired effect. Use lower opacity for soft blending or higher for stronger smudges.
How Does The Smudge Tool Work?
The smudge tool blends colors by dragging existing pixels on the canvas. Adjust brush size and strength for smooth or strong effects. Select a smudge brush, then drag your finger or stylus to create seamless color transitions and realistic blending.
How To Smudge What You’ve Drawn In Procreate?
Tap the Smudge tool icon, choose a brush from the Brush Library, then drag your finger or stylus over your drawing to blend colors smoothly. Adjust brush size and strength for desired effects.
How To Use Smudge Tool To Blend?
Select the smudge tool and choose a soft brush. Drag gently over colors to blend edges smoothly. Adjust strength for desired blending effect.
Conclusion
Using the Smudge Tool in Procreate helps you create smooth color transitions. Adjust the brush size and strength for different effects. Practice blending with simple strokes to improve your skills. This tool adds depth and softness to your artwork. Keep experimenting to find your favorite blending style.
The Smudge Tool is easy to use and very useful. Try it today to enhance your digital paintings.