Have you ever wanted to create something beautiful that also helps you relax and focus? DIY mandala rock painting is the perfect way to do just that.
With just a few simple tools and some colorful paints, you can transform plain rocks into stunning pieces of art. Imagine holding a smooth, hand-painted mandala stone that you made yourself—each dot and pattern reflecting your creativity and calm. In this guide, you’ll discover easy steps to start your own mandala rock painting project, even if you’ve never painted before.
Ready to unlock your artistic side and enjoy a fun, stress-relieving hobby? Let’s dive in!
Materials Needed
Gathering the right materials is the first step for a successful mandala rock painting project. Choosing suitable rocks and paints makes the process smooth and enjoyable. Having the right tools helps you create neat, detailed designs. Below is a list of what you need to get started.
Choosing The Right Rocks
Select smooth, flat rocks for easy painting. River rocks work well because they have a nice surface. Avoid rough or porous stones that absorb paint unevenly. Look for medium-sized rocks that fit comfortably in your hand. Clean the rocks with soap and water before painting. Let them dry completely to ensure paint sticks properly.
Essential Painting Supplies
Use acrylic paints for bright, long-lasting colors. Choose a variety of colors to make your mandala vibrant. Get small paintbrushes with fine tips for detail work. Dotting tools help create perfect dots and patterns. A palette or plate is useful for mixing colors. Seal your finished design with clear varnish to protect it from damage.
Optional Tools For Details
Fine-tip markers add precision to your mandala lines. Toothpicks or cotton swabs work well for tiny dots. Stencils can help if you want consistent shapes. A pencil is handy for sketching your design lightly before painting. Keep paper towels nearby to clean mistakes quickly.
Preparing Your Rock
Preparing your rock is the first important step in DIY mandala rock painting. A well-prepared surface helps your paint stick better and last longer. It also makes your design look clean and smooth. Taking time to prepare the rock will improve your final art piece.
Cleaning And Drying
Start by washing your rock with warm water and soap. Use a brush to remove dirt and dust. Rinse the rock well to clear all soap. Let the rock dry completely before painting. A dry rock prevents paint from slipping or peeling.
Smoothing The Surface
Use sandpaper to smooth rough or bumpy areas. Sanding creates an even surface for your paint. Wipe the rock with a cloth to remove dust after sanding. Smooth rocks make painting dots and lines easier and neater.
Priming For Paint
Apply a thin coat of white acrylic paint or primer. This base layer helps colors appear brighter. Let the primer dry fully before starting your mandala design. Priming prevents the paint from soaking into the rock and fading.
Basic Dot Mandala Technique
The basic dot mandala technique is a simple way to create beautiful patterns on rocks. It uses small dots arranged in circles that grow outward. This method is perfect for beginners. It helps you practice control and symmetry while making stunning designs. Follow these steps to start your mandala rock painting journey.
Creating The Center Dot
Begin with a clean, dry rock. Choose a color that stands out. Dip your dotting tool into the paint. Place one large dot in the center of the rock. This dot is the base of your mandala. Let it dry before moving to the next step. A steady hand helps make a neat center dot.
Adding Concentric Circles
After the center dot dries, start adding circles around it. Use smaller dots placed evenly in a circle. Each circle should have dots spaced the same distance apart. Change colors to make the design more vibrant. Keep the dots consistent in size for a balanced look. Work from the inside out, adding more circles as you go.
Using Dotting Tools Effectively
Dotting tools come in different sizes for varied dot sizes. Use bigger tools for large dots and smaller ones for detail. Dip the tool lightly into the paint to avoid blobs. Practice on paper to get used to the pressure needed. Clean the tool between colors to keep dots clear. Holding the tool straight helps make perfect round dots.

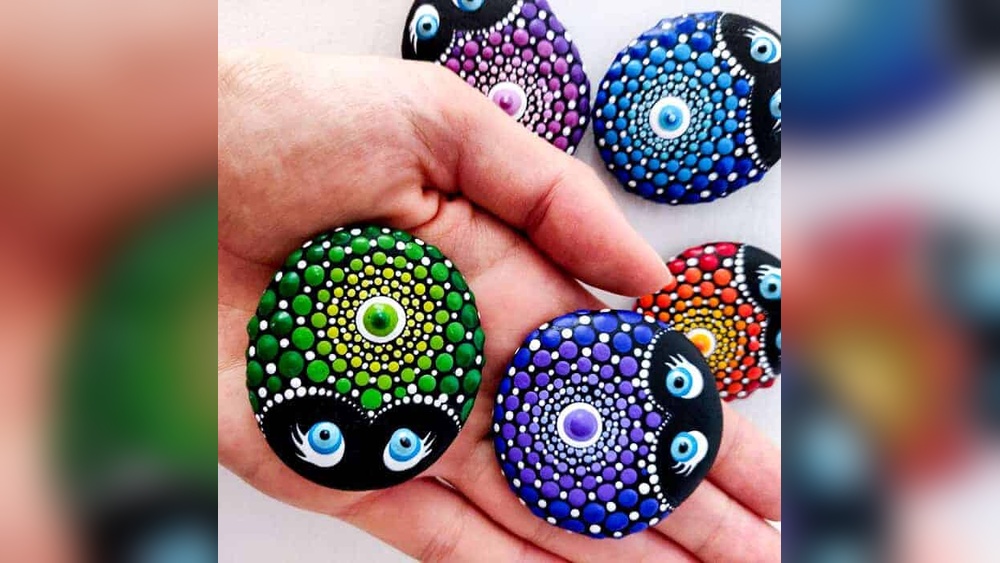
Credit: www.youtube.com
Color Selection And Mixing
Selecting and mixing colors is key to creating stunning mandala rock art. Colors bring your design to life and set the mood. The right choices make your mandala eye-catching and balanced.
Understanding color basics helps you blend and layer paints smoothly. This section guides you through picking palettes and crafting gradients for vibrant results.
Choosing A Color Palette
Start with a few main colors. Pick shades that match your style and the rock’s shape. Use three to five colors for harmony.
Consider color schemes like complementary, analogous, or monochromatic. Complementary colors pop, while analogous colors blend softly.
Test colors on paper or a practice rock. Check how they look together before painting your mandala.
Blending And Layering Paint
Use thin layers for smooth coverage. Let each layer dry before adding the next to avoid smudges.
Blend colors by adding small amounts of one color into another. Use a small brush or dotting tools for control.
Layer light colors over dark ones to make designs stand out. Dark outlines and light dots create depth and interest.
Creating Color Gradients
Gradients add flow and dimension to your mandala. Start with the darkest shade and gradually add lighter tones.
Work in small sections, blending edges carefully. Use a damp brush or sponge for smooth transitions.
Try dotting colors side by side, then blending with a tool. This technique gives a soft, fading effect.
Step-by-step Painting Process
Creating a mandala rock painting can be a relaxing and rewarding craft. The process breaks down into clear, easy steps. This guide will help you paint your mandala with confidence and creativity. Follow each stage carefully to build a beautiful design.
Sketching The Design Outline
Begin by cleaning the rock surface. Use a pencil to sketch a simple circle in the center. Draw light lines to mark the main sections of your mandala. These guidelines help keep your design balanced. Avoid pressing too hard to keep lines easy to erase later.
Applying The First Layer
Choose a base color for your mandala. Apply this paint evenly over the entire rock. Let it dry completely before moving on. A smooth base layer makes your design stand out. Use acrylic paints for bright, lasting colors.
Building Up Patterns
Start adding shapes and dots from the center outward. Use dotting tools or the back of paintbrushes for neat circles. Repeat patterns in each section to create symmetry. Work slowly and allow layers to dry between steps. This builds depth and complexity.
Adding Fine Details
Use a fine-tipped brush for tiny dots and lines. Add small accents to enhance the design’s beauty. Choose contrasting colors to highlight details. Take your time for precision. Finish with a clear sealant to protect your artwork.
Finishing Touches
Finishing touches bring your mandala rock painting to life. These final steps ensure your artwork looks polished and lasts long. Careful attention now protects your effort and enhances beauty. Follow these simple tips to complete your project perfectly.
Correcting Mistakes
Small errors can happen during painting. Use a fine brush dipped in matching paint to fix spots. Let each correction dry before adding more layers. For stubborn mistakes, gently scrape off paint with a toothpick. Take your time to keep the design neat and clean.
Applying Varnish For Protection
Varnish shields your mandala from water and fading. Choose a clear, non-yellowing varnish for best results. Apply thin, even coats with a soft brush or spray. Cover the entire painted surface and edges. Two or three coats give strong protection and a smooth finish.
Drying And Curing Tips
Let varnished rocks dry in a dust-free area. Avoid touching the surface until fully dry. Drying times vary by varnish type, usually several hours. For best durability, cure rocks for 24-48 hours before handling. Proper drying ensures your mandala stays vibrant and intact.
Creative Variations
Creative variations add excitement and personality to your mandala rock painting. They allow you to explore new styles and experiment with colors and shapes. Trying different techniques keeps the craft fresh and fun. These variations can make your artwork unique and eye-catching.
Explore these ideas to bring your mandala rocks to life with creativity and style. Each variation offers a new way to express your artistic vision.
Incorporating Different Shapes
Mandala rocks are not limited to dots and circles. Try using triangles, squares, or hearts in your patterns. Mixing shapes creates interesting textures and designs. Use these shapes to build layers or borders around the mandala. This technique adds depth and complexity to your artwork. It also challenges your skills and imagination.
Using Metallic And Glow Paints
Metallic paints bring a shiny, reflective quality to your mandalas. Gold, silver, and bronze colors catch the light beautifully. Glow-in-the-dark paints add a magical touch after sunset. These paints highlight details and create contrast. They make your mandala rocks stand out in any setting. Use them sparingly to emphasize key parts of the design.
Combining Mandalas With Other Art Styles
Blend mandalas with styles like watercolor, abstract, or tribal art. Paint backgrounds with soft washes of color before adding mandala details. Add tribal patterns alongside your circular designs for a bold look. Use abstract shapes to break the symmetry and create movement. This fusion results in unique, modern artwork. It also expands your creative boundaries and skills.

Credit: www.doodlecraftblog.com
Displaying And Gifting
Displaying and gifting your DIY mandala rock paintings brings extra joy to this creative journey. These colorful artworks brighten spaces and create personal, heartfelt gifts. Thoughtful presentation enhances their charm and value. Taking care of your painted rocks ensures their beauty lasts for years. Here are some useful tips for showcasing, packaging, and preserving your mandala rocks.
Ideas For Showcasing Your Art
Place your mandala rocks on small stands or shelves. Use clear glass bowls or trays to create a colorful display. Arrange them in groups by size or color for visual appeal. Add your rocks to garden beds or potted plants for a natural look. Use them as paperweights on your desk to brighten your workspace. Rotate your display often to keep it fresh and interesting.
Packaging For Gifts
Wrap your mandala rock in tissue paper to protect the paint. Use small boxes or drawstring bags for an elegant touch. Add a handwritten note to make the gift personal. Include a small card explaining the mandala design’s meaning. Use eco-friendly packaging to show care for the environment. Secure the package with ribbon or twine for a charming finish.
Care Instructions For Longevity
Keep painted rocks out of direct sunlight to prevent fading. Avoid placing them in harsh weather or extreme temperatures. Clean gently with a soft, damp cloth if dust collects. Do not use harsh chemicals or abrasive cleaners. Apply a clear sealant every few months for extra protection. Store indoors during winter or bad weather to keep paint fresh.
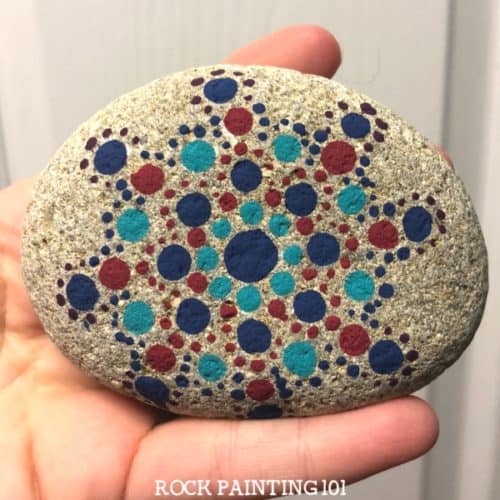
Credit: rockpainting101.com
Frequently Asked Questions
What Materials Are Needed For Diy Mandala Rock Painting?
You need smooth rocks, acrylic paints, dotting tools or Q-tips, a pencil, and sealant for durability. Clean rocks before painting for best results.
How Do You Start Painting A Mandala On Rocks?
Begin by drawing a small dot or circle in the center. Use dotting tools to create symmetrical patterns radiating outward.
What Painting Techniques Work Best For Mandala Rocks?
Dotting with tools or Q-tips creates precise circles. Layer colors carefully and let each dry before adding details for a clean design.
How Can I Protect My Mandala Rock Painting?
Apply a clear varnish or sealant once the paint is dry. This protects the design from fading and weather damage.
Conclusion
Creating your own mandala rock painting brings calm and joy. Each dot and color adds a personal touch. Practice helps you improve your design and technique. Use simple tools and colors to start with confidence. Enjoy the creative process without rushing the steps.
Display your painted rocks or gift them to friends. This craft suits all ages and skill levels alike. Start painting today and watch your art come alive.