
Have you ever wanted to create stunning digital portraits but thought you needed expensive tools or a big computer? What if you could turn your phone into a powerful art studio, right in your pocket?
Painting digital portraits on your phone is easier than you think, and it opens up a world of creativity wherever you go. In this guide, you’ll discover simple steps and insider tips to help you bring your portraits to life using just your phone.
Ready to transform your art and surprise yourself with what you can create? Let’s dive in!
Choosing The Right App
Choosing the right app is the first step in painting digital portraits on your phone. The app you select affects your tools, ease of use, and final artwork quality. Many apps offer unique features that suit different skill levels and styles. Picking an app that fits your needs helps you create better portraits and enjoy the process more.
Top Free And Paid Apps
Free apps like Autodesk SketchBook and MediBang Paint offer solid tools for beginners. They include brushes, layers, and easy interfaces. For advanced features, paid apps like Procreate Pocket and Adobe Fresco provide more brushes and better control. These apps often get regular updates and support. Choose an app that matches your budget and skill level.
Features To Look For
Look for apps with layers to separate parts of your portrait. A good color picker and blending tools help create smooth skin tones. Undo and redo options save you from mistakes. Customizable brushes allow you to create different textures. User-friendly interfaces make drawing easier on small phone screens.
Pen Pressure Compatibility
Pen pressure sensitivity lets you control line thickness and opacity. This feature mimics real drawing tools and improves portrait details. Some apps support pressure with specific styluses or phones. Check if your phone and stylus work with the app. Apps like Procreate Pocket excel in pen pressure support for better artwork.
Credit: www.adamidis-art.com
Setting Up Your Workspace
Setting up your workspace is the first step to paint digital portraits on your phone. A clean and well-organized digital workspace helps you focus on your art. It improves your workflow and saves time. Preparing your canvas, layers, and brushes carefully can make your painting process smooth and enjoyable.
Canvas Size And Resolution
Choose a canvas size that fits your project. A larger canvas lets you add more details. Set the resolution to at least 300 dpi for sharp images. High resolution keeps your portrait clear when zoomed in. Keep in mind that very large files can slow down your phone.
Organizing Layers
Use layers to separate parts of your portrait. For example, create different layers for the skin, hair, and background. Name each layer for easy identification. Lock layers that you don’t want to change. This method helps you fix mistakes without ruining your whole work.
Customizing Brushes
Pick brushes that suit your style and portrait type. Many apps let you change brush size, opacity, and texture. Save your favorite brush settings to speed up your work. Experiment with different brushes to find what works best for shadows and highlights.
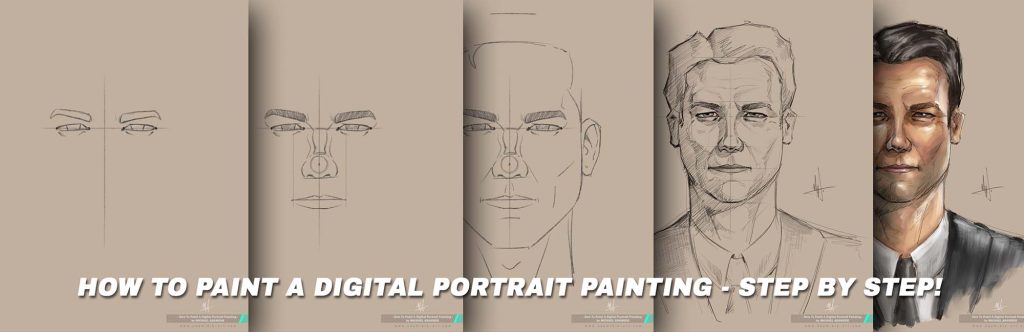
Sketching The Portrait
Sketching the portrait is the first step in creating digital art on your phone. It helps build the foundation of your portrait. A good sketch guides your painting and improves the final result.
Focus on simple shapes and correct proportions. Keep your lines light and loose. This stage is about capturing the basic look and feel of the face.
Basic Shapes And Proportions
Start by drawing simple shapes like circles and ovals. These shapes represent the head, eyes, nose, and mouth. Use lines to mark the center and eye level. This helps keep the face balanced. Check that the eyes, nose, and mouth are in the right places. Avoid details at this stage. Just capture the general form and size.
Using Reference Photos
Choose clear photos with good lighting for reference. Study the photo closely while sketching. Notice the angles and shapes of the face parts. Use your phone screen to zoom in and see details. This makes your sketch more accurate. Reference photos help you understand the face better. They guide you to draw realistic portraits.
Refining The Sketch
After the basic shapes are set, start refining. Add curves and smooth lines to replace rough shapes. Focus on the eyes, nose, and lips for more detail. Erase unnecessary lines to clean the sketch. Keep your strokes light for easy changes. This step prepares your sketch for painting. The cleaner the sketch, the better your colors and shadows will fit.
Adding Base Colors
Adding base colors is the first step in creating a digital portrait on your phone. It sets the foundation for your painting and helps define the overall mood. By applying the main colors early, you create a clear structure to build upon. This stage focuses on broad areas of color rather than details.
Base colors bring life to your portrait. They allow you to see how different tones interact. Starting with simple color blocks makes it easier to add depth later. Use a medium-sized brush for smooth coverage without too many strokes.
Choosing Skin Tones
Select skin tones that match your subject’s natural color. Use warm colors like peach, pink, or light brown for a healthy look. For cooler skin tones, try soft blues or purples. Blend colors softly to avoid harsh lines. Keep your palette limited to a few shades for a natural feel.
Blocking In Shadows And Highlights
Identify where light hits the face and where shadows fall. Use darker colors for shadows under the chin, around the nose, and below the cheekbones. Add lighter colors on the forehead, nose bridge, and cheek tops. Blocking in these areas early gives your portrait shape and volume.
Using Color Palettes
Use pre-made color palettes or create your own for consistency. A good palette keeps your colors balanced and harmonious. Pick colors that work well together and fit the portrait’s mood. Save your palette in the app for quick access during painting. This saves time and keeps your colors uniform.
Detailing And Shading
Detailing and shading bring depth and life to digital portraits on your phone. These steps highlight the tiny elements that make a portrait realistic and engaging. Careful attention to shading adds volume and dimension to flat images.
Focus on smooth transitions and subtle color shifts. This makes the skin and features appear natural and soft. Proper detailing helps capture the personality and mood of the subject.
Blending Techniques
Blending smooths harsh edges between colors and shades. Use soft brushes to gently mix colors on your canvas. Layer colors lightly and blend gradually for a natural look. Experiment with different brush opacities to find what suits your style. Many apps offer smudge tools that mimic real paint blending. Work slowly and build your shading in small steps.
Painting Facial Features
Facial features need precise shapes and correct proportions. Start with the eyes, nose, and lips using simple shapes. Add small highlights to eyes to bring them to life. Shade around the nose to create depth and form. Lips look fuller with gentle gradient shading. Keep strokes light and avoid heavy lines for softer effects.
Creating Realistic Textures
Textures make skin and hair look believable. Use fine brush strokes to mimic hair strands. Apply tiny dots or lines for skin pores and freckles. Avoid over-detailing; suggest texture with subtle marks. Adjust brush size and pressure to vary texture intensity. Layer these details lightly over your base colors for best effect.

Credit: www.youtube.com
Enhancing With Effects
Enhancing your digital portrait with effects gives it depth and personality. Effects help your artwork stand out and feel more alive. Simple additions can change the mood and focus of your portrait. Use effects thoughtfully to bring out your style and vision.
Light And Shadow Play
Adding light and shadows creates a three-dimensional look. Use soft brushes to paint light spots on the face. Shadows add depth, making features more realistic. Adjust brightness to highlight key areas like eyes and lips. Play with contrast to set the mood and time of day.
Adding Background Elements
Backgrounds give context to your portrait. Keep it simple to avoid distraction from the main subject. Use gradients or soft colors for a smooth backdrop. Add subtle patterns or shapes that match the portrait’s theme. Background elements can tell a story or add emotion.
Using Filters And Overlays
Filters change the overall tone and style of your portrait. Try black and white or sepia for a classic look. Overlays add texture, like grain or light leaks, for artistic effects. Adjust opacity to keep the portrait clear and balanced. Experiment with different filters to find your favorite effect.
Final Touches
Final touches bring your digital portrait to life. This stage refines details and improves overall look. Small changes can create big impact. Focus on cleaning edges, adjusting colors, and saving your work correctly. These steps ensure your portrait looks polished and professional.
Cleaning Edges
Check the outline of your portrait carefully. Use a soft eraser tool to remove rough or stray marks. Zoom in to see edges clearly. Smooth lines make your portrait neat and clear. Avoid harsh or jagged edges for a natural look.
Adjusting Colors And Contrast
Colors can change the mood of your portrait. Use color adjustment tools to balance tones. Increase or decrease brightness and contrast for depth. Enhance skin tones and shadows for realism. Simple tweaks make your portrait vibrant and eye-catching.
Saving And Exporting
Save your work often to prevent data loss. Export your portrait in high resolution for best quality. Choose common file types like PNG or JPEG. Adjust file size for sharing on social media or print. Proper saving keeps your digital art safe and ready to show.
Tips For Better Results
Getting better at painting digital portraits on your phone takes focus and the right approach. Small changes in your practice can lead to big improvements. The tips below help you build skills and creativity step by step.
Practicing Regularly
Practice is the key to improving your digital portraits. Set aside time each day to draw and paint. Short sessions work well if you stay consistent. Repeating techniques helps your hand become steady. You will see progress in line work and shading.
Try to finish simple portraits often. Each finished piece teaches something new. Don’t worry about mistakes. They are part of learning and growth.
Learning From Tutorials
Tutorials offer valuable lessons for all skill levels. Follow step-by-step videos or guides on digital painting apps. They show useful tools and tricks you might miss. Focus on tutorials that explain portrait basics like proportions and colors.
Watch how artists layer colors or create skin tones. Pause and try techniques yourself on your phone. This hands-on learning builds confidence and skill fast.
Experimenting With Styles
Trying different styles keeps your art fresh and fun. Explore realistic, cartoon, or abstract portraits. Each style has unique challenges and ways to paint. Playing with styles helps you find what suits you best.
Use various brushes and colors to change your portraits’ look. Experimenting helps you understand digital tools more deeply. It also sparks creativity and personal expression in your work.
Credit: www.adamidis-art.com
Frequently Asked Questions
Can I Draw Digital Art On My Phone?
Yes, you can draw digital art on your phone using various apps. Some phones support pen pressure for precise strokes. Choose apps like Procreate or Ibis Paint for better features. Drawing on a phone is convenient and accessible for artists at any skill level.
What Is The 70 30 Rule In Drawing?
The 70 30 rule in drawing suggests dedicating 70% of effort to observation and 30% to actual sketching. This balance improves accuracy and creativity.
What Is The 80/20 Rule In Painting?
The 80/20 rule in painting means focusing 80% effort on key areas and 20% on details to create balanced artwork.
Is There A Free App That Turns A Picture Into A Painting?
Yes, free apps like Prisma and PicsArt turn photos into paintings with artistic filters. They work on both Android and iOS.
Conclusion
Painting digital portraits on your phone is simple and fun. Start with basic tools and practice daily. Experiment with colors and shading to bring your art to life. Use layers to correct mistakes easily and add depth. Stay patient and enjoy each step of your creative journey.
Your skills will grow with time and effort. Keep exploring different apps and techniques to find what suits you best. Digital portrait painting on a phone opens new ways to express your creativity anywhere.


