
If you want your digital paintings to pop with realistic depth and dimension, mastering perspective is key—and Procreate makes it easier than ever. Imagine creating stunning scenes where buildings, roads, and objects naturally draw the eye, making your artwork feel alive.
In this guide, you’ll learn simple steps to use Procreate’s perspective tools to transform flat sketches into dynamic, three-dimensional masterpieces. Whether you’re a beginner or looking to sharpen your skills, this article will help you unlock new creative possibilities and bring your art to the next level.
Ready to see your paintings in a whole new light? Let’s dive in.

Credit: www.youtube.com
Procreate Perspective Tools
Procreate offers useful perspective tools that help artists create realistic depth. These tools make it easy to draw objects that appear three-dimensional. Understanding how to use the perspective tools will improve your artwork.
The perspective tools include a special grid and adjustable vanishing points. These features guide your drawing and keep lines aligned. Using these tools saves time and makes your art look professional.
Accessing Drawing Guides
Open Procreate and tap the Actions menu (wrench icon). Select “Canvas” and then choose “Edit Drawing Guide.” This opens the Drawing Guides screen where you can set up grids. Drawing Guides help you keep your artwork neat and accurate.
Activating Perspective Grid
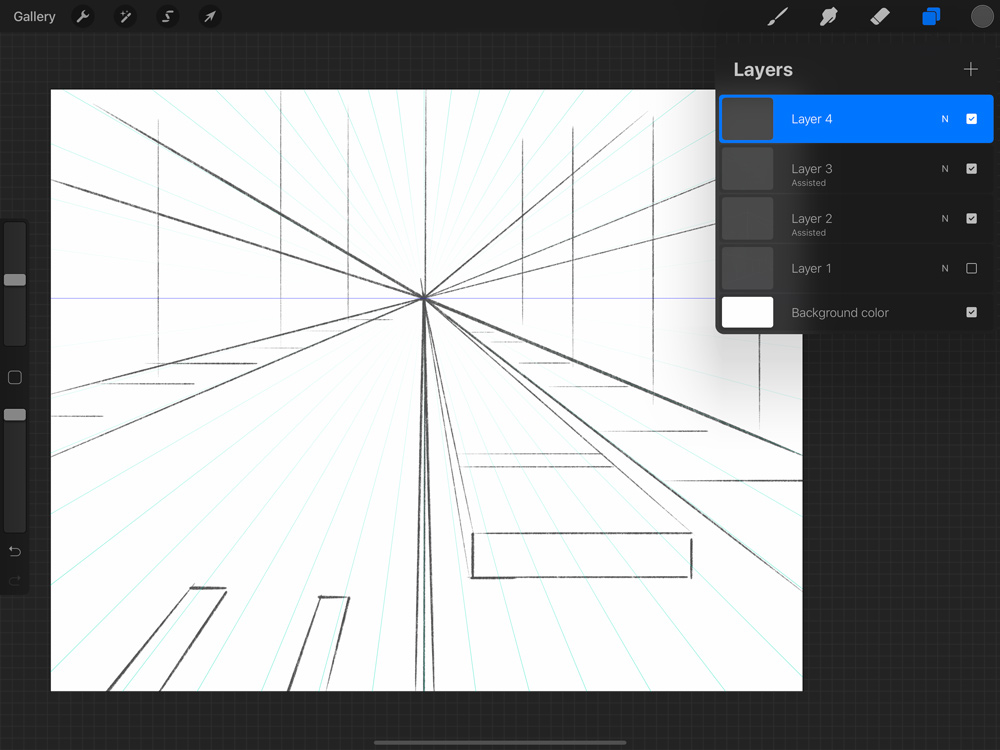
In the Drawing Guides screen, tap “Perspective” at the bottom. This changes the grid to a perspective grid with lines converging to vanishing points. The perspective grid helps you draw objects that get smaller as they go back in space.
Adjusting Vanishing Points
Drag the vanishing points to set the direction and depth of perspective. You can create one-point, two-point, or three-point perspectives by moving these points. Adjusting vanishing points controls how your objects appear in space.
Setting Up Perspective
Using Drawing Assist in Procreate is a simple way to create accurate perspective drawings. This feature helps your strokes follow the perspective lines automatically. It makes drawing buildings, roads, and other objects easier and more precise. Drawing Assist saves time and improves your artwork’s quality.
Enabling Drawing Assist Mode
First, open your Procreate canvas. Tap the Actions menu, then go to Canvas. Select Edit Drawing Guide. Choose the Perspective option at the bottom. Set one, two, or three-point perspective grids based on your needs. Tap Done to apply the guide. Now, select the layer where you want to draw. Tap the layer thumbnail, then enable Drawing Assist. Your strokes will now snap to the perspective grid.
Snapping Strokes To Perspective
With Drawing Assist on, your brush strokes follow the perspective lines automatically. This helps keep objects aligned and proportional. Draw straight lines easily along the vanishing points. It prevents mistakes like skewed or off-angle shapes. You can create complex structures faster. Adjust the grid anytime for different perspectives. Drawing Assist works best with simple brushes for clean lines.
Tips For Smooth Lines
Use quick, confident strokes for better results. Avoid slow, shaky movements that may cause rough edges. Choose a brush with stabilizer settings to smooth your lines. Zoom in to work on details carefully. Lower the brush size for precise control. Practice on separate layers before adding final details. Use the undo button if a line looks off. These tips improve your perspective drawing’s clarity and flow.
Using Drawing Assist
Perspective painting in Procreate can be tricky. Many artists face common challenges that slow down their progress. These challenges include fixing distorted objects, managing complex scenes, and balancing realism with style. Knowing these issues helps you prepare and improve your work.
Fixing Distorted Objects
Objects often look stretched or squashed in perspective. This happens when the vanishing points are not set correctly. You can fix distortion by adjusting the perspective grid. Use Procreate’s Perspective Tool to align objects properly. Check the angles and proportions regularly. Small changes prevent big mistakes.
Managing Complex Scenes
Complex scenes have many objects at different distances. It can be hard to keep all elements in correct perspective. Break the scene into smaller parts. Focus on one section at a time using layers. Use multiple vanishing points for better depth. Simplify details to avoid confusion. This approach keeps your painting organized and clear.
Balancing Realism And Style
Perfect perspective can look too stiff or lifeless. Artistic style often needs some freedom from strict rules. Find a balance between accuracy and creativity. Use perspective as a guide, not a limit. Experiment with exaggeration to add emotion or interest. This balance makes your work unique and engaging.

Credit: www.reddit.com
Building Depth And Dimension
Efficiency is key when painting with perspective in Procreate. Using smart techniques saves time and improves results. These pro tips help you work faster without losing quality. They simplify complex tasks and keep your workflow smooth.
Try these tricks to speed up your perspective painting and keep your focus on creativity. They are easy to apply and make a big difference.
Using Quickshape For Perfect Lines
QuickShape helps you draw straight lines easily. Draw a line and hold your pen on the screen. Procreate will snap the line into a perfect shape. Use this to create sharp edges and clean perspective lines. It reduces the need to erase or redraw. This tool works well for grids and architectural details.
Duplicating And Transforming Elements
Save time by copying parts of your painting. Select an object and duplicate it to reuse elsewhere. Use the transform tool to scale or rotate duplicates. This keeps perspective consistent and avoids redrawing similar shapes. It speeds up work on complex scenes with repeating patterns or objects.
Saving Custom Perspective Grids
Create your own perspective grids for specific scenes. After setting up a grid, save it as a custom guide. Load this grid in other projects to maintain style and accuracy. Custom grids reduce setup time and ensure uniform perspective across artworks. This tip helps keep your workflow organized and consistent.
Mastering Perspective Painting
Exploring perspective painting in Procreate opens many creative doors. Trying different projects helps sharpen your skills. It also keeps your art fresh and exciting. These inspiring perspective projects can guide your next digital painting session.
Urban Landscapes
Urban landscapes are perfect for practicing perspective in Procreate. Buildings, streets, and sidewalks create natural lines. Use one-point or two-point perspective for realistic depth. Try adding cars and people to bring scenes alive. Play with light and shadow to enhance dimension. Urban scenes offer many details that improve your skill.
Interior Spaces
Painting interior spaces sharpens your understanding of angles and space. Rooms, furniture, and windows all follow perspective rules. Use Procreate’s perspective guides to position objects correctly. Focus on walls and floors converging to vanishing points. Include small details like lamps and books for realism. Interiors challenge you to think about depth in close quarters.
Fantasy Worlds
Fantasy worlds let you combine imagination with perspective techniques. Castles, floating islands, and strange creatures can follow perspective rules. Use perspective to create dramatic scenes and epic views. This genre encourages creative freedom with structured depth. Experiment with unusual angles and exaggerated forms. Fantasy projects make learning perspective fun and adventurous.
Credit: bardotbrush.com
Frequently Asked Questions
How To Do Perspective In Procreate?
Open Actions menu, tap Canvas, then select Edit Drawing Guide. Choose Perspective, set vanishing points, and enable Drawing Assist to draw in perspective.
Can You Do 4 Point Perspective In Procreate?
Procreate supports up to 3-point perspective natively. For 4-point perspective, use custom guides or manual drawing techniques.
How To Set Up A 3 Point Perspective?
To set up a 3-point perspective, draw three vanishing points: two on the horizon and one above or below. Connect your object’s edges to these points. This technique creates depth and realism by showing height, width, and depth converging toward each vanishing point.
How To Add Perspective To Painting?
Add perspective by using vanishing points and horizon lines to guide depth. Vary object sizes and overlap elements to enhance realism. Apply shading and detail to foreground objects while simplifying distant ones. Use tools like Procreate’s perspective guides for accuracy.
Conclusion
Perspective painting in Procreate opens many creative doors. Practice using guides and vanishing points often. Experiment with different angles to find your style. Remember, simple steps build strong skills over time. Keep your strokes confident and shapes clear. Watch your artwork gain depth and realism.
Enjoy the process as you improve daily. Your digital paintings will soon look more lifelike. Stay patient, and keep creating with Procreate.


