

Are you looking to add a splash of color and personality to your garden without spending a fortune? Painting DIY rocks for your garden is a simple, fun, and creative way to do just that.
Whether you want charming garden markers, vibrant decorations, or unique gifts, painted rocks can transform your outdoor space instantly. In this guide, you’ll learn easy steps, helpful tips, and the best materials to make your rock painting project stand out and last through all seasons.
Ready to turn ordinary stones into eye-catching garden art? Let’s dive in!
Credit: leftbraincraftbrain.com
Choosing Rocks
Choosing the right rocks is the first step to creating beautiful garden art. The type, location, and surface texture affect how well the paint sticks and how the design looks. Picking the perfect rock makes your painting easier and more enjoyable.
Types Of Rocks
Some rocks work better for painting than others. Smooth river rocks and flat stones are popular choices. These rocks have even surfaces that make painting simple. Avoid porous or crumbly rocks because paint may not last long on them.
Granite, slate, and sandstone are good options. They are sturdy and hold paint well. Each type gives a different texture and appearance to your garden art.
Where To Find Rocks
Rocks can be found in many places around your home or neighborhood. Check your garden, parks, or riverbeds. Construction sites and landscaping stores also sell rocks suitable for painting.
Always ask for permission before collecting rocks from public or private land. You want to respect the environment and local rules.
Selecting Smooth Surfaces
Smooth surfaces make painting easier and results neater. Look for rocks with flat, even areas to create your designs. Rough or jagged rocks are harder to paint on and may cause your brush to skip.
Test a rock by running your hand over it. If it feels smooth and firm, it is a good candidate. These surfaces allow paint to dry evenly and prevent chipping.
Cleaning Rocks
Cleaning rocks is a vital step before painting DIY garden stones. Dirt, oils, and moisture can prevent paint from sticking well. Properly cleaned rocks ensure bright, long-lasting colors and a smooth finish. This process is simple but must be done carefully.
Removing Dirt And Oils
Start by rinsing the rocks with water to remove loose dirt. Use a soft brush or old toothbrush to scrub the surface gently. Add a few drops of dish soap to warm water for better cleaning. Scrub each rock to remove oils and grime that block paint adhesion. Rinse thoroughly to wash away soap residue. Avoid harsh chemicals to keep the rocks safe for your garden.
Drying Techniques
After cleaning, dry the rocks completely before painting. Pat them with a clean towel to remove excess water. Lay the rocks on a dry cloth in a sunny spot for faster drying. Avoid painting on damp rocks as paint may peel or chip. Allow at least 24 hours for rocks to dry fully, depending on their size and moisture level.
Materials Needed
Gathering the right materials is key to painting DIY rocks for your garden. Each item plays an important role in making your rock art last and look great. Prepare all supplies before starting to avoid interruptions. Clean and dry rocks ensure paint sticks well and colors stay bright.
Choose paint and tools that suit your design and outdoor use. Sealants protect your work from weather and wear. The following sections explain essential materials for a successful rock-painting project.
Paint Types
Acrylic paint is the best choice for rock painting. It sticks well and dries fast. Use patio acrylic paint for outdoor rocks. It holds up against sun and rain. Paint pens are great for fine details and small designs. Avoid oil-based or watercolors as they do not last outside.
Brushes And Tools
Use various brush sizes to create different effects. Small detail brushes help with fine lines. Flat brushes cover larger areas smoothly. Sponges can add texture or blend colors. Prepare a clean container for water and paper towels for wiping brushes. Toothbrushes or scrub brushes clean rocks before painting.
Sealants And Finishes
Seal your painted rocks to protect your artwork. Choose a clear, waterproof sealant with UV protection. Spray sealants are easy to apply evenly. Brush-on sealants offer more control but take longer to dry. Apply at least two coats for strong protection. Let each coat dry completely before adding the next.
Preparing Rocks
Preparing rocks for painting is a key step in making your garden DIY project last long. Clean, smooth surfaces help paint stick better. Proper preparation also stops colors from fading or chipping quickly outdoors. Spend time on this phase to get the best results for your painted rocks.
Priming Surfaces
Start by washing your rocks with soap and water. Use a brush to remove dirt and grime. Rinse well and let the rocks dry completely. Dry rocks hold paint better and prevent peeling.
Apply a primer made for outdoor use. A clear or white primer works well. It creates a smooth base for paint. Use a small brush or spray for even coverage. Let the primer dry fully before painting.
Base Coating
Choose a bright acrylic paint for the base coat. This layer hides the rock’s natural color and textures. Use a few thin coats instead of one thick coat. Let each coat dry before applying the next.
Cover the entire rock, including edges and bottom. A full base coat protects the rock and improves paint adhesion. Once dry, your rock is ready for detailed designs or patterns.
Painting Techniques
Painting techniques shape the look of your DIY garden rocks. They help bring your ideas to life with color and style. Choosing the right method makes painting easier and fun. It also improves how long your painted rocks last outside. Try different ways to find what suits you best.
Simple Designs
Start with easy shapes like dots, stripes, or hearts. Use a small brush for neat lines. Simple designs look great and take less time. They fit well in any garden style. Practice basic patterns before trying complex art. Keep your strokes light and steady for best results.
Using Paint Pens
Paint pens give control for detailed work on rocks. They work well for writing or drawing small pictures. Pens dry fast and reduce mess from brushes. Choose waterproof pens to keep colors bright outdoors. Shake the pen and test on paper before use. This tool helps make sharp, clean lines on rough surfaces.
Layering Colors
Layering adds depth and richness to your rock art. Let each color dry fully before adding the next. Start with a base coat to cover the whole rock. Add lighter or darker shades on top for texture. Use thin layers to avoid paint cracking. This method creates vibrant and long-lasting designs.

Credit: www.momendeavors.com
Adding Details
Adding details to your DIY garden rocks makes them stand out. Small touches bring life and personality to plain stones. Details can be simple or complex, depending on your style. They help turn rocks into charming garden art or useful markers.
Focus on clear, easy-to-paint designs. Use bright colors and neat lines. This section guides you through patterns, lettering, and tips for garden markers. These ideas make your painted rocks both beautiful and practical.
Patterns And Shapes
Start with basic shapes like dots, stripes, or swirls. These patterns are easy to paint and look attractive. Use a small brush or paint pens for precision. Try floral patterns or geometric shapes for a modern look. Layer different colors for depth. Patterns add texture and interest to your rocks.
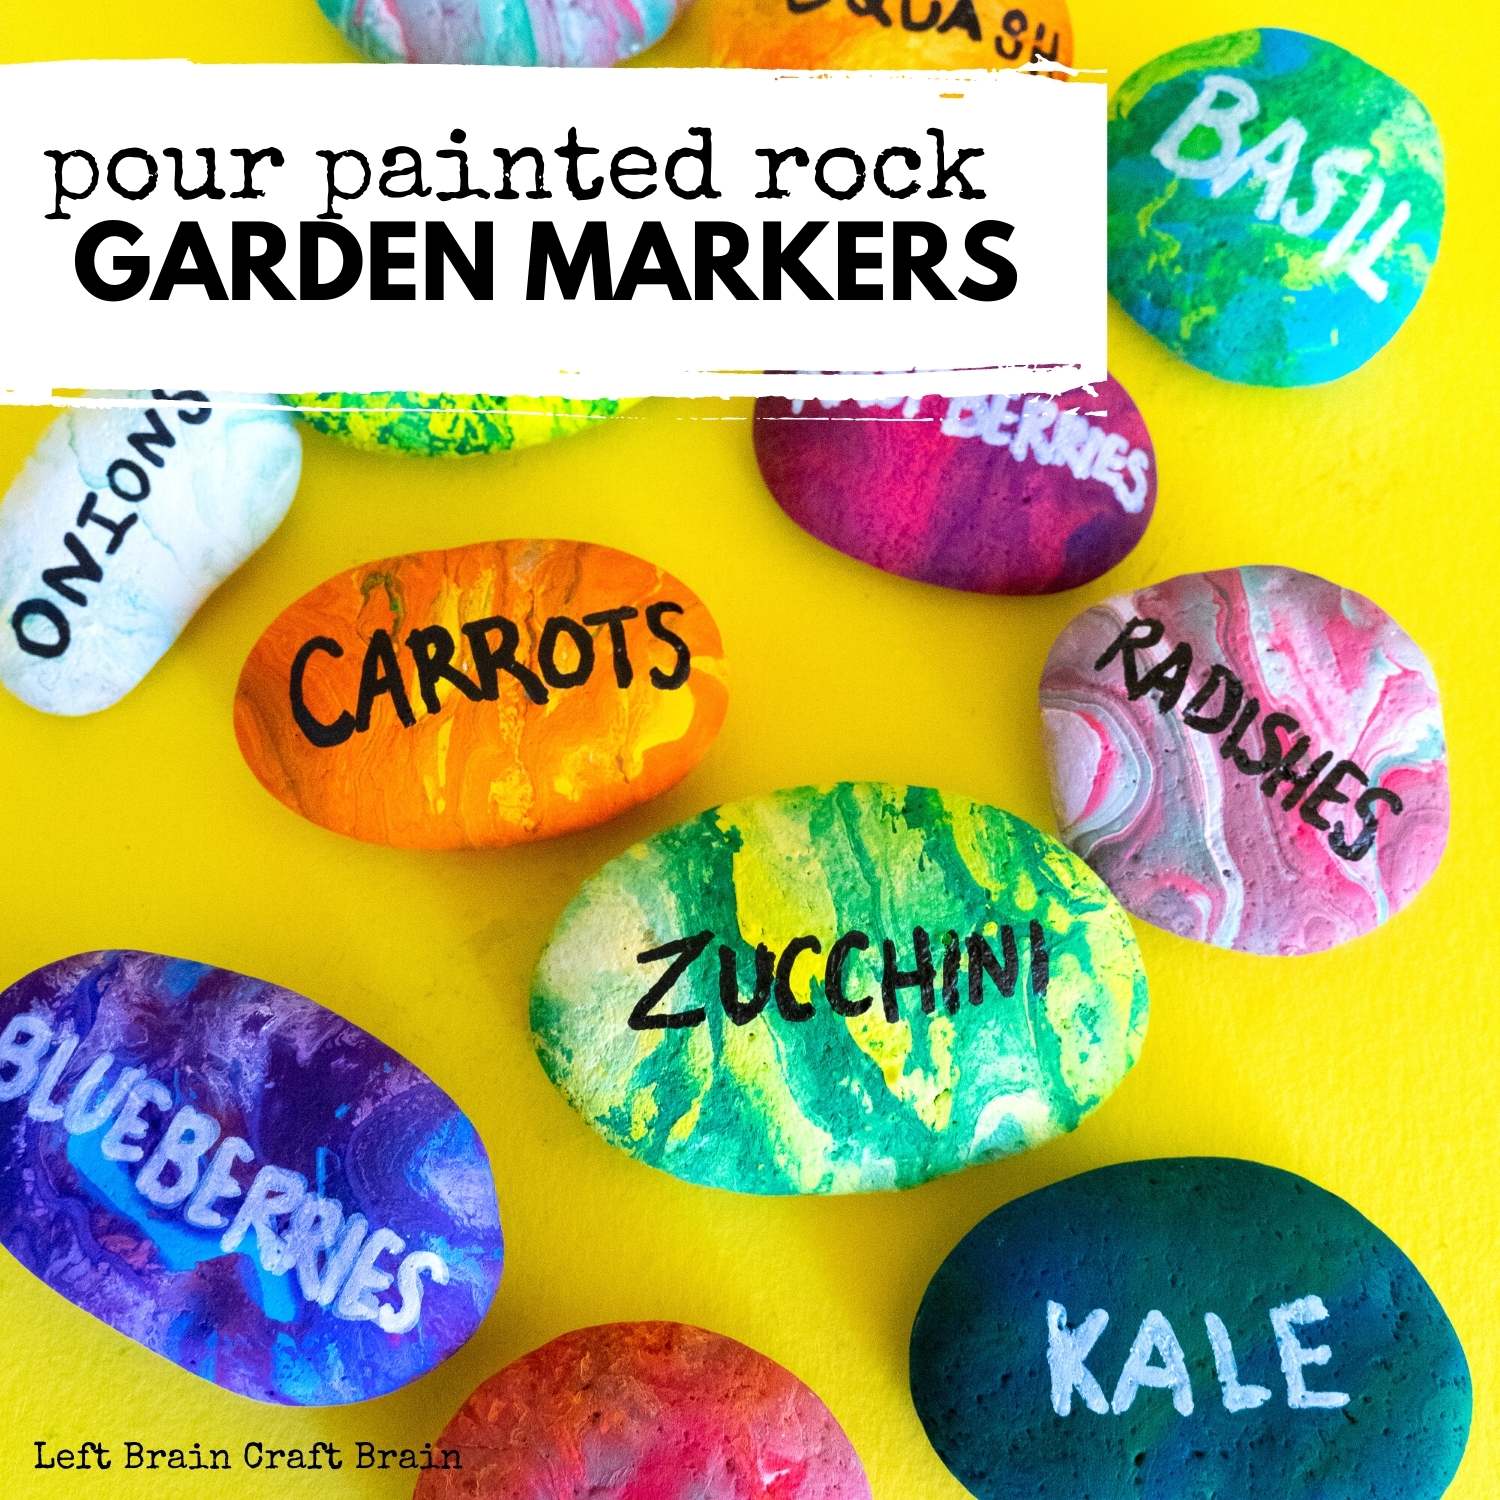
Lettering Ideas
Adding words or names personalizes your rocks. Use simple fonts or block letters for readability. Paint plant names or short messages like “Welcome” or “Grow.” Practice on paper before painting on the rock. White or black paint works well for contrast. Lettering helps identify plants and adds charm.
Garden Marker Tips
Choose rocks with a flat surface for easy writing. Seal your paint with a clear coat to protect from weather. Use permanent acrylic paint or paint pens for durability. Place markers near plants for easy identification. Keep designs bold and colors bright for visibility. Garden markers combine art with function beautifully.
Sealing Painted Rocks
Sealing painted rocks is a key step for garden DIY projects. It protects your artwork from weather and fading. A good sealant keeps colors bright and stops paint from chipping. Choosing the right sealant depends on where you place your rocks. Proper sealing also adds a nice finish that enhances your design.
Indoor Vs Outdoor Sealants
Indoor sealants suit rocks kept inside your home. They protect against dust and light wear. These sealants usually have less strong chemicals. Outdoor sealants are made for harsh weather. They resist rain, sun, and temperature changes. Use outdoor sealant for garden rocks to ensure long-lasting color. Always check product labels for water resistance and UV protection.
Applying Glossy Finish
A glossy finish gives rocks a shiny and smooth look. It makes colors pop and appear more vibrant. Spray sealants provide an even glossy layer quickly. Brush-on sealants allow more control but need careful application. Apply two thin coats for best results. Let each coat dry completely before adding the next. Glossy finish also helps rocks look clean and fresh for longer.
Placing Rocks In Garden
Placing painted rocks in your garden adds charm and color. Thoughtful placement enhances both the rocks and the plants around them. You can create a unique garden look by arranging the rocks creatively. Positioning the rocks near plants or in specific spots can highlight garden features. Seasonal decorations on rocks bring fresh appeal throughout the year.
Arrangement Ideas
Group rocks in clusters for a natural feel. Line them along garden paths to guide visitors. Use larger rocks as focal points and smaller ones as accents. Scatter rocks randomly for a wild, organic look. Try stacking rocks to form small sculptures or cairns.
Combining With Plants
Place rocks near low-growing plants to add texture contrast. Use bright painted rocks to brighten shady spots. Position rocks around flower beds to frame the blooms. Mix different rock sizes to complement plant shapes. Rocks work well near succulents and cacti for a desert vibe.
Seasonal Decor
Paint rocks with seasonal themes like pumpkins for fall. Use bright colors and patterns for spring and summer. Add snowflake designs for winter interest. Change rock designs to match holidays or garden events. Seasonal rocks keep your garden lively all year long.
Maintaining Painted Rocks
Maintaining painted rocks keeps your garden colorful and fresh. Proper care helps your artwork last longer outdoors. Dirt, rain, and sun can wear off paint over time. Simple steps protect your painted rocks and keep them looking their best.
Cleaning Painted Surfaces
Use a soft brush or cloth to remove dust and dirt. Avoid harsh scrubbing that can damage the paint. For stubborn grime, use mild soap with water. Rinse gently and dry the rocks completely. Clean rocks regularly to prevent buildup and fading.
Touch-up Tips
Check your rocks for chips or faded areas often. Use the same acrylic paint to fix small spots. Apply paint in thin layers to match the original design. Let each layer dry before adding another. Seal the touched-up areas with a clear spray sealant for extra protection.
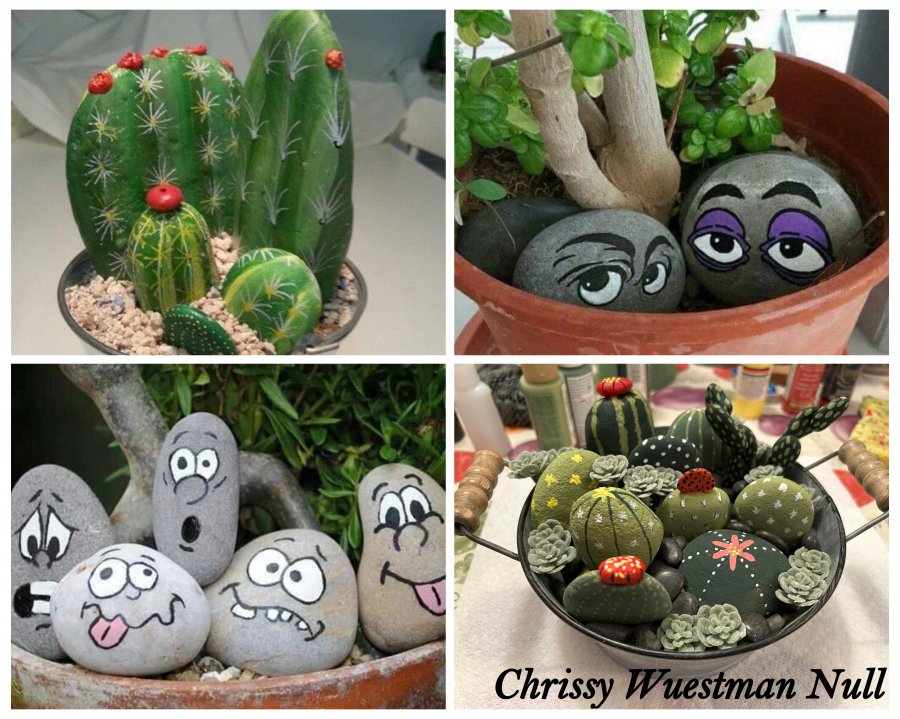
Creative Rock Painting Ideas
Creative rock painting ideas turn simple stones into unique garden art. Painting rocks lets you add color and personality to your outdoor space. You can express yourself with many themes and styles. These ideas make your garden more fun and inviting.
Try different designs to match your garden’s mood. Bright colors, patterns, or messages bring joy to your plants and visitors. Rock painting is easy and relaxing. It gives your garden a personal touch that stands out.
Themed Collections
Create themed rock collections to decorate your garden beautifully. Choose themes like animals, flowers, or seasonal designs. For example, paint ladybugs, butterflies, and bees for a nature theme. Or, use pumpkins and leaves for autumn vibes.
Themed collections make your garden look organized and creative. Group your painted rocks near garden beds or pathways. This draws attention and adds charm. Changing themes for different seasons keeps your garden fresh and lively.
Rock Hiding And Sharing
Rock hiding is a fun way to share your art with others. Paint rocks with happy faces, quotes, or cute designs. Then hide them in local parks or garden spaces. Others find these rocks and enjoy the surprise.
This activity spreads kindness and connects communities. You can start a rock exchange with friends or neighbors. Sharing painted rocks creates smiles and encourages creativity everywhere. It is simple and rewarding to brighten someone’s day.
Credit: fb-rocks.com
Frequently Asked Questions
What Kind Of Paint Will Stick To Rocks?
Acrylic paint sticks best to rocks due to its durability and vibrant colors. Use paint pens for detailed designs. Always clean and dry rocks before painting. Seal outdoor rocks with a clear varnish for protection and longevity.
How To Paint Rocks For A Garden?
Clean rocks thoroughly and let them dry. Apply a base coat of acrylic paint. Paint your design using acrylic paints or paint pens. Seal with a clear outdoor varnish to protect colors. Place painted rocks in your garden for decoration.
What Do You Put On Rocks Before Painting?
Clean rocks with soap and water to remove dirt and oils. Dry completely before painting. Apply a base coat of acrylic paint for best results.
How Do I Seal Painted Rocks For Outdoor Use?
Clean and dry the painted rock thoroughly. Apply a clear outdoor acrylic sealer or varnish evenly. Let it dry completely before outdoor placement. Repeat for extra protection.
Conclusion
Painting DIY rocks for your garden adds color and charm easily. Start by cleaning rocks well and using acrylic paint for best results. Let each layer dry before adding new designs or details. Seal your painted rocks to protect them from weather damage.
Place your colorful creations around your garden to brighten the space. Enjoy crafting unique decorations that make your garden special. Simple steps create beautiful, lasting garden art anyone can do. Try painting rocks today and watch your garden come alive!


