PaintingProGuide is reader-supported. When you buy through links on this page we may earn an affiliate commission at no extra cost to you.
When artists search for clip art brushes they almost always mean brushes for Clip Studio Paint, the illustration and comic software from Celsys. Clip Studio has its own brush engine, its own .sut brush file format and a built-in marketplace called Clip Studio Assets where tens of thousands of brushes are shared, many for free. This guide explains which categories of Clip Studio brushes are worth downloading first, how to judge a brush before installing it, and how to bring in brushes made for other programs.
One housekeeping note: everything below concerns software brushes, most of which cost nothing. The only physical products on this page are a few drawing tablets near the end, included because pressure and tilt hardware change how Clip Studio brushes behave.
Quick answer: Start with Clip Studio Paint’s bundled G-pen and Mapping pen for inking, then download a textured pencil and a soft watercolor blender from Clip Studio Assets. Comic artists should add a screentone and hatching brush set, and background painters benefit most from foliage and texture stamp brushes. Filter Assets by free downloads and recent updates before paying with Clippy points.
Our Top Picks at a Glance
- Bundled G-pen and Mapping pen — Best inking brushes to master first
- Textured pencil brushes — Best for sketching and concept work
- Soft watercolor and blending brushes — Best for painterly coloring
- Screentone and hatching brushes — Best for manga and comic shading
- Foliage, cloud and texture stamp brushes — Best for backgrounds
- Lettering and effect brushes — Best for sound effects and titles
- Converted Photoshop .abr brushes — Best way to reuse an existing library
| Brush Type | Best For | Key Spec | Key Strength | Price Tier |
|---|---|---|---|---|
| G-pen / Mapping pen (bundled) | Line art and inking | Pressure-sensitive taper, anti-aliasing options | Industry-standard comic ink line | Free (included) |
| Textured pencil brushes | Sketching | Paper-grain texture, tilt response | Natural graphite feel | Free to $ |
| Watercolor and blender brushes | Soft coloring | Color mixing, edge bleed, opacity ramps | Painterly results without layers of effort | Free to $ |
| Screentone and hatching brushes | Manga shading | Dot and line patterns at set frequencies | Fast, print-ready tone | Free to $ |
| Foliage and texture stamps | Backgrounds | Scattered image tips, random rotation | Fills complex areas in seconds | Free to $ |
| Lettering and effect brushes | SFX and titles | Ribbon, speed-line and sparkle tips | Dynamic text and action effects | Free to $ |
| Converted .abr brushes | Reusing a Photoshop library | Import via File menu, tip images preserved | Keeps years of collected brushes usable | Varies |
How We Chose
We did not draw with every brush pack on Clip Studio Assets; there are far too many. Instead, this guide groups brushes by the job they do, based on the Clip Studio Paint documentation, the structure of the Assets marketplace and the kinds of brushes working illustrators and comic artists most commonly cite as essentials. For each category we explain what a good example looks like, so you can judge any individual pack yourself.
- Job first: a brush earns a place if it removes a repetitive task or unlocks a look that is hard to get with defaults.
- Engine fit: brushes that use Clip Studio features such as tilt, dual brush and ribbon tips rather than just a static image tip.
- Cost and licensing: free or Clippy-point packs with clear commercial-use terms.
- Maintenance: packs updated for recent Clip Studio Paint versions (2.0 and later).
Best Clip Studio Paint Brushes by Category
1. Bundled G-Pen and Mapping Pen — Best Inking Brushes to Master First
Before downloading anything, learn the pens Clip Studio Paint already includes. The G-pen produces the classic variable-width manga ink line and responds strongly to pressure; the Mapping pen gives a thinner, stiffer line for hatching and fine detail. Both are modeled on the dip-pen nibs Japanese comic artists have used for decades, which is why so many professional pages are inked with nothing else.
Their settings are fully editable in the Sub Tool Detail palette. Adjusting stabilization, minimum size and anti-aliasing turns the two bundled pens into a dozen personal variants without a single download.
What to look for:
- Pressure-to-size curve that suits your hand
- Stabilization set between 5 and 20 for smooth curves
- Vector layer compatibility for editable lines
Strengths:
- No download or cost
- Vector-layer friendly for clean, scalable inks
- Deep customization through Sub Tool Detail
Limitations:
- Default feel can seem stiff until the pressure curve is tuned
- No texture; lines are perfectly smooth
- Easy to over-rely on stabilization
2. Textured Pencil Brushes — Best for Sketching and Concept Work
Clip Studio’s default pencils are fine, but community pencil brushes on Assets add paper grain, tilt shading and a softer taper that feels closer to real graphite. Good packs include a hard construction pencil, a soft shading pencil and a chunky side-of-the-lead variant.
Look for brushes that use the engine’s tilt input for broad shading and that keep texture consistent as you scale brush size, which cheaper packs often fail to do.
What to look for:
- Tilt-responsive width or opacity
- Paper texture applied in the brush, not just a canvas texture layer
- Range from hard 2H-style lines to soft 6B-style shading
Strengths:
- Makes digital roughs feel like paper sketches
- Reduces temptation to over-polish early drawings
- Many excellent free options
Limitations:
- Textured strokes are slower to render on older iPads
- Some packs are near-duplicates of each other
- Texture can muddy clean line art if used for final inks
3. Soft Watercolor and Blending Brushes — Best for Painterly Coloring
Clip Studio Paint’s brush engine can mix colors on the canvas, and watercolor and blending brush packs exploit this to produce edge bleed, granulation and soft transitions. A strong pack usually includes a wet wash brush, a dry-edge brush, a water blender that moves pigment without adding color, and a lifting brush for highlights.
These brushes are especially popular for character illustration where flat cel shading would feel too hard. Pair them with the Blur and Finger Tip tools for the last touches.
What to look for:
- Color mixing and “paint thinner” settings exposed in the brush
- Separate blender with zero color output
- Opacity ramps that respond gently to pressure
Strengths:
- Painterly results on a single layer
- Fast ambient shading on backgrounds
- Hides line-art imperfections
Limitations:
- Easy to overwork into mud
- Heavier on performance than pens
- Less predictable for print-ready flats
4. Screentone and Hatching Brushes — Best for Manga and Comic Shading
Clip Studio Paint ships with tone layers, but screentone brushes let you paint dot and line patterns directly, with pressure controlling density. Hatching brushes draw parallel or crosshatched lines with a single stroke. Together they turn hours of manual shading into minutes, and the results reproduce cleanly in print at the standard 60-line frequency.
For black-and-white comics, this category is the single biggest time saver after the inking pens.
What to look for:
- Pattern frequency options such as 60 and 65 lines per inch
- Gradient tone brushes for smooth falloff
- Crosshatch tips that vary line spacing with pressure
Strengths:
- Huge time savings on shaded pages
- Print-safe at common tone frequencies
- Many packs are free
Limitations:
- Painted tone cannot be edited like a tone layer
- Moire appears if patterns are rotated or scaled carelessly
- Overuse flattens depth
5. Foliage, Cloud and Texture Stamp Brushes — Best for Backgrounds
Stamp or scatter brushes place image tips with random rotation, size and spacing. Leaf, grass, cloud, brick and stone packs fill large background areas quickly while leaving the foreground to hand-drawn work. Clip Studio’s dual-brush and spraying settings make these brushes richer than a simple repeated stamp.
The best packs provide tips in several densities and include matching shadow or highlight variants so you can build volume rather than a flat pattern.
What to look for:
- Multiple tip images per brush for variation
- Random rotation and size jitter
- Companion shadow or highlight versions of each tip
Strengths:
- Fills environments in minutes
- Consistent detail across a long comic
- Easy to recolor with layer modes
Limitations:
- Repetition shows if used without hand adjustment
- Large tip images bloat the brush file
- Style may clash with hand-drawn foreground
6. Lettering and Effect Brushes — Best for SFX and Titles
Ribbon brushes stretch an image along the stroke, which is ideal for speed lines, lightning, chains and sound-effect lettering. Sparkle, smoke and splatter brushes round out the effects category. Comic artists use these for action panels; illustrators use them for finishing flourishes.
Because effects are so visible, choose packs whose look matches your art style; a glossy anime sparkle will clash with gritty inks.
What to look for:
- Ribbon-type brushes for continuous shapes
- Pressure-controlled scale for tapered speed lines
- Clean transparency so effects layer over color
Strengths:
- Instant drama in action scenes
- Good for titles and logos
- Often bundled free with larger packs
Limitations:
- Easy to overuse
- Style-specific; few packs suit every project
- Ribbon brushes behave oddly on tight curves
7. Converted Photoshop .abr Brushes — Best Way to Reuse an Existing Library
Clip Studio Paint can import Photoshop .abr brush files directly in recent versions, converting tip images into Clip Studio sub tools. Dynamics do not always translate perfectly, but the tip shapes do, so years of collected Photoshop brushes remain usable. We explain the limits and the exact steps in do Photoshop brushes work in Clip Studio.
After importing, open each brush in Sub Tool Detail and rebuild pressure and texture settings; a converted brush is a starting point, not a finished tool.
What to look for:
- Recent Clip Studio Paint version with .abr import support
- Tips saved at high resolution in the original file
- Simple dynamics that convert cleanly
Strengths:
- No need to rebuy brush collections
- Keeps a consistent look across programs
- Tip images import cleanly
Limitations:
- Pressure and texture settings rarely survive conversion
- Some brushes rely on Photoshop-only features
- Takes time to retune each brush
Installing Brushes in Clip Studio Paint
Brushes from Clip Studio Assets install through the Clip Studio launcher: download, then drag the material from the Material palette onto the Sub Tool palette. Standalone .sut files can be dragged directly into the Sub Tool palette on desktop. On iPad, open the Sub Tool palette menu and choose to import a sub tool from a file. Group new brushes into named sub tool groups so your palette stays usable as it grows.
Organizing a Growing Brush Library
Brush packs accumulate fast. Create sub tool groups named by job (Ink, Sketch, Color, Tone, Background, FX) and move each new brush into one as soon as it is installed. Delete duplicates after a week of use; if you have not reached for a brush, you probably never will. Back up your custom sub tools by exporting them as .sut files or by syncing materials to your Clip Studio account, so a device change or reinstall does not erase hours of tuning.
It also helps to keep a single “daily” group of eight to twelve brushes you actually use on every piece. Professionals rarely work from more than that, and a compact palette is faster than scrolling through two hundred options mid-stroke.
Buying Guide: How to Choose Clip Studio Paint Brushes
Match the brush to the medium you are imitating
Decide whether you want a clean comic look, a textured sketch feel or a painterly finish. Download one strong pack per category rather than fifty random brushes.
Check the Assets listing details
Good listings show stroke samples at several sizes, state the Clip Studio Paint version required, and specify whether the brush uses texture, dual brush or ribbon settings. A single thumbnail and no description is a warning sign.
Free versus Clippy points versus Gold
Much of Assets is free. Paid brushes cost Clippy points, which you can earn through the service or buy. Prioritize free packs while you learn what you like, then pay for a few polished sets from creators whose style you admire.
Read the license
Most brushes allow commercial use of artwork made with them, but a few restrict redistribution or modification. Check before using a brush on client work.
Performance on your device
Texture-heavy and high-resolution stamp brushes lag on older iPads and laptops. If strokes stutter, reduce the texture density or brush size rather than discarding the brush.
Vector or raster
Pens and simple brushes work on vector layers, which allow editable line weight; textured and watercolor brushes generally need raster layers. Decide before you start inking.
Drawing Hardware for Clip Studio Brushes
A brush file only behaves the way its creator intended when your hardware sends pressure and, for many textured pencils, tilt. These four tablets were chosen from Amazon listings checked in October 2026 for pen specs, screen quality and how widely buyers review them. We have not inked with them, so compare the listed specs with the brushes you use most.
HUION Kamvas 13 (Gen 3) — Best Pen Display for Inking

The Kamvas 13 (Gen 3) is a 13.3-inch fully laminated pen display with anti-sparkle Canvas Glass 2.0, a pen the listing rates at 16,384 pressure levels, three pen buttons and a factory calibration report. Drawing directly on the image makes G-pen and Mapping pen inking far more intuitive than working on a screenless tablet. It must be connected to a computer.
Best suited for: comic and manga artists who ink for long sessions in Clip Studio Paint.
Key features:
- 13.3-inch fully laminated display
- 16,384 pressure levels, 3 pen buttons
- 99% sRGB with factory calibration report
XPPen Artist 13.3 Pro V2 — Best for Tilt-Sensitive Textured Brushes
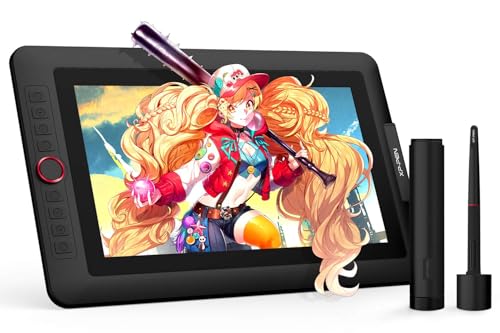
XPPen lists up to 60 degrees of tilt support on this 13.3-inch fully laminated FHD display, which is useful for pencil and charcoal brushes that respond to pen angle. The red dial handles brush size or zoom, and the listing confirms Windows, macOS, ChromeOS and Linux support. It also requires a computer.
Best suited for: illustrators who rely on textured pencils and watercolor brushes that use tilt.
Key features:
- Up to 60 degrees of tilt
- 13.3-inch fully laminated FHD screen
- Red dial and shortcut keys
UGEE UE12 — Best Budget Screen Tablet

The UGEE UE12 brings an 11.6-inch full-laminated, anti-glare FHD screen and a 124% sRGB color gamut down to a lower price than the 13-inch displays above. It has a battery-free stylus with two buttons, eight shortcut keys with a raised design for blind use, and dual USB-C ports.
Best suited for: students and hobbyists who want to draw on screen without paying for a larger display.
Key features:
- 11.6-inch full-laminated FHD screen
- Battery-free stylus with 2 buttons
- 8 shortcut keys, dual USB-C
Wacom Intuos Small — Best Screenless Starter
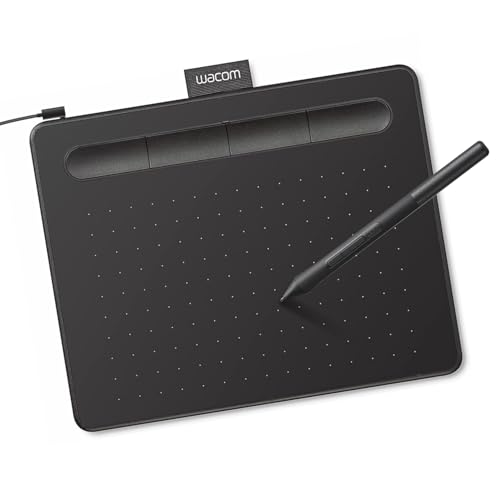
If you are not ready for a pen display, the Intuos Small is a compact screenless tablet with Wacom’s battery-free pen. The listing says it works in any software, so it handles Clip Studio Paint brushes, though you draw while looking at your monitor rather than at the pen tip.
Best suited for: beginners testing Clip Studio Paint before committing to a screen tablet.
Key features:
- Battery-free EMR pen
- Compact screenless design
- Bundled software with registration
For the traditional side of the brush drawer, our guides on keeping paint brushes from shedding, painting with large brushes and drying paint brushes correctly cover the physical side of the brush drawer.
Common Mistakes to Avoid
- Downloading hundreds of brushes before learning the G-pen and Mapping pen.
- Never opening Sub Tool Detail to tune pressure curves and stabilization.
- Scaling or rotating screentone brushes and creating moire in print.
- Using textured sketch brushes for final inks and wondering why lines look fuzzy.
- Ignoring the version requirement on an Assets listing.
- Leaving imported Photoshop brushes with their default converted settings.
FAQs
Where do I get brushes for Clip Studio Paint?
Clip Studio Assets, accessed through the Clip Studio launcher, is the official marketplace with free and paid brushes. Creators also sell .sut brush files on their own stores, which you can import directly.
Are Clip Studio Paint brushes free?
A large share of Assets materials are free. Paid brushes use Clippy points or Gold. The bundled pens and brushes that come with the software are included at no extra cost.
Can I use Photoshop brushes in Clip Studio Paint?
Yes, recent versions import .abr files and convert tip images into sub tools. Pressure dynamics and textures usually need to be rebuilt afterward.
Which brush is best for inking comics in Clip Studio?
The bundled G-pen is the standard choice for variable-width ink lines, with the Mapping pen for fine detail and hatching. Tune stabilization and the pressure curve to your hand.
How do I install a .sut brush file?
On desktop, drag the .sut file onto the Sub Tool palette. On iPad, use the Sub Tool palette menu to import a sub tool and select the file.
Why do my downloaded brushes lag?
Texture and large stamp tips are demanding. Lower the brush size or texture density, close other apps, and check that your Clip Studio Paint version matches the brush requirements.
Final Recommendation
Learn the bundled G-pen and Mapping pen thoroughly, then add one textured pencil pack for sketching and one watercolor and blender set for color. Comic artists should download a screentone and hatching set next; environment painters should prioritize foliage and texture stamps. Import your old Photoshop brushes last, once you understand Sub Tool Detail well enough to rebuild them properly.