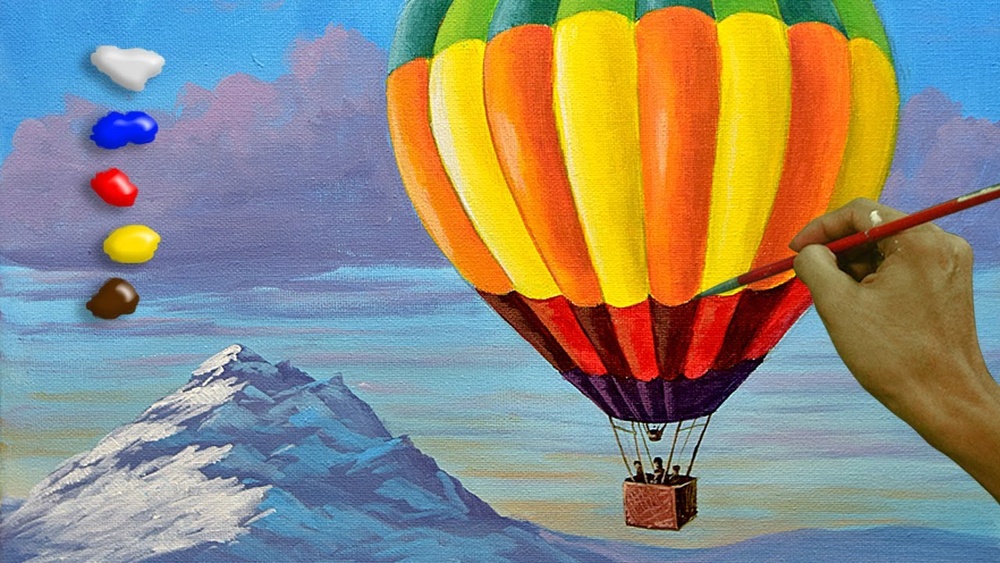
Have you ever wanted to capture the magic of a hot air balloon floating gently across the sky? Painting one with acrylics is easier than you might think—and it’s a fun way to bring vibrant color and life to your artwork.
Whether you’re a beginner or looking to improve your technique, this guide will walk you through every step to create a stunning acrylic hot air balloon painting. By the end, you’ll have the skills to add your own personal touch and make your canvas soar.
Ready to lift off your creativity? Let’s dive in!

Credit: theartsherpa.com
Materials Needed
Gathering the right materials is the first step in painting a hot air balloon with acrylics. Having quality supplies makes your painting easier and more enjoyable. Prepare everything before you start to avoid interruptions. Here is a list of essentials to help you create a vibrant and detailed hot air balloon painting.
Choosing Acrylic Paints
Select acrylic paints with bright and rich colors. Basic colors like red, blue, yellow, white, and black are a must. You can mix these to create custom shades for your balloon. Choose paints that have good coverage and dry quickly. Look for brands that are known for smooth blending and lasting color.
Brushes And Tools
Use a variety of brushes for different details. Flat brushes work well for large areas and background. Round brushes help with fine lines and small shapes. Have a small detail brush for the balloon’s ropes and basket. A palette or mixing tray keeps your paints organized. Keep a cup of water and paper towels handy for cleaning brushes.
Surface Preparation
Choose a smooth surface like canvas, canvas board, or acrylic paper. Make sure the surface is clean and dry before painting. If needed, apply a layer of gesso primer to improve paint adhesion. Allow the primer to dry completely. This step helps your colors appear brighter and prevents peeling later.
Sketching The Balloon
Sketching the hot air balloon is the first step in your acrylic painting journey. This stage helps you plan the shape and details before adding color. A clear sketch guides your brushstrokes and keeps your painting balanced.
Start lightly with a pencil. The goal is to create a simple outline that captures the balloon’s form. Avoid pressing too hard to keep lines easy to erase later. Focus on the balloon’s round shape and the basket below it.
Basic Shapes
Begin with a large oval or circle for the balloon’s main body. This shape should be centered on your canvas. Below the oval, draw a small rectangle or trapezoid for the basket. Connect these two shapes with thin lines to represent the ropes.
Use basic shapes to maintain correct proportions. This approach makes the sketch less intimidating. It also helps you adjust the size and position before adding details.
Adding Details
After the basic shapes are in place, add the balloon’s panels. These are the vertical sections that wrap around the balloon. Draw gentle curved lines from the top to the bottom of the oval. These lines give the balloon a 3D look.
Next, sketch the basket’s texture by adding vertical and horizontal lines. Include small ropes and attachments between the basket and balloon. Keep your lines light and clean for easy painting later.
Painting The Background
Painting the background sets the mood for your hot air balloon acrylic artwork. It creates depth and context, making the balloon stand out. A well-crafted background adds life and atmosphere to your painting. Focus on simple shapes and smooth colors for the best effect. Use layers and soft edges to build a natural scene.
Sky And Clouds
Start with a clean canvas and paint the sky first. Choose light blue or soft pastel tones for a calm sky. Use broad strokes to cover the upper part of the canvas. Add white or light gray to form clouds. Paint clouds with round, soft shapes to mimic real ones. Leave some sky visible between clouds for a natural look. Use a dry brush to soften cloud edges. Keep the clouds light and fluffy, not too dense.
Blending Techniques
Blending colors smoothly helps the background look realistic. Use a wet brush to blend edges between sky and clouds. Work quickly before the paint dries to avoid harsh lines. Try a circular motion with the brush for a gentle blend. Use a clean brush to soften the transition areas. Layer thin paint coats for gradual color changes. Avoid over-mixing to keep colors vibrant. Blending creates a smooth, dreamy background for your hot air balloon.

Credit: www.youtube.com
Base Colors For Balloon
Choosing the right base colors sets the foundation for a vibrant hot air balloon painting. The base colors give the balloon shape and life. They help you build depth and make your artwork stand out. Start with simple, bright colors to capture the balloon’s lively spirit. These colors will guide your painting as you add details.
Base colors should be smooth and even. This step prepares your canvas for layering and shading. Proper base colors create a clean canvas for the next paint layers. Pay attention to the balloon’s sections and patterns while selecting your colors.
Color Selection
Pick colors that match the mood you want to create. Bright reds, yellows, and blues make the balloon cheerful. Soft pastels give a calm, dreamy feel. Use colors that contrast well to highlight the balloon’s shape. Consider mixing colors to get unique shades. Avoid dark colors at this stage, as they can overpower the painting.
Layering Paint
Apply the base colors in thin, even layers. Thin layers dry faster and avoid cracking. Let each layer dry fully before adding the next. Layering builds richness and depth in your colors. Use a flat brush for smooth coverage on the balloon. Add more layers to brighten colors or fix uneven spots. Keep edges clean to define the balloon’s shape clearly.
Adding Patterns And Shadows
Adding patterns and shadows brings life to your hot air balloon acrylic painting. Patterns create visual interest and texture. Shadows add depth and realism. Both are key to making your balloon look three-dimensional and vibrant. Use simple shapes and tones to enhance each panel of the balloon. Think about where the light hits and where shadows fall to guide your shading.
Creating Balloon Panels
Start by dividing the balloon into sections called panels. Use a pencil or light paint strokes to mark curved lines from top to bottom. Each panel can have a different color or pattern. Stripes, chevrons, or dots work well for bright patterns. Paint each panel carefully, keeping the edges neat. This technique helps simulate the fabric sections on a real hot air balloon.
Highlighting And Shading
Identify the light source in your painting. Add lighter colors on the side where light hits the balloon. Use white or a lighter shade of the panel color for highlights. For shadows, mix the panel color with a bit of blue, gray, or brown. Paint shadows on the opposite side of the highlights. Blend the edges softly to avoid harsh lines. This creates a smooth transition and adds volume to the balloon.
Painting The Basket
The basket is a key part of your hot air balloon painting. It adds balance and realism. Painting it well makes the whole piece come alive.
Focus on the shape first. The basket usually has a rectangular or square shape with rounded edges. Use a small brush to outline it carefully. Choose warm browns and tans to give it a natural look.
Texture And Details
Adding texture brings the basket to life. Use short, quick strokes to mimic the woven wicker. Mix a little white or yellow with brown to highlight some areas. Shadows and light make the basket look three-dimensional.
Paint small lines and crosshatches to show the weave pattern. Add tiny knots or ties where ropes might connect. These details make your painting more interesting and realistic.
Attaching The Basket To Balloon
Show the basket connected to the balloon with thin ropes or cords. Use a fine brush and a darker color, like dark brown or black. Paint straight lines from the basket corners up to the balloon’s base.
Make sure the lines are even and spaced well. This step links the two parts and gives your painting a finished look. Keep the lines subtle but clear to avoid distraction from the main balloon.
Final Touches
Final touches bring your hot air balloon painting to life. This stage sharpens your work and adds depth. Small changes here make a big difference in the final look.
Refining Edges
Use a fine brush to clean up the balloon’s edges. Smooth lines create a polished feel. Carefully remove any paint that spilled over. Crisp edges help the balloon stand out clearly. Take your time; this step improves the overall neatness.
Adding Highlights
Apply lighter colors where light hits the balloon. This adds shine and volume. Use white or pale yellow for small strokes. Highlights give the balloon a round, three-dimensional look. Focus on the top and sides that catch sunlight. These small touches make the painting more vibrant and real.

Credit: us.amazon.com
Common Mistakes To Avoid
Painting a hot air balloon with acrylics can be fun and rewarding. Yet, beginners often make avoidable mistakes. These errors can affect the final look of your artwork. Knowing common pitfalls helps you paint smoothly and confidently. This section highlights key mistakes to watch out for. Follow these tips to improve your painting experience and results.
Not Preparing The Surface Properly
Start with a clean, dry canvas or paper. Dirt or grease stops paint from sticking well. Use a primer or gesso for better paint adhesion. Skipping this step can cause paint to peel or crack later.
Using Thick Paint Without Layering
Applying thick acrylic paint all at once can ruin details. Thin your paint with water or medium for smooth layers. Build colors gradually to add depth and avoid clumps.
Ignoring Drying Time Between Layers
Rushing to paint over wet layers blurs colors. Let each layer dry fully before adding the next. This keeps colors crisp and prevents mixing mistakes.
Overworking The Paint
Keep brush strokes confident and light. Over-blending or scrubbing damages texture and colors. Stop once the paint feels even and smooth.
Forgetting Light Source And Shadows
Hot air balloons need shadows for a 3D look. Decide where the light comes from before painting. Add highlights and shadows to shape the balloon realistically.
Using Too Many Colors Without Planning
Limit your palette to a few colors. Too many shades can confuse the eye. Plan colors that match and complement each other well.
Neglecting Details On The Basket And Ropes
The basket and ropes add life to your painting. Don’t skip these small parts. Use fine brushes to include these details carefully.
Tips For Acrylic Painting
Painting a hot air balloon with acrylics can be fun and rewarding. Using the right techniques improves your artwork’s look. These tips help you control the paint and get smooth results. Follow simple steps to create bright, clear colors and perfect details.
Mixing With Water
Add small amounts of water to thin acrylic paint. This makes the paint easier to spread on the canvas. Avoid adding too much water; it weakens the color and may cause peeling later. Use a spray bottle for light misting or a brush dipped in water to blend colors smoothly.
Using Mediums
Acrylic mediums change the paint’s texture and drying time. Gloss medium makes colors shiny and bright. Matte medium gives a flat, soft finish. Gel medium thickens paint for texture effects. Use mediums to customize your paint for different parts of the hot air balloon.
Drying Times
Acrylic paint dries fast compared to oils. Thin layers dry in minutes, thick layers take longer. Plan your painting in stages to avoid unwanted mixing. Use a hairdryer on low heat to speed up drying. Remember, quick drying helps you add details faster without smudging.
Frequently Asked Questions
How To Draw A Beautiful Hot Air Balloon?
Start by sketching a large oval for the balloon. Add vertical panels, then draw the basket below. Use bright colors and shading for depth. Finish with details like ropes and patterns to make it beautiful and lively.
Should I Mix Water With My Acrylic Paints Or Just Paint?
Mixing a small amount of water thins acrylic paint for smoother application and transparency. Avoid adding too much water to prevent weakening the paint’s adhesion and color intensity. Use water sparingly for best results.
What Kind Of Paint Sticks To Balloons?
Acrylic paint sticks well to balloons, especially on foil types. Applying a clear lacquer spray before and after painting improves adhesion and durability.
What Does Adding Rubbing Alcohol To Acrylic Paint Do?
Adding rubbing alcohol to acrylic paint creates unique textures and cells by breaking the paint’s surface tension. It enhances fluid art effects and adds interesting patterns.
Conclusion
Painting a hot air balloon with acrylics is fun and rewarding. Use simple steps and bright colors for best results. Take your time blending and layering paint carefully. Practice helps improve your technique and confidence. Enjoy creating your colorful balloon artwork anytime you want.
Keep experimenting and let your creativity soar high!