Wood burning, also called pyrography, is a beautiful way to create art on wood. The burned lines are dark and rich, showing off the natural grain of the wood. Many crafters want to add color to their wood burned items to make them even more eye-catching. But painting over burned wood can be tricky—if you use the wrong paint or technique, you might cover up your design or damage the wood. In this guide, you’ll learn how to paint wood burned items crafts, from start to finish. Whether you’re new or experienced, you’ll find practical steps, useful tips, and answers to common questions.
Why Add Paint To Wood Burned Crafts?
Pyrography alone is striking, but adding paint opens up new creative options. Color can make details pop, add a playful touch, or help a piece fit in with your decor. For gifts or selling crafts, painted wood burned items often attract more attention and can command higher prices. However, paint changes the look and feel of wood, so you need to use the right materials and process.
Choosing The Best Paint For Wood Burned Surfaces
Not all paints are suitable for wood burned crafts. Some soak into the wood and blur the burned lines, while others sit on top and hide the detail. Here’s a quick comparison of common paint types for this purpose:
| Paint Type | Pros | Cons |
|---|---|---|
| Acrylic | Bright colors, quick drying, easy to find | Can cover fine lines if applied thickly |
| Watercolor | Transparent, keeps burned lines visible, blends well | Requires sealing, can bleed if wood isn’t sealed |
| Colored Pencil | Precise control, good for small areas | Less vibrant, may rub off if not sealed |
| Oil-based Paint | Durable, rich finish | Slow drying, strong odor, can muddy design |
For most crafters, acrylic paint is the top choice. It’s easy to use and comes in many colors. Watercolor paints are great for soft effects, especially if you want the wood grain to show. Colored pencils work for delicate details, but you must seal them to prevent smudging.
Preparing Your Wood Burned Item For Painting
Proper preparation is key to a great result. If the wood isn’t ready, paint won’t stick well or might spread into the burned lines.
- Sand the Surface: Use fine sandpaper (220 grit or higher) to smooth the wood. Sand in the direction of the grain. This removes rough spots and helps paint apply evenly.
- Clean the Dust: After sanding, wipe the surface with a dry cloth, then a slightly damp one. Make sure the wood is completely dry before continuing.
- Inspect Burned Lines: Check that your burned design is deep and dark enough. Paint can lighten burned marks. If needed, go over lines again with your wood burning tool.
- Seal if Using Watercolors: If you plan to use watercolors, apply a thin layer of clear acrylic spray or wood sealer first. This stops paint from bleeding into the wood.
Step-by-step: How To Paint Wood Burned Crafts
Let’s break the process down into easy-to-follow steps. These can be used for any wood burned craft, from coasters to wall hangings.
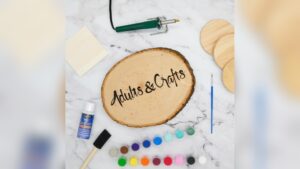
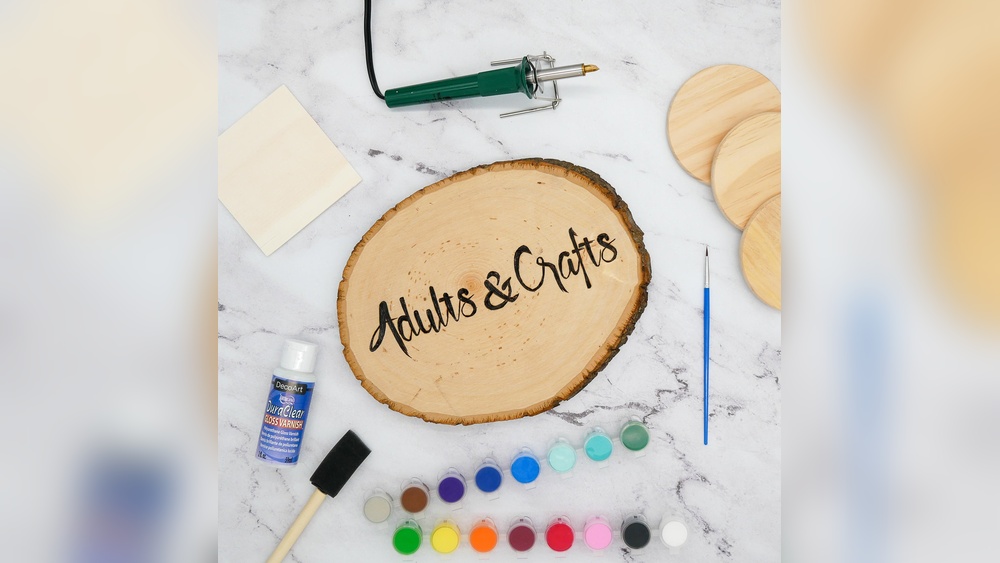
1. Gather Your Supplies
You’ll need:
- Your finished wood burned item
- Paint (acrylic, watercolor, or colored pencil)
- Paintbrushes (small detail and medium flat)
- Palette or mixing tray
- Water cup (for water-based paints)
- Paper towel or cloth
- Clear sealer (spray or brush-on)
- Masking tape (optional for sharp lines)
2. Plan Your Colors
Before painting, think about which areas you want to color. Lightly sketch your plan with a pencil if needed. For beginners, start with just a few colors to avoid overpowering the burned design.
3. Apply The Paint
- Use a small brush for detailed areas and a larger one for backgrounds.
- Thin layers work best. It’s better to build up color slowly than to apply thick paint, which can hide the burned lines.
- If you use watercolors, control the water amount. Too much water can cause bleeding.
- For colored pencils, color gently in layers. This keeps the burned lines visible and gives you more control.
4. Let The Paint Dry
Wait for each layer to dry before adding another. This prevents colors from mixing and keeps details sharp. Acrylic paint usually dries in 15–30 minutes, watercolors in about 10–20 minutes.
5. Add More Detail (optional)
After your first color layer, you can add highlights or shadows for depth. Use a fine brush for small touches. Be careful not to overdo it—too much paint can make your piece look messy.
6. Seal Your Work
Sealing protects both the paint and the wood burned design. It also gives a finished look and can add shine or keep a matte effect, depending on the sealer you choose.
| Sealer Type | Finish | Best For |
|---|---|---|
| Spray Acrylic | Matte, satin, or glossy | Quick, even coverage on flat items |
| Brush-on Polyurethane | Glossy or semi-gloss | Durable finish, good for items in use |
| Wax Polish | Soft sheen | Rustic look, indoor display pieces |
Apply sealer in thin, even coats. Let each coat dry fully before adding more.
Tips For Success With Painted Pyrography
- Test paint on scrap wood first. This shows how colors look and behave on your wood.
- Less is more. Too much color can cover the burned art. Use paint to highlight, not hide.
- Choose the right brush. Soft, small brushes give better control and prevent messy edges.
- Protect your workspace. Paint and sealer can stain surfaces. Use newspaper or a drop cloth.
- Ventilation matters. Some sealers and paints have strong fumes. Work in a well-ventilated area.
Common Mistakes And How To Avoid Them
Even experienced crafters run into problems with painted wood burned items. Here are a few issues—and how to fix or prevent them:
- Paint Bleeding into Burned Lines: This happens if the wood isn’t sealed before using watery paints. Always seal if using watercolors or inks.
- Burned Lines Disappearing: Applying too much paint can hide your pyrography. Use thin layers, and let each dry fully.
- Rough Paint Edges: Paint can spread in the wood grain. Sanding well and using the right brush helps.
- Sticky or Cloudy Finish: This results from applying sealer too thickly or not letting it dry between coats. Follow the instructions on your sealer for best results.
- Colors Fading After Sealing: Some cheap sealers can react with paint. Use high-quality, clear acrylic or polyurethane sealers for lasting color.

Credit: www.walmart.com
Advanced Techniques For Painted Wood Burned Crafts
If you want to go beyond basic coloring, try these techniques:
Dry Brushing
This technique uses very little paint on a dry brush to add soft color highlights. It’s perfect for shading or creating a weathered look.
Layered Watercolor Washes
Apply several thin washes of watercolor for a gentle, blended effect. Let each layer dry before adding the next.
Masking For Clean Edges
Use masking tape or a masking fluid to block off areas you don’t want painted. This is useful for geometric designs or adding a colored border.
Mixed Media
Combine acrylic paint, colored pencil, and even metallic pens to create unique textures and accents. Just remember to seal your finished piece.
When To Paint: Before Or After Burning?
Most artists recommend doing the burning first, then painting. Burning over paint can release toxic fumes and damage your tool. However, some advanced crafters use both methods for special effects. If you want to experiment, always work in a well-ventilated area and wear a mask.

Credit: www.amazon.com
Caring For Your Painted Wood Burned Crafts
Painted wood burned items are durable, but they still need some care:
- Keep away from direct sunlight to prevent fading.
- Clean with a dry or slightly damp cloth. Avoid harsh chemicals or soaking.
- Handle with clean hands to avoid transferring oils or dirt.
If your craft is something like a serving tray or coaster, use a food-safe sealer on the finished piece. You can find safe options at art stores or online.
Real-world Examples And Inspiration
Many artists use painted pyrography for gifts, home decor, or to sell at craft fairs. For example, a simple wood burned flower can be brought to life with a touch of green and yellow paint. Or, a set of coasters can have each season burned and painted in matching colors.
Some experienced crafters create portrait plaques by burning the main outlines and shading, then painting the background or clothing. This makes the face stand out and adds a professional touch.
For more inspiration and to see examples from artists around the world, you can visit Pyrography Online.

Credit: www.ebay.com
Frequently Asked Questions
How Do I Stop Paint From Covering The Burned Lines?
Use thin layers of paint and avoid heavy, opaque types. Watercolors and diluted acrylics are best for keeping lines visible. Always let each layer dry before adding more.
Can I Use Oil Paints On Wood Burned Crafts?
It’s possible, but not recommended for beginners. Oil paints take a long time to dry and can blur fine details. Acrylic or watercolor paints are easier and safer for most projects.
Do I Need To Seal Painted Wood Burned Items?
Yes, sealing is important. It protects the paint and burned design from fading, moisture, and scratches. Use a clear acrylic spray or brush-on sealer for best results.
What Kind Of Brush Should I Use?
Choose soft, small brushes for detail work, and a flat brush for larger areas. Synthetic brushes usually work well with acrylics and watercolors.
Is It Safe To Paint Over Wood Burned Items Used For Food?
If your item will touch food (like a cutting board), use only food-safe paints and sealers. Many craft paints and sealers are not food-safe. Always check the label and follow safety guidelines.
Adding paint to wood burned crafts lets you combine two beautiful art forms: pyrography and painting. With the right approach, you can create stunning, colorful works that highlight the best of both techniques. Remember to test materials, work patiently, and seal your work for lasting beauty. Whether you keep your art, give it as a gift, or sell it, painted wood burned crafts are sure to impress.