
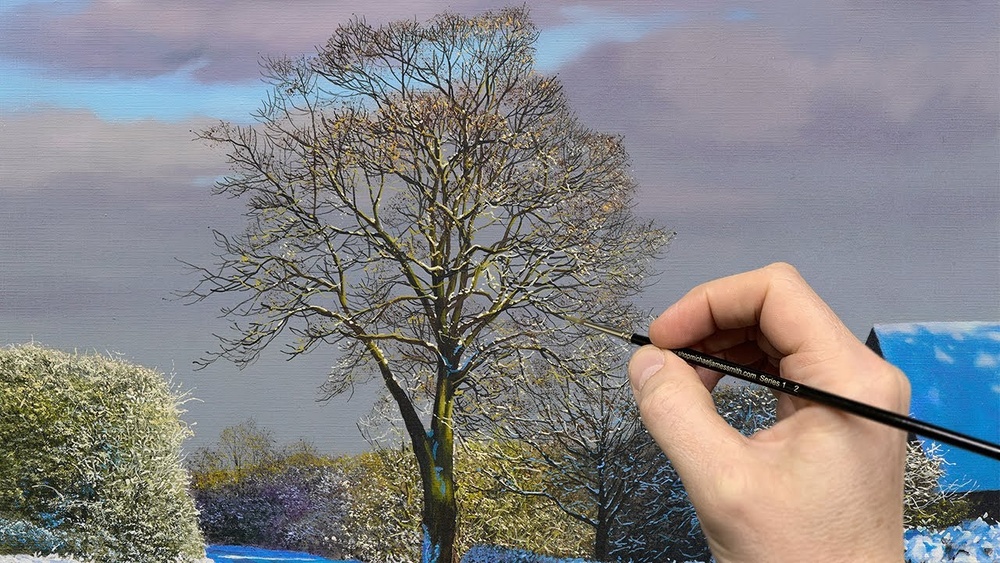
A bare winter tree strips painting down to structure. Without leaves to hide behind, every branch angle, every thickness change, and every value shift is on display. That makes winter trees one of the best subjects for improving your drawing and brush control in oils, and one of the most atmospheric subjects to hang on a wall.
This guide shows how to paint trees in oil for a winter scene, covering branch structure, a limited palette for snowy scenes, the layering order from sky to snow, and how to paint snow-covered pines as well as bare deciduous trees.
Quick answer: To paint a winter tree in oil, tone the canvas, block in a cool sky and snowy ground, and let the sky set slightly. Paint the trunk in a dark, warm gray-brown, then pull branches outward with a small round or rigger brush, making each fork thinner than the one before and letting the finest twigs fade into the sky. Add snow along the tops of branches with thick, slightly blue-white paint, cast blue-violet shadows on the ground, and keep distant trees paler and cooler for depth.
How Winter Trees Are Built
The most common mistake when painting bare trees is drawing branches as uniform sticks. Real trees follow a few consistent rules that you can use as a checklist.
- Tapering: The trunk is thickest at the base and narrows as it rises. Every branch is thinner than the limb it grows from.
- Forking: Branches split into two or more smaller branches, repeatedly, so the tree becomes finer toward its outer edge.
- Direction changes: Branches rarely grow in straight lines. They bend and zigzag slightly at each fork.
- Silhouette: Different species have recognizable outlines. Oaks spread wide with twisting limbs, elms form a vase shape, birches are slender with drooping twigs, and maples tend toward rounded crowns.
- Outer haze: At a distance, the mass of fine twigs at the edges reads as a soft, slightly transparent haze rather than individual lines.
Spending ten minutes sketching real trees, or photos of them, before painting will improve your results more than any brush technique.
Materials for a Winter Tree Oil Painting
- Surface: Primed canvas or panel, 11 x 14 or 12 x 16 inches.
- Limited palette: Titanium white, ultramarine blue, burnt sienna, burnt umber, yellow ochre, alizarin crimson or a permanent alternative, and cadmium red light for a few warm notes. Payne’s gray is optional.
- Brushes: Large flat or filbert (size 10 to 12) for sky and snow, medium filbert for trunks, small round, and a rigger or liner brush for twigs.
- Tools: Palette knife for snow texture, odorless mineral spirits, a medium such as linseed oil or a fast-drying alkyd medium, and lint-free rags.
A limited palette of blue, sienna, ochre, and white is enough for an entire winter scene, and it keeps colors harmonious. For broader advice on oil painting styles, materials, and choosing paints, see our oil painting tips and buying guide.
Mixing Winter Colors
| Element | Mix | Notes |
|---|---|---|
| Overcast sky | White + small amount of ultramarine + a touch of burnt sienna | Sienna grays the blue for a cold, cloudy feel |
| Clear winter sky | White + ultramarine, lighter near horizon with a hint of yellow ochre or alizarin | Warm glow near the horizon adds interest |
| Trunk and main limbs | Burnt umber + ultramarine | Makes a rich near-black that is softer than tube black |
| Lit side of bark | Burnt sienna + yellow ochre + white | Use sparingly on the sun side |
| Snow in light | White + tiny touch of yellow ochre | Pure white can look chalky; a warm tint reads as sunlit |
| Snow in shadow | White + ultramarine + a touch of alizarin | Blue-violet shadows are characteristic of snow on clear days |
| Distant trees | Sky color + a little umber | Close in value to the sky so they recede |
Snow is rarely pure white in a painting. Its color is largely reflected light: warm from the sun, blue from the sky in shadowed areas. Mixing both temperatures gives snow its glow.
How to Paint Trees in Oil: Winter Step by Step
- Tone the canvas. Rub a thin wash of burnt sienna or a neutral gray thinned with solvent over the canvas. A warm tone peeking through cool snow adds vibrancy. Let it set until tacky, about 15 to 30 minutes.
- Sketch the composition. With thinned umber, mark the horizon (often in the lower third), the main tree’s trunk and largest limbs, and any distant tree lines. Place the main tree off center.
- Paint the sky. Use the large brush to block in the sky, lighter near the horizon and slightly darker at the top. Blend gently. Paint over the area where branches will go; you will paint branches into the wet or tacky sky later.
- Add distant trees. While the sky is wet, use a slightly darker mix of the sky color to suggest a far tree line with soft, vertical dabs. Blend their tops softly so they look misty.
- Block in the snowy ground. Paint the ground with your light snow mix, using broad horizontal strokes. Add the blue-violet shadow mix in dips and where the main tree’s shadow will fall.
- Paint the trunk. Using the medium filbert and the umber-blue mix, paint the trunk from the ground upward, tapering as you go. Flare the base slightly where roots meet the ground.
- Paint the main limbs. Pull large limbs out from the trunk with the small round brush, thinning paint slightly with medium. Each limb should taper and fork. Lift pressure as you move outward.
- Add fine branches with a rigger. Thin the dark mix with medium until it flows like ink. Load the rigger fully and pull long, thin lines outward from the limbs. Rotate the brush and vary pressure to keep lines lively.
- Create the twig haze. Using a dry, worn fan brush or a scruffy small brush with very little paint, lightly drag or dab at the outer edges of the crown. This suggests masses of fine twigs without painting each one.
- Add light to the bark. On the side facing the light source, add thin strokes of the warm bark mix along the trunk and largest limbs.
- Add snow on branches. Mix a thick, slightly warm white. With the small round or the edge of a palette knife, lay snow along the top edges of branches and in forks, where snow naturally collects. Keep it irregular.
- Paint the cast shadow. Pull a blue-violet shadow across the snow from the base of the tree, in the direction opposite the light. Shadows should follow the contours of the ground.
- Final details. Add a few grasses poking through snow, a fence line, or footprints. Brighten the lightest snow areas with impasto white tinted with a hint of yellow.
How to Oil Paint Pine Trees in Snow
Evergreens need a different approach because their shape comes from dense masses of needles rather than visible branches.
- Paint a thin vertical line for the trunk as a guide, from base to tip.
- Mix a deep green from ultramarine, yellow ochre, and a touch of burnt sienna. Pine greens in winter are usually dark and cool.
- Starting at the top, use the corner of a fan brush or a small filbert to tap short, downward-angled strokes on either side of the trunk. Keep the top narrow and widen the tiers as you move down, creating a loose triangle.
- Leave gaps between tiers so the tree does not become a solid cone. Let a little sky show through.
- Add snow by laying thick white along the tops of each tier with a palette knife or round brush, letting it drape downward in places.
- Paint a slightly blue shadow under each snow layer on the green, which separates the tiers.
- For distant pines, use smaller, simpler triangles painted in grayer, lighter greens that are close to the sky value.
Creating Depth in a Winter Landscape
Atmospheric perspective is the key to depth. Particles in the air scatter light, so distant objects appear lighter, bluer, and less detailed. Apply this in three planes: a pale, soft background tree line; a middle ground with slightly darker trees and some definition; and a foreground with the darkest values, sharpest edges, and warmest notes.
Mist and falling snow deepen this effect. The techniques covered in our guide to painting fog in oils work beautifully for misty winter mornings, where background trees almost dissolve into the sky.
Common Mistakes When Painting Trees in Oil
Branches look like a fishbone. Limbs coming off the trunk at identical angles in matching pairs look artificial. Vary angles and spacing, and let some limbs grow toward or away from the viewer.
Twigs are too thick. Thin your paint more and use a rigger brush. If lines get heavy, softening the outer crown with a dry brush can rescue them.
Snow looks flat white. Introduce warm light and cool shadow. Pure titanium white everywhere removes all form.
Muddy branches over wet sky. Painting dark branches into very wet, light sky can blend them into gray. Let the sky become tacky first, or use a medium that helps the paint stay on top.
Everything has hard edges. Distant trees and outer twigs should be soft. Keep the sharpest edges for the main trunk and foreground.
Painting Birch Trees in Winter
Birches are a favorite winter subject because their pale bark glows against snow and dark woods. Since the trunk is light, reverse your usual approach: paint the background woods darker first, then lay in the trunk with a warm off-white (white plus a hint of yellow ochre) and shade one side with a cool gray made from white, ultramarine, and a touch of burnt sienna.
Add the characteristic dark horizontal marks with the edge of a palette knife or a small flat brush, varying their width and spacing. Near the base, mature birches often have rougher, darker bark, so add more dark patches there. Birch twigs are fine and often droop, so pull them downward with a rigger in a reddish-brown mix rather than pure dark.
Practice Exercises
- Fill a small canvas board with five tree silhouettes of different species using only umber and white.
- Do a 30-minute rigger exercise, pulling long, tapering branches until your lines become fluid.
- Paint the same scene twice, once on an overcast day palette and once with a clear blue sky and long violet shadows, and compare the moods.
If you enjoy subtle whites and textured ground surfaces, the methods in our sand and beach oil painting tutorial translate surprisingly well to snowy fields, since both rely on warm and cool variations of very light values.
FAQs
How do you paint trees in oil paint for beginners?
Start with the trunk and largest limbs in a dark mix, taper every branch as it extends, and fork repeatedly into thinner lines. Use a rigger brush with fluid paint for twigs and soften the outer crown so it blends into the sky.
What brush is best for painting tree branches in oil?
A rigger or liner brush with long bristles is ideal for thin, flowing branches. Use a small round for medium limbs and a filbert for the trunk. A worn fan brush helps suggest dense twigs.
What colors make winter snow look realistic?
Mix white with a touch of yellow ochre for sunlit snow and white with ultramarine and a bit of alizarin for shadowed snow. Using both warm and cool whites creates form and light.
How do I paint snow on tree branches?
Lay thick, slightly warm white along the top edges of branches and in forks, using a small round or palette knife. Keep the snow irregular and add a hint of blue shadow underneath for dimension.
How do I make painted trees look far away?
Paint distant trees lighter, cooler, and with less detail, keeping their value close to the sky. Soften their edges. Save dark values, sharp edges, and warm colors for the foreground.
Should I paint branches wet into wet or on dry sky?
Both approaches work. Painting into a tacky sky gives soft, natural edges, while painting on a dry sky gives crisper lines. Very wet sky can muddy dark branches, so wait until it is slightly tacky if possible.
Final Thoughts
Winter trees reward careful observation: taper every branch, fork repeatedly, vary angles, and let the finest twigs dissolve into the sky. Combine that structure with warm and cool snow, blue-violet shadows, and atmospheric depth, and your winter scene will feel cold, quiet, and convincing.
To keep building your skills in landscapes and other oil subjects, explore our full resource on oil painting styles, techniques, and materials.




