Painting snow in oil is both a challenge and an opportunity for artists. Snow is not just white—it reflects colors, changes with light, and brings a special mood to any landscape. Many artists struggle to make snow look real and alive in their paintings.
It’s easy to end up with flat, dull areas if you only use white paint. To capture the magic of snow, you must understand how to mix colors, see temperature shifts, and build texture and depth on your canvas.
This guide will give you practical, clear tips to help you paint snow in oil. Whether you’re a beginner or have painted landscapes before, you’ll learn how to see snow differently and use oil paint to make it come alive.
We’ll explore color mixing, brushwork, light effects, and common mistakes—plus offer insights that even experienced artists sometimes miss. Let’s get started and turn that blank canvas into a snowy masterpiece.
Understanding Snow: Color And Light
Before picking up your brush, it’s important to know that snow is not just white. In nature, snow reflects the sky, trees, buildings, and even the ground beneath. It can look blue, purple, pink, yellow, or even grey, depending on the time of day and weather conditions.
Key insights:
- In bright sunlight, snow can look almost blue in the shadows and warm yellow or orange in the highlights.
- On cloudy days, snow appears cooler and more neutral—think blue-grey or violet tints.
- Early morning or late evening snow may have rosy or golden glows, reflecting sunrise or sunset.
Example: If you’re painting a winter sunset, the snow near the horizon may pick up soft pink and orange tones, while distant snow fields remain cooler and bluer.
Tip: Always observe real snow scenes, or look at reference photos, and note where you see color shifts. Try to capture these in your painting.
Essential Materials For Painting Snow In Oil
Choosing the right supplies will make your process smoother and help your colors stay vibrant.
Paint Colors You’ll Need
You don’t need every color in the store. Focus on a balanced palette:
- Titanium White: For mixing, but never use straight from the tube for snow.
- Ultramarine Blue: Essential for cool shadows.
- Cobalt Blue: For brighter, cooler snow tints.
- Alizarin Crimson: For subtle purples and pinks in snow.
- Cadmium Yellow: For warm sunlight on snow.
- Burnt Sienna: To neutralize cool tones and add earthiness.
- Payne’s Grey: Useful for deep, cool shadows.
Brushes And Surfaces
- Flat brushes: Great for broad snowy areas.
- Round brushes: For details and blending.
- Palette knife: For texture and crisp highlights.
- Stretched canvas or canvas board: Choose a surface with some texture to hold thick paint.
Pro tip: Keep a clean brush or rag nearby to lift off paint and keep your whites clean.
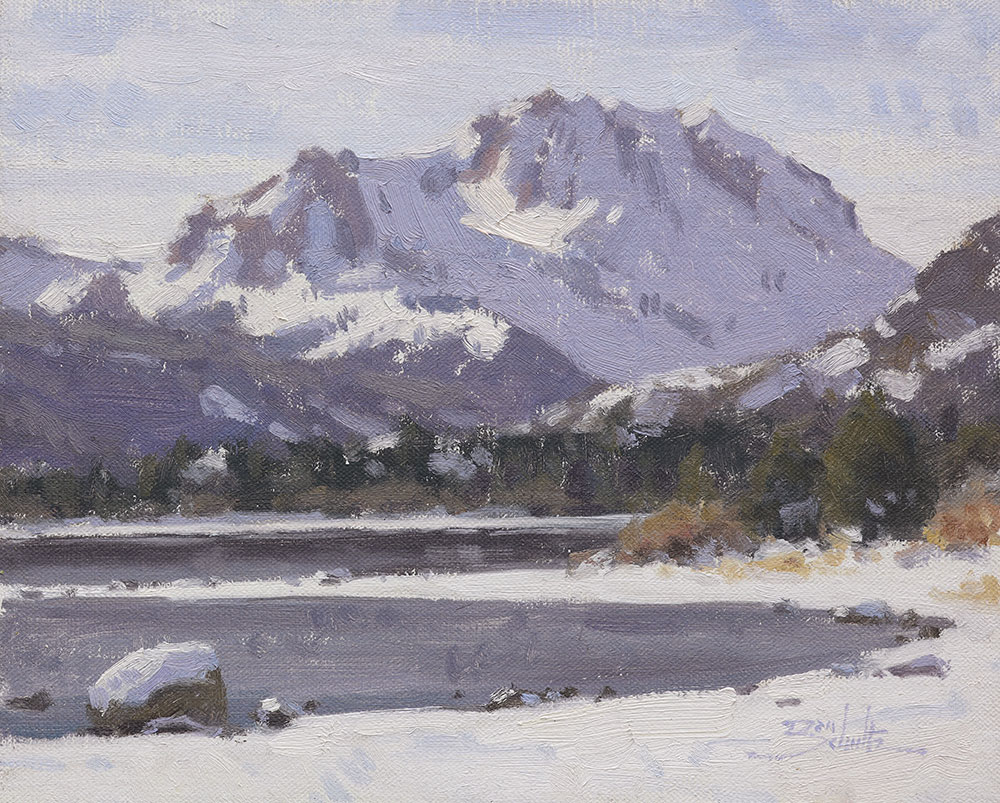
Credit: www.danschultzfineart.com
Mixing Colors For Snow
Getting the right color for snow is not about using pure white. It’s about finding the right balance between warm and cool colors.
Basic Color Recipes
- Shadow snow: Mix Titanium White with Ultramarine Blue and a touch of Alizarin Crimson for a cool, blue-violet.
- Sunlit snow: Try Titanium White plus a hint of Cadmium Yellow and a touch of Burnt Sienna for a warm, golden effect.
- Reflected color snow: Add a tiny amount of surrounding color—like green from trees or red from buildings—into your white.
Common Mistakes In Mixing
- Using pure white everywhere makes snow look flat and fake.
- Ignoring the temperature (warm/cool) leads to unnatural snow.
Practical Example: If you’re painting snow under a pine tree, add a small amount of green to your snow color to suggest reflected light.
Creating Texture: Techniques For Realistic Snow
Snow is not smooth like glass. It piles up, drifts, and sometimes sparkles. Oil paint is perfect for capturing these effects.
Techniques To Try
- Impasto: Use a palette knife or thick brush to apply paint heavily in highlight areas. This makes snow seem to sit on top of branches or rocks.
- Dry brush: Drag a nearly dry brush over the canvas to create soft, broken areas—good for distant snow or subtle highlights.
- Blending: Use a soft brush to gently blend shadow colors into highlights, mimicking soft, powdery snow.
Adding Sparkle
For the brightest spots where the sun hits, use pure Titanium White with thick impasto, but only in a few places. Too much pure white can ruin the illusion.
Non-obvious Insight: Leave some of your canvas unpainted (or underpainted with a warm color) in the first layer. Small bits of this warmth peeking through make the final snow look more natural and alive.
Painting Snow Shadows
Shadows are key to making snow feel three-dimensional. They add depth and drama to your painting.
Understanding Shadow Colors
- Snow shadows are almost never black or grey. They’re usually blue, purple, or blue-grey.
- The color of the sky often influences snow shadows. A blue sky creates blue shadows; a sunset might make them purple or pink.
How To Paint Snow Shadows
- Paint shadows with a mix of blue and a touch of red (like Ultramarine Blue and Alizarin Crimson), plus white.
- Keep the edges of shadows soft, not hard. Snow is powdery, so shadows don’t have crisp lines.
- Make shadows darker and cooler closer to you, and lighter/bluer as they recede into the distance.
Example: On a sunny day, the shadow of a fence on snow might be painted with Cobalt Blue, Alizarin Crimson, and White, blended softly at the edges.
Light Effects: Capturing Atmosphere
Snow changes with the light. Capturing these changes brings your painting to life.
Painting Sunlit Snow
- Use warmer colors in the highlights—add a touch of yellow or orange to your white.
- Put the strongest highlights where the sun hits directly.
- Don’t make all snow equally bright. Vary your values for interest.
Painting Overcast Or Evening Snow
- Use cooler colors—blues, violets, and greys.
- Highlights are softer and less bright.
- Add subtle touches of pink or purple for sunset or sunrise effects.
Atmospheric Perspective
Farther snow looks lighter and less detailed due to atmospheric haze. Use more white and less color for distant snow, and sharper contrasts in the foreground.
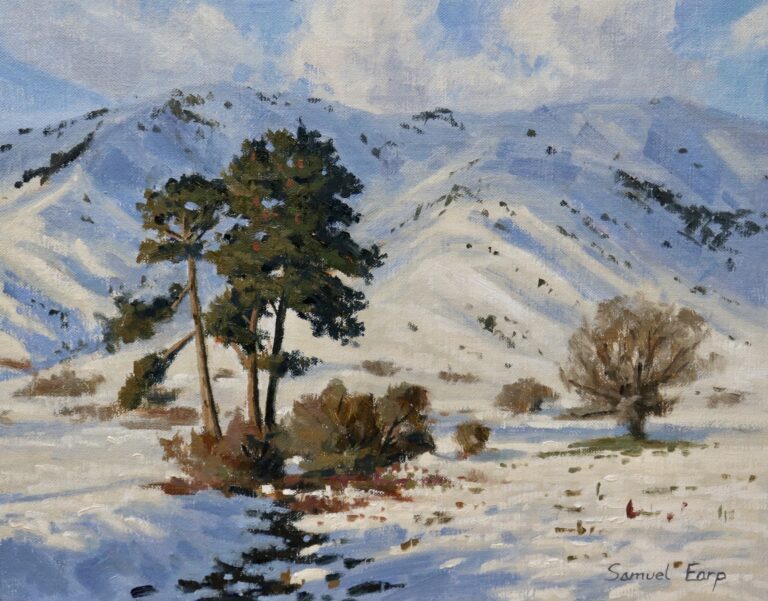
Credit: samuelearp.com
Compositional Tips For Snow Scenes
A good snow painting isn’t just about color and texture. Composition matters, too.
Leading The Eye
- Use paths, fences, or lines of trees to guide the viewer’s eye through the painting.
- Place the brightest snow highlights in the center of interest.
Balancing Warm And Cool Areas
- If your snow is mostly cool (blue), add warm touches (orange, yellow) to balance.
- Avoid making the whole painting one temperature.
Using Negative Space
Snow often creates large, open areas. Use these spaces to give the eye a rest, but add small details (twigs, animal tracks) for interest.
Table: Comparing Snow Colors By Light Condition
See how snow color changes with different lighting:
| Light Condition | Highlight Color | Shadow Color | Suggested Mix |
|---|---|---|---|
| Sunny Day | Warm White/Yellow | Blue-Violet | White + Cadmium Yellow for highlights, White + Ultramarine + Alizarin for shadows |
| Overcast | Cool White | Grey-Blue | White + Cobalt Blue for highlights, White + Payne’s Grey for shadows |
| Sunset/Sunrise | Pink/Orange | Purple/Blue | White + Alizarin + Cadmium Yellow for highlights, White + Ultramarine + Alizarin for shadows |

Credit: www.lesliefehling.com
Common Mistakes And How To Avoid Them
Many artists make the same errors when painting snow. Here’s what to watch out for:
- Using only white paint. Real snow has many colors.
- Hard shadow edges. Snow is soft, so keep shadows blended.
- Ignoring reflected colors. Snow picks up color from the sky, trees, buildings, and even people.
- Flat highlights. Vary the brightness—save pure white for the most intense spots.
- Dirty whites. Clean your brush when switching between shadow and highlight colors, or your snow will look muddy.
Non-obvious Insight: If your snow looks dull, it may be because you overmixed your colors. Leave some brushstrokes “broken” so small bits of color show through.
Table: Brush Techniques For Snow Effects
Here’s a quick reference for which brush technique creates which snow effect:
| Technique | Tool | Best For |
|---|---|---|
| Impasto | Palette knife or stiff brush | Thick highlights, snow on branches |
| Dry Brush | Dry, flat brush | Soft, distant snow, sparkles |
| Blending | Soft round brush | Smooth transitions, powdery snow |
| Scumbling | Soft, worn brush | Foggy or misty snow, atmosphere |
Practical Painting Steps: From Start To Finish
To put all these tips together, here’s a step-by-step approach you can follow for painting a snowy landscape:
- Plan your composition. Sketch out main elements—horizon, trees, paths, etc.
- Block in big shapes. Use a thin wash of neutral color to cover the canvas.
- Establish light direction. Decide where the sunlight comes from. This will guide your highlights and shadows.
- Paint shadow areas first. Mix your cool shadow color and lay in the shapes with soft edges.
- Add midtones. Paint areas that are neither in direct sun nor full shadow. These often have subtle color shifts.
- Place highlights. With a clean brush, add your brightest snow—usually a warm, thick white—where the sun hits.
- Refine edges and add detail. Use smaller brushes for twigs, animal tracks, or snow-covered branches.
- Step back. Look at your painting from a distance. Adjust values and colors to make sure the snow looks lively and natural.
Pro Tip: Photograph your work and view it in black and white to check the value contrast. Snow needs strong value shifts to look real.
Inspirational Examples
Many great artists have painted snow. Study their work to see how they handled color and light. For example, Claude Monet’s winter scenes use blue and purple shadows with bright, warm highlights. Isaac Levitan and Lawren Harris also created striking snow landscapes, each with their unique approach.
For more ideas, you can visit the Wikipedia page on snow painting and see how artists across history have tackled this subject.
Table: Quick Reference—do’s And Don’ts
| Do | Don’t |
|---|---|
| Use color in snow | Paint snow pure white everywhere |
| Vary brushwork for texture | Make all snow areas smooth and flat |
| Observe real snow and photos | Rely only on imagination for snow color |
| Balance warm and cool tones | Make the painting all one temperature |
| Keep whites clean by cleaning your brush | Mix shadow and highlight colors with a dirty brush |
Final Thoughts
Painting snow with oil is a rewarding experience if you pay attention to color, temperature, light, and texture. Remember, snow is alive with reflected colors and changing light. Don’t be afraid to use blues, purples, and even pinks in your snow. Practice observing snow in real life or in high-quality photos. Take your time mixing colors and building up layers. With these tips, your next winter painting will have depth, sparkle, and true atmosphere.
Frequently Asked Questions
How Do I Make Snow Look Bright And Not Muddy?
Keep your brush clean when switching between colors, and avoid overmixing. Use pure Titanium White only for the brightest highlights, and place them carefully.
What Colors Should I Use For Snow In Shadow?
Snow shadows are often blue or purple. Try mixing Ultramarine Blue, Alizarin Crimson, and White for a realistic effect. Adjust based on the light in your scene.
Can I Use Black Paint For Snow Shadows?
It’s better to avoid black. Use cool blues and reds instead. Black can make snow look flat and lifeless.
How Can I Show Sunlight On Snow?
Mix a little warm color (like Cadmium Yellow or Burnt Sienna) into your white for sunlit areas. Place these highlights only where the sun hits directly.
What’s A Common Beginner Mistake When Painting Snow?
The most common mistake is using only white for snow. Real snow is full of color. Beginners also forget to soften shadow edges or clean their brushes, leading to muddy colors.