Resist painting is a creative and fun art activity that opens a world of color and surprise for kids. It’s a process where children use special materials to keep parts of their paper white (or untouched), while painting over or around them.
When the paint is dry, they reveal patterns, words, or images that seem to “pop out” like magic. This art form is simple enough for preschoolers, yet offers endless possibilities for older kids and even adults. Whether you’re a parent, teacher, or just want to inspire young artists, resist painting can help kids learn about color, layering, and thinking outside the box.
This guide will walk you through everything you need to know about how to do resist painting for kids. You’ll learn about the best materials, step-by-step instructions, helpful tips, and creative ideas to make your resist painting sessions a success.
We’ll also cover common mistakes, safety advice, and ways to adapt resist painting for different ages and settings. By the end, you’ll have the confidence and know-how to create beautiful resist art with children of any skill level.
What Is Resist Painting?
Resist painting is a technique where a substance is applied to a surface to “resist” paint, leaving certain areas uncolored. The most common materials used for the resist are crayons, oil pastels, or masking tape. When kids paint over these materials with watercolor or other paints, the areas covered by the resist stay white or the original color of the paper, while the rest absorbs the paint.
Resist painting is used in many cultures and forms, such as batik in Indonesia (using wax on fabric) or in fine arts. For kids, it’s a way to experiment and see how different materials interact. The surprise of revealing a hidden design brings excitement and builds curiosity.
Why Kids Love Resist Painting
Kids are naturally drawn to activities with an element of surprise and discovery. Resist painting offers both. Some reasons why children enjoy this process:
- Instant results: Kids see their hidden designs appear right away as they paint.
- Sensory experience: Using crayons or oil pastels adds a tactile element.
- Easy for all ages: Even young children can make interesting results with simple shapes.
- Encourages creativity: Kids can invent their own patterns, mix colors, and try new ideas.
- No “wrong” way: Every resist painting is unique, which builds confidence.
Resist painting also helps with fine motor skills, hand-eye coordination, and color theory in a playful way.
Essential Materials For Resist Painting
Choosing the right materials can make resist painting much easier and more enjoyable. Here are the basics you’ll need:
| Material | Purpose | Best For |
|---|---|---|
| White Crayon or Oil Pastel | Draw the resist design | Simple, safe for all ages |
| Watercolor Paint | Paint over the resist design | Easy clean-up, bright colors |
| Watercolor Paper | Base for the artwork | Holds water and color well |
| Brushes | Apply paint | Different sizes for variety |
| Masking Tape | Make geometric or sharp-edged designs | Older kids, tape resist art |
| Salt (Optional) | Adds texture to wet paint | For extra effect |
Tip: For younger children, large brushes and sturdy paper help prevent frustration.
Step-by-step Guide: How To Do Resist Painting For Kids
Resist painting is simple to set up, but following these steps will help you get the best results:
1. Prepare Your Workspace
Cover the table with newspaper or a plastic tablecloth. Have a cup of water for rinsing brushes, and paper towels for spills. This keeps cleanup easy and stress-free.
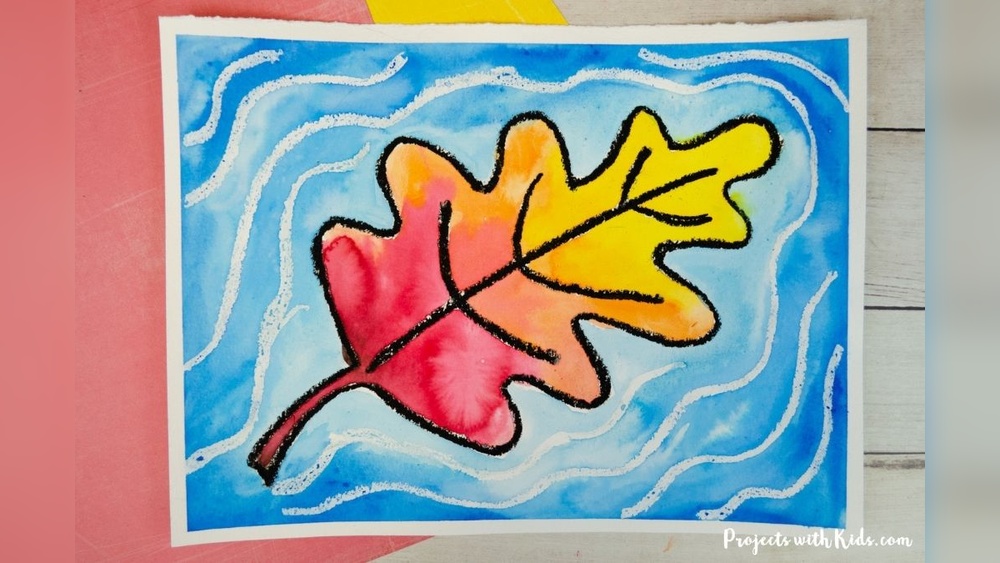
2. Draw The Resist Design
Using a white crayon or oil pastel, have the child draw a design on the paper. Encourage pressing firmly, as a thicker wax layer will resist the paint better. Common ideas include:
- Names or secret messages
- Simple shapes (hearts, stars, circles)
- Patterns (zig-zags, swirls)
- Outlines of animals or trees
For tape resist, place strips of masking tape on the paper to create geometric patterns. Press down well so no paint seeps under the tape.
3. Paint Over The Design
Mix watercolor paint with a little water. Show kids how to brush paint over the entire page—including right on top of the crayon or tape. As they paint, their hidden design will appear like magic.
Encourage experimenting with:
- Single colors for a calm look
- Blending colors for a rainbow effect
- Layering (let dry between coats)
4. Add Special Effects (optional)
While the paint is still wet, sprinkle a little table salt onto the painting. The salt will soak up some paint, creating starburst effects. This adds texture and interest.
5. Let It Dry And Reveal
Allow the painting to dry flat. If you used tape, carefully peel it away to reveal crisp white lines. Display the finished art proudly!
Creative Variations For Different Ages
Resist painting can be adapted for any age group. Here are a few ideas:
For Preschoolers (ages 3–5)
- Use thick, easy-to-hold crayons.
- Try simple shapes or scribbles.
- Limit to one or two colors.
For School-age Kids (ages 6–10)
- Introduce tape resist for sharp lines.
- Encourage writing words or names.
- Experiment with salt or spatter techniques.
For Tweens And Teens
- Try more detailed drawings.
- Mix other media (collage, ink outlines).
- Use stencils or stamps for advanced designs.
Non-obvious insight: Older kids can layer resist and painting steps multiple times to create more complex, multi-colored artworks.
Safety And Clean-up Tips
Resist painting is generally safe, but a few best practices keep it hassle-free:
- Make sure younger kids don’t put crayons or pastels in their mouths.
- Use washable paints for easy clean-up.
- Keep wet paintings on a flat surface to prevent drips.
- Have kids wear aprons or old shirts.
If using salt, remind kids not to rub their eyes afterward.

Credit: www.youtube.com
Common Mistakes And How To Avoid Them
Even though resist painting is simple, these mistakes can lead to disappointment:
- Drawing too lightly: If the crayon or pastel marks are faint, the paint will cover them. Remind kids to press hard.
- Using thin paper: Regular printer paper can rip or buckle. Watercolor or heavy drawing paper works best.
- Tape not pressed down well: Paint can seep under tape, making lines less crisp. Press tape edges firmly.
- Too much water: Overly wet paint can dilute colors and make paper soggy.
- Not letting paint dry: Lifting tape or moving paper before it’s dry can cause smears.
Pro tip: Test each material before starting with the group, especially if you’re working with a large class or different brand supplies.
Comparing Resist Painting Techniques
There are several ways to create resist effects. Here’s a quick comparison to help you choose:
| Resist Material | Best Paint Type | Pros | Cons |
|---|---|---|---|
| White Crayon | Watercolor | Easy, safe, good for young kids | Hard to see design before painting |
| Oil Pastel | Watercolor, Tempera | Bold resist, vibrant colors | Messier, more expensive |
| Masking Tape | Any | Sharp lines, geometric designs | Tape must be removed carefully |
| Glue (dried) | Watercolor | Raised, tactile effect | Takes longer to dry before painting |
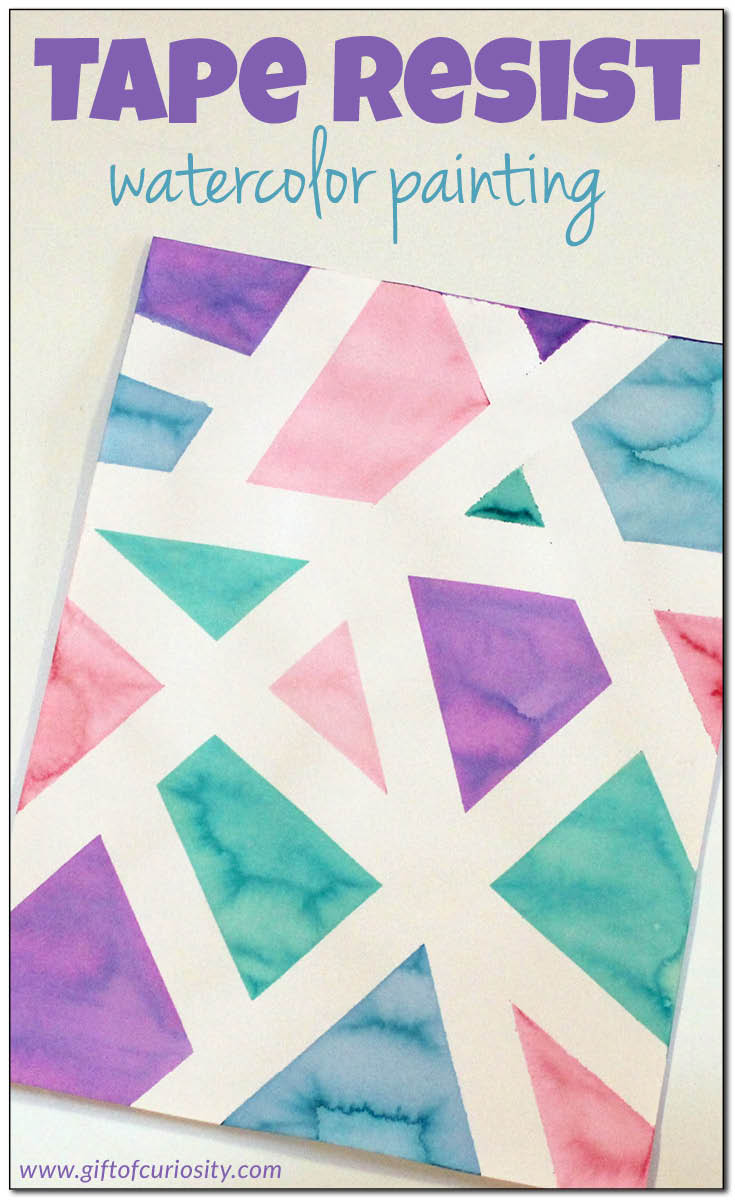
Credit: www.giftofcuriosity.com
Fun Ideas And Project Inspiration
Once you master the basics, resist painting can be used for many creative projects:
- Greeting cards: Kids can write messages in crayon, then paint over for a surprise reveal.
- Holiday art: Make snowflakes with tape resist, or secret Valentine hearts.
- Science tie-ins: Draw shapes from nature, or use salt for “galaxy” effects.
- Storytime connection: Illustrate a favorite book scene using resist techniques.
- Classroom murals: Have each child make a square, then combine for a large artwork.
Advanced tip: Try using wax candles or even hot glue (with adult help) as a resist for special textures.
How Resist Painting Teaches Key Skills
Resist painting isn’t just fun—it’s also educational. Here’s what kids learn:
| Skill | How Resist Painting Helps |
|---|---|
| Fine Motor Control | Drawing and painting require grip and precision |
| Cause & Effect | Kids see how wax resists water, connecting action and result |
| Creativity | Choosing colors, designs, and techniques |
| Patience | Waiting for paint to dry before revealing the full effect |
| Observation | Noticing how materials interact and change |
These skills go beyond the art room and help in reading, writing, and problem-solving.
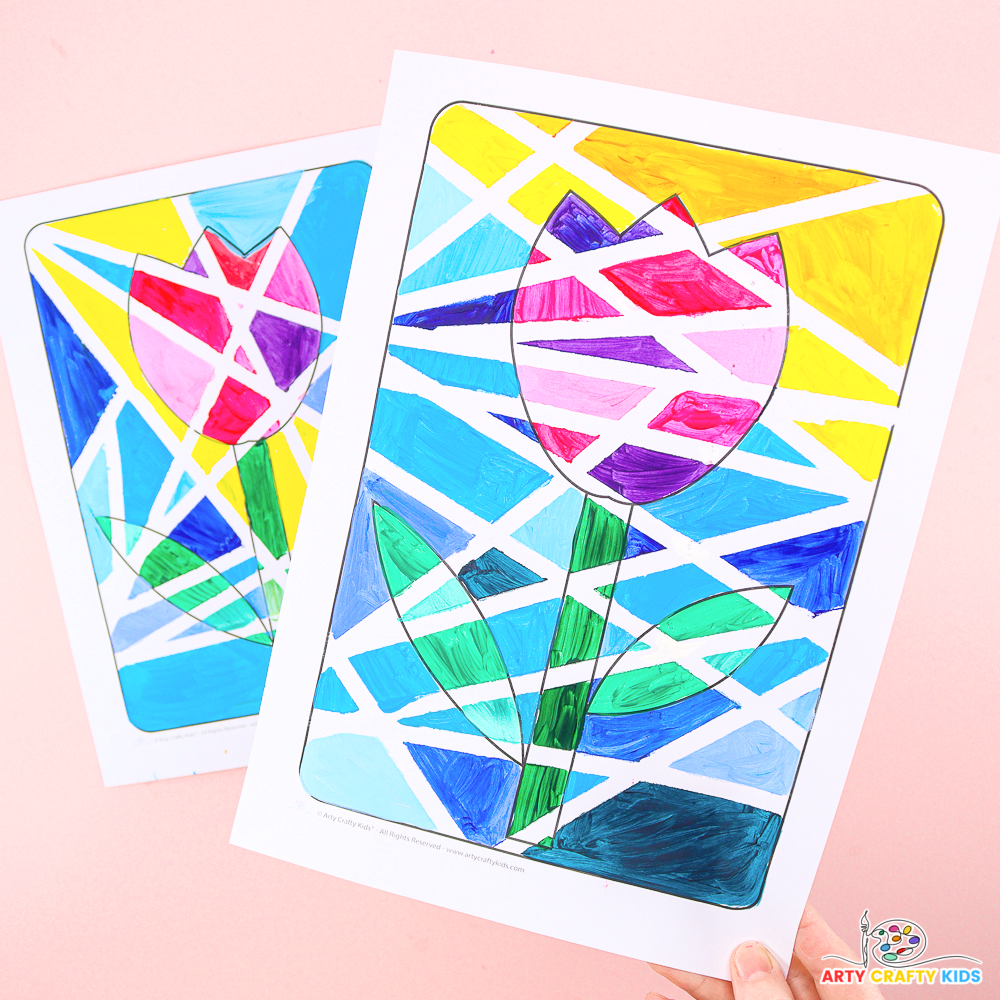
Credit: www.artycraftykids.com
How To Involve Groups Or Classes
Resist painting is excellent for group settings. Here’s how to manage it with multiple kids:
- Set up painting stations with shared supplies.
- Demonstrate each step before kids start.
- Use name tags on paper if doing a gallery wall.
- Let kids help with setup and clean-up for more responsibility.
If you have mixed ages, pair younger and older kids for peer learning.
Troubleshooting: When Things Don’t Go As Planned
If something isn’t working, try these fixes:
- If the resist doesn’t show up, switch to oil pastels or press harder.
- If paint is too light, use less water or more pigment.
- If tape tears the paper, wait until fully dry and peel slowly at an angle.
Unusual insight: Humidity can affect how paint dries—if it’s very humid, allow extra drying time to prevent smudges.
Taking Resist Painting Further
For families or teachers ready to go beyond basics, consider these ideas:
- Try black paper with white crayon and bright watercolors for dramatic effects.
- Make layered “hidden pictures” by doing several rounds of resist and painting.
- Use stencils or templates for group projects.
- Host a resist painting “art show” to celebrate kids’ work.
For more advanced resist techniques, you can explore batik or wax resist on fabric—learn more from the Wikipedia page on resist dyeing.
Frequently Asked Questions
What Age Is Resist Painting Best For?
Resist painting is great for children as young as three, but older kids and even teens enjoy it too. The technique can be made simple or complex, depending on the child’s age and interest.
Can I Use Regular Crayons Instead Of Oil Pastels?
Yes, regular crayons (especially white) work well with watercolor paint. Oil pastels make bolder lines and colors but can be messier.
Why Isn’t My Resist Design Showing Up?
The most common reasons are pressing too lightly with the crayon or pastel, using thin paper, or using too much water with paint. Try pressing harder and using less water.
Is Resist Painting Safe For Kids With Allergies?
Most resist painting materials are safe, but always check paint labels for potential allergens. Avoid scented or flavored crayons for kids with sensitivities.
Can I Use Other Paints Besides Watercolor?
Yes, you can use tempera, poster paint, or even acrylic for older kids. However, watercolors are easiest for creating the classic resist effect.
Resist painting turns ordinary art time into a magical experience of discovery and color. With the right materials, a little preparation, and these practical tips, you can spark creativity and confidence in any child. The surprise of revealing hidden designs never gets old, and each painting is a reminder that art is full of possibilities.
Try it today—you might find yourself inspired, too.