
Want to add a personal touch to your garden that’s both fun and unique? Painting DIY rocks for your garden is an easy and creative way to brighten up your outdoor space.
Whether you want colorful decorations, cute garden markers, or charming accents, you can transform simple stones into eye-catching art. In this guide, you’ll discover simple steps and helpful tips to paint your rocks like a pro, even if you’ve never picked up a paintbrush before.
Ready to turn ordinary rocks into beautiful garden treasures? Let’s dive in and get your garden glowing with your own artistic flair!
Choosing The Right Rocks
Choosing the right rocks is the first step in creating beautiful DIY painted garden stones. The type and shape of the rock affect how well the paint sticks and how your design looks. Picking the perfect stone makes painting easier and your garden more charming.
Types Of Rocks For Painting
Rocks with smooth surfaces work best for painting. River rocks and flat pebbles are popular choices. These stones have fewer bumps and cracks, allowing paint to spread evenly. Avoid porous or crumbly rocks, as they absorb paint and fade quickly.
Where To Find Suitable Stones
Look for rocks in your garden, nearby parks, or riverbeds. Garden centers and craft stores also sell smooth painting stones. Choose stones that are clean and free from dirt or moss. Always collect rocks from places where it is allowed.
Selecting Smooth And Flat Surfaces
Flat rocks provide a large canvas for your artwork. Smooth surfaces help paint dry evenly without blotches. Test a rock’s surface by running your hand over it. A stone with a gentle texture will hold paint better and show your design clearly.
Credit: fb-rocks.com
Preparing Rocks For Painting
Preparing rocks for painting is a crucial step in creating beautiful garden decorations. Clean and smooth surfaces help paint stick better and last longer. Taking time to prep rocks ensures vibrant colors and neat designs. Follow simple steps to get your rocks ready for painting.
Cleaning Techniques
Start by washing the rocks with warm water and mild dish soap. Use a scrub brush or old toothbrush to remove dirt and grime. For porous rocks, scrub gently to avoid damage. Rinse thoroughly to remove soap residue. Dirt and oils can stop paint from adhering properly.
Drying Methods
Pat the cleaned rocks dry with a paper towel or soft cloth. Leave them in a sunny spot to dry completely. Avoid painting on damp rocks because moisture affects paint adhesion. Dry rocks make sure your paint stays bright and lasts longer.
Priming The Surface
Apply a thin layer of primer or white acrylic paint to the rock surface. This base coat helps colors show true and last longer. Let the primer dry fully before painting your design. Priming creates a smooth, even surface that improves paint coverage.
Selecting Paints And Tools
Choosing the right paints and tools is key to successful DIY rock painting for your garden. The right materials ensure your designs last outdoors and look great. This section guides you through the best options for paints, brushes, and other supplies needed.
Best Paint Types For Outdoor Use
Acrylic paints work best for painting garden rocks. They dry quickly and resist fading under sunlight. Look for outdoor or weatherproof acrylic paints to ensure durability. Avoid watercolors or oil-based paints; they do not hold up well outside. Spray paints can also be used but choose ones labeled for outdoor use.
Brushes And Painting Tools
Use synthetic brushes with firm bristles for detail and control. Flat brushes cover large areas smoothly. Round brushes help with fine lines and shapes. Foam brushes work well for base coats or large flat surfaces. Small sponges can add texture to your designs. Keep brushes clean to maintain sharp edges and bright colors.
Additional Supplies Needed
Prepare your workspace with newspaper or a drop cloth to catch spills. Use a palette or paper plate to mix paint colors. Have a cup of water to rinse brushes between colors. Keep paper towels or a rag nearby for quick cleanups. Seal your painted rocks with a clear outdoor varnish to protect your artwork from rain and sun.
Basic Painting Techniques
Basic painting techniques help transform plain garden rocks into colorful art. These simple steps build a strong foundation for your rock painting project. You do not need special skills to start. Just follow easy methods to create eye-catching designs that last outdoors.
Applying Base Coats
Start by cleaning the rock surface well. Use soap and water, then dry completely. Choose a good quality acrylic paint for the base coat. Apply one or two thin layers evenly with a brush. Let each layer dry fully before adding the next. A smooth base coat makes colors pop and last longer.
Creating Simple Designs
Use basic shapes like dots, stripes, or flowers for easy designs. Sketch your idea lightly with a pencil if needed. Paint carefully with small brushes or paint pens. Keep your strokes steady and colors bright. Simple patterns bring charm and personality to your garden rocks.
Layering Colors
Layering adds depth and interest to your painted rocks. Start with lighter colors first. Let each color dry before adding another layer on top. Use small strokes or dabs to blend colors gently. This technique gives your rocks a polished and vibrant look that stands out in any garden.
Advanced Rock Painting Ideas
Advanced rock painting ideas bring creativity to your garden stones. These techniques elevate simple painted rocks into impressive garden art. They require patience and practice but deliver stunning results. Experiment with patterns, tools, and color blending to create unique designs. This section explores detailed patterns, stencil use, and shading tips for advanced rock painting.
Detailed Patterns And Images
Create intricate patterns using fine brushes or paint pens. Small dots, lines, and shapes make detailed designs stand out. Floral motifs, animals, or mandalas work well on flat rocks. Sketch your design lightly with a pencil before painting. Layer colors carefully to avoid smudging. Detailed images add personality and charm to garden rocks.
Using Stencils And Templates
Stencils help achieve sharp, consistent shapes and letters. Cut stencils from plastic sheets or buy ready-made ones. Secure the stencil on the rock with tape or adhesive spray. Apply paint gently with a sponge or brush to prevent bleeding. Remove the stencil carefully while paint is still wet. Stencils save time and produce professional-looking results.
Blending And Shading Tips
Blending colors creates depth and a three-dimensional effect. Use soft brushes or sponges to blend acrylic paints smoothly. Start with lighter colors and add darker shades gradually. Work quickly before paint dries to blend better. Practice shading around edges to enhance roundness. Blending and shading bring lifelike quality to your painted rocks.
Sealing And Protecting Painted Rocks
Sealing and protecting painted rocks is a key step to keep your garden art looking fresh. Paint can fade or chip when exposed to rain, sun, and dirt. A good sealant guards your artwork from weather and wear. This step also adds a nice shine that highlights your colors. Proper sealing helps your DIY garden rocks last through all seasons.
Choosing The Right Sealant
Pick a sealant made for outdoor use. Look for waterproof and UV-resistant types. Clear acrylic spray sealants are popular for ease and smooth finish. You can also use brush-on varnishes for thicker protection. Avoid sealants that yellow over time or peel off easily. Check product labels to match your needs.
Application Methods
Spray sealants offer quick, even coats without brush marks. Hold the can 6-12 inches from the rock surface. Spray in thin layers to avoid drips. Let each coat dry before applying the next one. Brush-on sealants need smooth, steady strokes. Apply thin layers and cover all painted areas. Allow full drying between coats for best results.
Ensuring Durability Outdoors
Seal painted rocks in a dust-free, dry space. Multiple sealant coats improve protection against rain and sun. Wait at least 24 hours after the last coat before placing rocks outside. Reapply sealant yearly to maintain durability. Store rocks indoors during harsh weather to extend life. These steps keep your garden art bright and intact.
Incorporating Painted Rocks In The Garden
Incorporating painted rocks into your garden adds color and personality. These small art pieces brighten outdoor spaces instantly. Painted rocks offer endless ways to enhance garden beauty. Use creativity to place them in spots that catch the eye. Each painted rock tells a story and brings joy to your garden.
Decorative Placement Ideas
Place painted rocks along garden paths to guide visitors. Scatter them near flower beds for a splash of color. Group several painted rocks to create a mini art display. Use rocks to frame garden features like birdbaths or benches. Hide small painted rocks among greenery for a fun surprise.
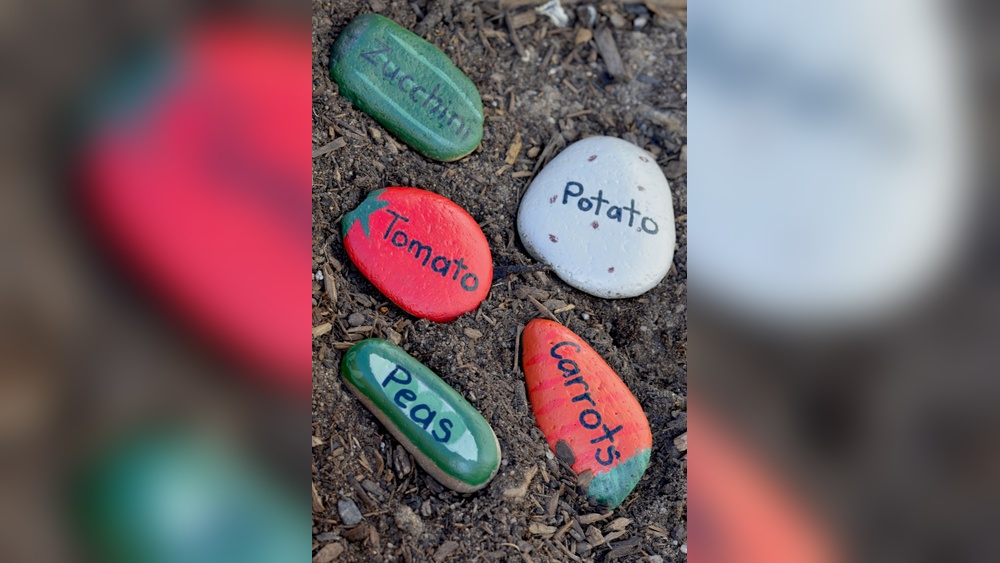
Creating Garden Markers
Paint rocks with plant names for easy garden identification. Use bright colors to make markers stand out clearly. Label herbs, vegetables, and flowers with custom painted stones. This adds both style and function to your garden beds. Durable paint and sealant keep markers looking fresh outdoors.
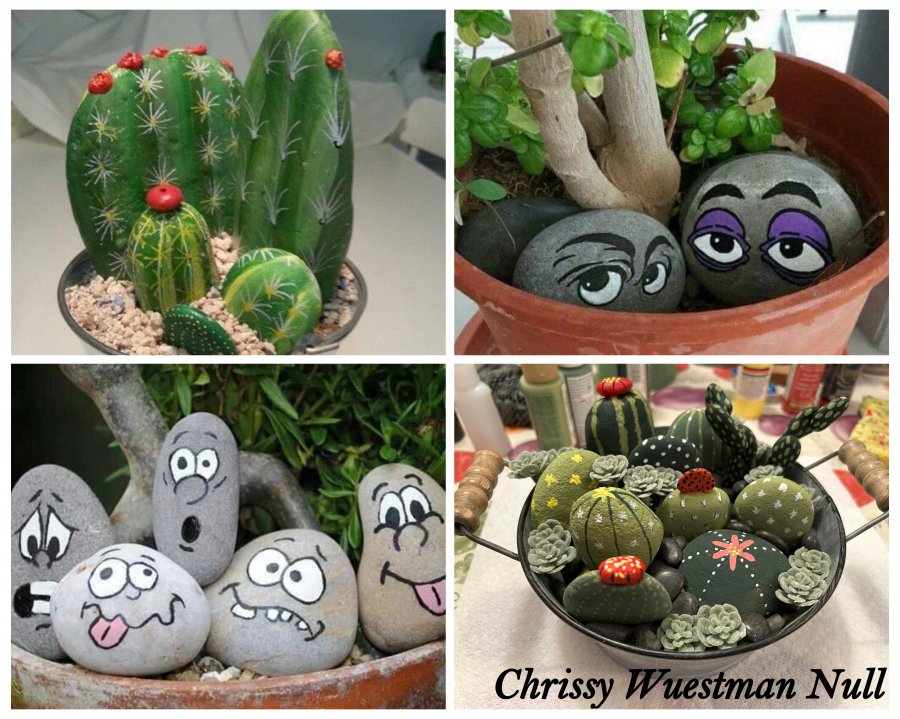
Combining Rocks With Plants
Place painted rocks at the base of potted plants for decoration. Use vibrant colors to complement the plant’s natural shades. Arrange rocks around succulents for a desert garden vibe. Mix smooth and textured rocks to add depth and interest. Painted rocks protect soil and prevent erosion in garden beds.
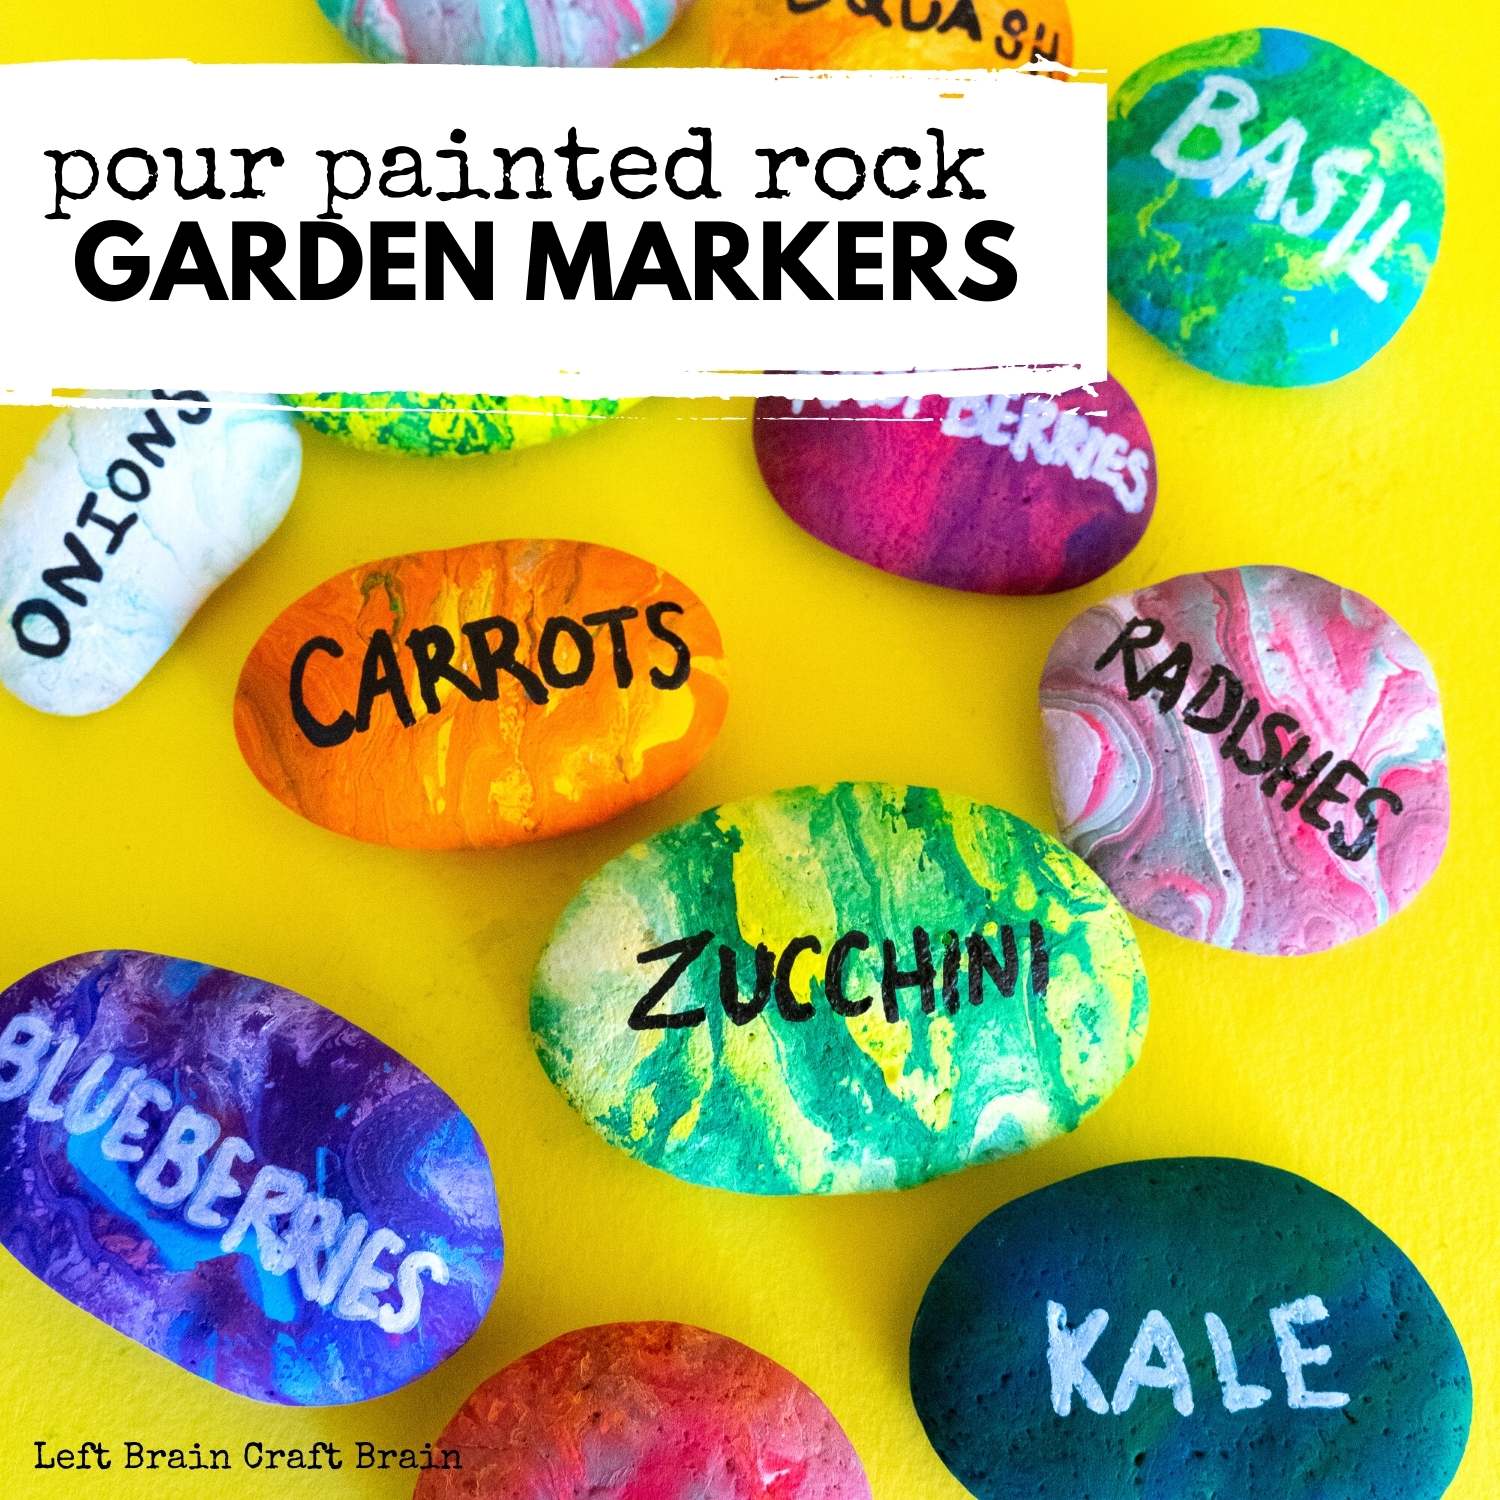
Credit: leftbraincraftbrain.com
Maintaining Your Painted Rocks
Maintaining your painted rocks is important to keep their colors bright and designs clear. Proper care helps your garden stones last longer and look fresh. Simple steps can protect your artwork from dirt, weather, and wear. Regular attention makes your garden decoration charming all year round.
Cleaning Painted Surfaces
Clean painted rocks gently to avoid damaging the paint. Use a soft brush or cloth to remove dust and dirt. Mild soap with water works well for tougher grime. Avoid harsh chemicals that can fade colors or peel paint. Rinse with clean water and dry thoroughly before placing back in the garden.
Touch-up Techniques
Check rocks regularly for chips or faded paint. Keep small paint pots or markers handy for quick fixes. Lightly sand rough spots before repainting to help new paint stick. Match original colors for a seamless look. Seal touched-up areas with a clear varnish to protect your work.
Seasonal Care Tips
Bring painted rocks indoors during harsh weather to prevent damage. Store them in a dry, cool place in winter. In spring, inspect rocks for cracks or peeling. Reapply sealant every few months to keep paint waterproof. Rotate rocks occasionally to avoid sun fading on one side.
Creative Diy Rock Projects
Creative DIY rock projects bring fun and beauty to your garden. Simple painted rocks can transform plain spaces into colorful displays. These projects invite imagination and personal touch. They also make gardening more enjoyable and inviting.
Painting rocks offers endless possibilities. Each rock can tell a story or show a theme. You can create art that reflects your style or shares a message. Here are some inspiring ideas to start your own rock painting journey.
Personalized Gifts
Painted rocks make thoughtful, unique gifts. Add names, dates, or special messages to each rock. Use bright colors or soft pastels to match the recipient’s taste. These gifts are simple but full of meaning. They last long and show you care.
Themed Garden Collections
Create collections of rocks with a common theme. Choose animals, flowers, or seasonal designs for your garden. Grouping themed rocks adds charm and unity to your outdoor space. It makes the garden feel planned and lively. Visitors will enjoy discovering each painted stone.
Community Rock Painting Activities
Host rock painting events for neighbors or friends. Sharing ideas and painting together builds community spirit. These activities are fun for all ages. After painting, place rocks in public gardens or parks. It spreads joy and encourages others to join the creative fun.

Credit: www.momendeavors.com
Frequently Asked Questions
What Kind Of Paint Will Stick To Rocks?
Acrylic paint sticks best to rocks due to its strong adhesion and durability. Clean and dry rocks before painting. Use a primer for better results. Seal with a clear varnish to protect outdoor designs and enhance longevity.
How To Paint Rocks For A Garden?
Clean rocks thoroughly and dry them completely. Apply a base coat of acrylic paint. Paint your design, let it dry, then seal with a clear outdoor varnish.
What Do You Put On Rocks Before Painting?
Clean rocks with soap and water to remove dirt and oils. Let them dry completely. Apply a base coat of acrylic paint before decorating.
How Do I Seal Painted Rocks For Outdoor Use?
Clean and dry rocks thoroughly. Paint with acrylic paint. Once dry, apply a clear outdoor sealer or varnish. Let it cure fully.
Conclusion
Painting DIY rocks for your garden adds color and charm easily. Choose smooth rocks and clean them well before painting. Use acrylic paints for bright, lasting colors. Let each layer dry fully for best results. Seal painted rocks with a clear varnish to protect them outdoors.
Place your finished art around plants or paths to brighten your space. Enjoy the fun and creativity of this simple garden project. Your garden will look unique and inviting with painted rocks. Give it a try and see the difference yourself!


