
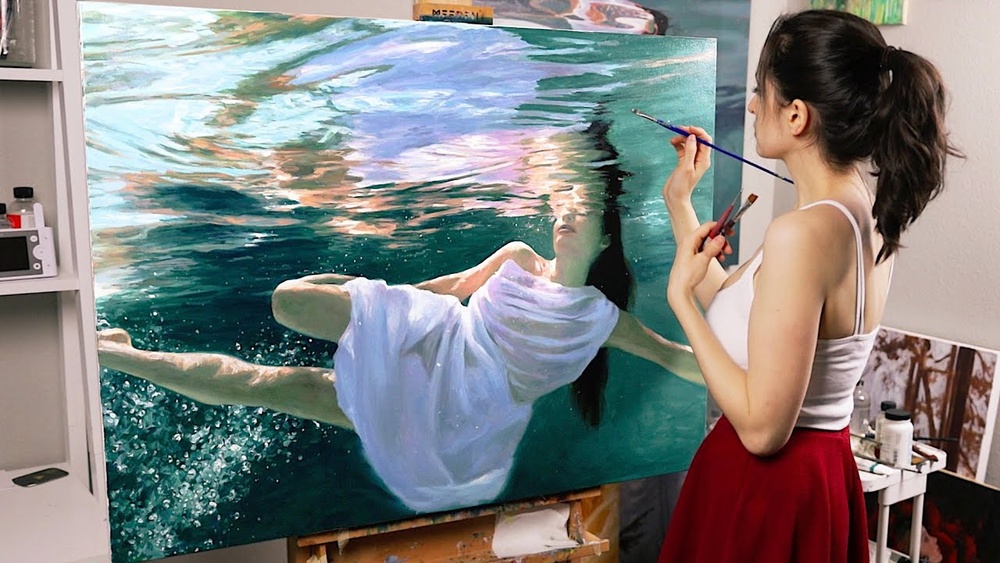
Quick answer: Here is how to paint underwater in oil painting: build a vertical gradient from light, greenish or turquoise water near the surface to deep blue at the bottom, then make objects lose red and yellow first and fade into the water color with distance. Add caustic light patterns and light rays with thin, soft-edged, semi-opaque strokes once the base is dry, and keep only the nearest subjects crisp and saturated. Water itself acts like fog, so color and contrast drop fast as things move away.
Underwater light follows rules that feel strange to anyone used to painting landscapes. Reds vanish within a few feet. Distance disappears into blue-green after a short span. Sunlight arrives from directly above in shifting nets of brightness. Once you understand these effects, painting underwater in oil becomes far less mysterious, and far more believable.
This guide explains the optics in plain terms, suggests a palette, gives a full step-by-step method, then covers light rays, caustics, bubbles, fish, divers and coral, along with common mistakes.
How Light Behaves Underwater
Every underwater painting decision traces back to a few physical effects. You do not need to be a scientist; you just need to translate them into color and value.
Color is absorbed with depth
Water absorbs the long-wavelength end of the spectrum first. Reds fade quickly, then oranges and yellows, while blues and greens penetrate deepest. In practical painting terms, a red fish near the surface stays red, while the same fish deeper down turns brownish, then dark gray-blue. A red coral reef may look strikingly colorful only where it is close to the viewer or lit by a nearby light.
Distance becomes blue-green haze
Water also scatters light, much like heavy fog. Visibility underwater is often limited to tens of feet rather than miles. Objects fade quickly into the background water color, lose contrast and soften their edges. This is the same principle as atmospheric perspective on land, just far stronger.
Light comes from above
Sunlight enters through the surface, so the top of the scene is brightest and the bottom is darkest. Objects are lit from above, with their upper surfaces lighter and undersides darker, which is the opposite of what you often see in reflected-light landscapes.
The surface moves light around
Waves on the surface focus sunlight into rippling bright lines on the sea floor and objects, called caustics, and into visible light shafts in particles suspended in the water. Both effects are signature details of shallow underwater scenes.
Palette and Materials
A restrained palette makes it easier to keep the water harmonious. For guidance on choosing quality oils and mediums, see our oil painting guide to styles, expert tips and buying advice.
| Color | Use underwater |
|---|---|
| Titanium white | Surface light, rays, caustics, highlights |
| Phthalo blue (green shade) or Prussian blue | Intense, transparent deep water |
| Ultramarine blue | Deep shadows, cooler distant water |
| Viridian or phthalo green | Green-tinted coastal or lake water |
| Cerulean or a turquoise (optional) | Bright shallow tropical water |
| Cadmium yellow light (or hue) | Warm shallow water, sunlit sand, fish |
| Cadmium red or a coral pink | Nearby colorful subjects only |
| Burnt sienna | Neutralizing blues, sand shadows, rocks |
Phthalo colors are extremely strong. Add them to white in tiny amounts, and keep a separate brush for them to avoid tinting everything.
Other useful tools include large soft flats for gradients, a mop or soft blending brush, small rounds for fish and bubbles, a rigger for fine light lines, and a smooth primed panel or fine canvas.
Choosing Your Water Color
| Environment | Near surface | Deep / far |
|---|---|---|
| Tropical reef | White + cerulean or turquoise + touch of yellow | Phthalo blue + ultramarine |
| Open ocean | White + ultramarine + touch of phthalo blue | Ultramarine + phthalo blue, very dark |
| Temperate coast or kelp forest | White + viridian + touch of yellow ochre | Phthalo green + ultramarine + speck of burnt sienna |
| Freshwater lake | White + yellow ochre + green | Olive-brown green: green + burnt sienna + ultramarine |
Mix a value string of four or five steps between your surface color and your deep color before you start. Every object you paint will be mixed partly from this string, depending on how far away and how deep it is.
How to Paint Underwater in Oil Painting: Step by Step
- Plan depth zones. In a thumbnail, divide your scene into near, middle and far, and also into upper (lit) and lower (darker) water. Decide where the focal subject sits, often in the near zone where it can keep color.
- Paint the water gradient. Using large flats, lay your value string from top to bottom: lightest near the surface, darkest at the bottom. Blend the bands wet-into-wet with horizontal strokes, then soften with a clean dry brush. Some painters also lighten the area around the sun’s position near the surface.
- Add distant shapes. Into the wet gradient, paint far rocks, reef forms or fish silhouettes using a mix only slightly darker than the surrounding water. Keep their edges very soft. They should barely separate from the background.
- Build the middle ground. Add mid-distance subjects with a bit more contrast and a little more local color, still heavily mixed with water color. Edges are soft but readable.
- Paint the foreground subjects. Here colors can be stronger: reds, oranges and yellows appear on coral, fish or a diver’s gear. Light comes from above, so paint top surfaces lighter and undersides darker and bluer.
- Add the sea floor. Sand near the surface catches light and caustic patterns; deeper sand turns blue-green. Darken it toward the bottom of the canvas and into the distance.
- Let it dry. Wait until the painting is touch dry before adding light effects. Painting rays and caustics into wet paint usually muddies them.
- Add light rays. With a soft brush and a thin, semi-opaque mix of white and a little surface water color, drag diagonal or near-vertical shafts downward from the surface. Make them wider and fainter as they descend, and soften both edges with a clean dry brush.
- Add caustics. With a small round or rigger and a light, slightly warm mix, paint a net of irregular, wavy, connected lines on the sea floor and the tops of objects. Keep lines thin and varied, brighter in shallow areas and fading with depth.
- Finish with bubbles and highlights. Add bubbles and the brightest accents last, keeping them limited to areas near the focal point.
Painting Light Rays and Caustics Convincingly
Light rays
- Rays fan out slightly from the brightest area of the surface, but they appear nearly parallel over short distances.
- Vary their width and spacing. Groups of two or three, with gaps between, look more natural than an evenly spaced fan.
- Rays should pass behind foreground subjects. Paint subjects that sit in front of a ray slightly darker where they block it.
- Glazing is not the right tool for rays, since transparent paint darkens. Use thin, semi-opaque scumbles of light color instead.
Caustics
- Caustic patterns look like a stretched net of bright, wavy cells. The lines are thicker where they meet and thinner between junctions.
- They follow the form of whatever they land on, curving over rocks, fish and sand ripples.
- Paint them only on surfaces facing upward toward the light.
- Keep them restrained in deeper areas, where they become faint or disappear.
Painting Common Underwater Subjects
Fish
Many fish are countershaded: darker on top, lighter underneath, which works against the overhead light and makes them hard to see. Painting this pattern correctly adds realism. Distant fish become simple silhouettes in water color; schools can be painted as a few clear shapes in front and a soft, fading mass behind.
Coral reefs
Block in coral forms as simple masses with lit tops and shadowed undersides. Add texture and color only in the foreground. Colorful corals look most convincing when farther corals become progressively bluer and simpler.
Divers and swimmers
Skin tones change quickly underwater, shifting toward cooler, greener or bluer hues. Keep warm colors only for divers close to the viewer or lit by a dive light. Bubbles rising from regulators add movement and help establish the vertical direction.
Shipwrecks and rocks
Hard edges fade quickly with distance. Paint the nearest parts of a wreck with crisp lines and rust colors, then let the far end dissolve into the water color. For coastal rocks and shallow sand, techniques from our guide on painting sand and beaches in oil carry over, with stronger blue-green shifts.
Shells and sea floor details
A shell resting on sand makes a natural foreground focal point. The form and highlight methods in our step-by-step seashell painting guide work well here; just add caustic light over the top and cool the shadow side.
Bubbles
Bubbles are small, but they are easy to overdo.
- Paint each bubble as a slightly darker or lighter ring than the water behind it, with a tiny bright highlight near the top and sometimes a faint light reflection near the bottom.
- Vary sizes, and let bubbles cluster and trail upward in loose streams rather than perfect lines.
- Bubbles expand as they rise because pressure drops, so they can get slightly larger toward the surface.
- Use only a few in the foreground; distant bubbles can be tiny light dots.
Looking Up at the Surface
A view toward the surface is one of the most striking underwater compositions. The surface often appears as a bright, rippling ceiling. Within a cone directly overhead you may see the sky distorted through the water, while outside it the surface acts like a mirror reflecting the dark water below. In painting terms, paint a bright, irregular area of light overhead fading into a darker reflective band around it, with ripples broken into soft light shapes.
Common Mistakes
Too much color in the distance
Bright reds and yellows far away break the illusion. Push distant colors strongly toward the water color.
Uniform water color
A single flat blue looks like a backdrop. Always use a vertical gradient and a distance gradient.
Hard edges everywhere
Underwater visibility is limited, so edges soften quickly. Reserve hard edges for the foreground focal point.
Rays painted with pure white
Pure white rays look chalky and pasted on. Tint them with water color and keep them thin.
Lighting from the side
Treating underwater subjects like land subjects, lit from the side, loses the underwater feel. Light from above, with darker undersides, is the default.
Tips by Skill Level
- Beginners: start with a gradient study on an 8 by 10 inch panel, then add a single fish silhouette and a few light rays.
- Intermediate: paint a reef scene with three clear depth zones and practice caustics on dry paint.
- Advanced: attempt a looking-up composition with surface light, or a diver in colored gear, managing color loss carefully across depth.
Related Reading
FAQs
What colors do you use to paint underwater?
Titanium white, phthalo or Prussian blue, ultramarine and a green such as viridian cover most water. Add yellow for shallow water, and use reds and oranges only for nearby subjects.
How do you paint light rays underwater in oil?
Once the base layer is dry, drag thin, semi-opaque strokes of white mixed with a little water color downward from the surface, wider and fainter as they descend. Soften both edges with a clean dry brush.
Why do underwater objects look blue?
Water absorbs red and yellow light first, so blue and green light reaches the eye from deeper or more distant objects. Painting objects progressively bluer and grayer with depth reproduces this effect.
How do you paint caustics?
Paint a net of irregular, connected wavy lines in light, slightly warm color on upward-facing surfaces, thicker at junctions and thinner between them. Keep them bright in shallow areas and fainter in deep ones.
Should underwater scenes be painted wet-on-wet?
The water gradient and distant forms work well wet-on-wet, since soft edges come naturally. Light rays, caustics and bubbles look cleaner when added over a dry layer.
How do I make the water look deep?
Use a strong vertical value gradient from light at the top to very dark at the bottom, and fade distant objects into the background color. A few crisp, colorful foreground subjects increase the sense of depth.
Final Thoughts
Underwater painting is mostly about honoring two gradients, light to dark from the surface down and clear to hazy from near to far, then adding rays, caustics and bubbles sparingly over a dry base. Get those relationships right and even a simple scene will feel immersive.
For advice on choosing paints with clean, intense blues and greens, plus mediums and surfaces for layered effects, explore our complete oil painting resource with styles and supply recommendations.




