
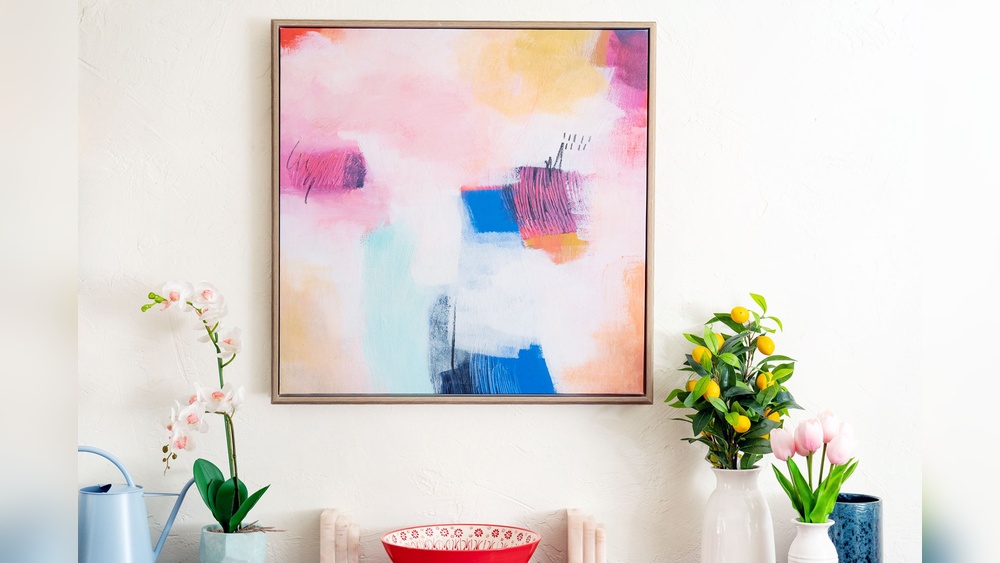
Quick answer: Here is how to do DIY painted canvas wall art: measure your wall and choose a canvas about two-thirds the width of the furniture below it, pull a 3 to 4 color palette from the room, prime or tone the canvas, then paint a forgiving design such as a color-field abstract, textured neutral piece, botanical silhouette or taped geometric pattern. Paint the edges, let it cure, varnish for an even finish and hang with the center about 57 to 60 inches from the floor.
Store-bought wall art often looks fine and feels anonymous. Painting your own lets you match a room’s exact colors, fill an awkward wall at the size it needs and end up with something no one else owns. The problem most people run into is not painting skill. It is planning: the wrong size, a palette that fights the sofa, or a design that looked great on a phone and flat on a wall.
This guide covers how to do DIY painted canvas wall art from planning to hanging, with six beginner-friendly designs, tips for large canvases and the finishing steps that make homemade art look gallery-ready.
Step 1: Plan the Size Before You Buy Anything
Size is the most common mistake in DIY wall art. Small canvases floating on a big wall look accidental. Use these guidelines:
| Where it hangs | Rule of thumb | Example |
|---|---|---|
| Above a sofa or bed | About 2/3 to 3/4 of the furniture width | 84-inch sofa: art (or a group) about 56 to 63 inches wide |
| Above a console or dresser | About 2/3 of the furniture width | 48-inch dresser: canvas around 30 to 36 inches wide |
| Empty wall, no furniture | Art covers roughly 60 to 75 percent of the wall section | 8-foot section: piece or grouping 58 to 72 inches wide |
| Hallway or narrow wall | Vertical formats or a vertical stack | Two 16x20s stacked |
Tape a rectangle of painter’s tape or kraft paper on the wall at your planned size and leave it for a day. It is the quickest way to know whether the scale feels right.
If you want to compare how finished large-format pieces look on a wall before committing, browsing a selection of large canvas wall art is a helpful reference for scale, framing and color balance.
Step 2: Gather Art Supplies for DIY Canvas Art
- Canvas: pre-primed stretched canvas. For large canvas art, choose a deep gallery profile (around 1.5 inches) so it looks finished without a frame.
- Paint: artist or craft acrylic. Craft acrylic works for flat color designs; artist acrylic gives richer color and better coverage.
- Gesso: for extra priming or building texture.
- Brushes: a 2 to 3-inch flat or a small foam roller for backgrounds, a 1-inch flat, and a small round for details.
- Palette knives for texture designs.
- Painter’s tape for geometric designs and clean edges.
- Varnish: satin or matte acrylic varnish for an even finish.
- Hanging hardware: D-rings and picture wire or sawtooth hangers, sized for the weight.
- Drop cloth, cups, rags and a level.
Step 3: Build a Palette From the Room
The fastest way to make DIY art look intentional is to borrow colors already in the room. Choose:
- A dominant neutral close to the wall or main furniture color (cream, warm gray, greige).
- A secondary color from textiles: rug, pillows, curtains.
- An accent from a small object, such as a vase or book spine.
- Optional: a dark anchor (charcoal, navy, deep green) to give contrast.
Mix a small amount of each and paint swatches on a piece of cardboard. Tape it to the wall in daylight and evening light before you paint the full canvas.
Step 4: Prepare the Canvas
Most store canvases are ready to paint, but a quick prep improves results:
- Add one coat of gesso if the surface feels absorbent or rough.
- Tone the canvas with a thin wash of your neutral, which prevents tiny white gaps showing through later.
- Paint the edges now if they will be a solid color; it is easier before the front is finished.
Six DIY Large Canvas Art Ideas for Beginners
1. Soft Color-Field Abstract
Skill: Beginner. Time: 2 to 3 hours plus drying.
- Divide the canvas into two or three horizontal bands of unequal height.
- Roll or brush each band with a related color, leaving the borders rough.
- While wet, blend borders with a dry 3-inch brush in horizontal strokes for a hazy edge.
- Add a second thin layer of each color for depth once the first is dry.
2. Textured Neutral Plaster Look
Skill: Beginner. Time: 1 hour plus overnight drying.
- Mix gesso or modeling paste with a little of your neutral paint.
- Spread across the canvas with a palette knife or plastic putty knife in sweeping arcs, leaving ridges.
- Let dry fully, often overnight.
- Dry-brush a slightly lighter or darker shade over the ridges to accent texture.
3. Taped Geometric Design
Skill: Beginner. Time: 2 hours plus drying.
- Paint the background your lightest color and let dry completely.
- Apply painter’s tape in intersecting lines or triangles.
- Seal tape edges by brushing a thin coat of the background color over them; this prevents bleed.
- Fill sections with your palette colors.
- Peel tape at a 45-degree angle while the last coat is slightly tacky.
4. Botanical Silhouette
Skill: Beginner to intermediate. Time: 2 hours.
Paint a solid or softly blended background, then paint oversized leaf shapes (palm, fern, monstera, eucalyptus) in a single dark or contrasting color. Keep shapes simple and large. A light pencil outline traced from a printed leaf can help.
5. Arch and Sun Mid-Century Design
Skill: Beginner. Time: 1.5 hours.
Use a string-and-pencil compass to draw concentric arches and a circle. Fill with warm terracotta, mustard, blush and cream. Clean edges come from a steady hand with a 1/2-inch angled brush.
6. Gestural Brushstroke Abstract
Skill: Intermediate. Time: 1 hour.
On a light background, make three to seven confident strokes with a wide brush loaded with two colors. Practice on newspaper until the movement feels natural. Restraint is the key; fewer strokes look deliberate.
Multi-Panel and Text Designs
Two or three canvases hung as a set can fill a wide wall more affordably than one huge canvas, and they are easier to carry and paint. Our sibling guide on painting a multi-canvas wall art set covers aligning a design across panels. If you would rather add words, see our walkthrough for painting a quote on canvas wall art.
Matching the Design to Your Decor Style
| Decor style | Designs that suit it | Palette ideas |
|---|---|---|
| Modern minimalist | Color-field, single gestural stroke, line drawing | White, black, one muted accent |
| Boho | Arches and suns, textured neutrals, botanicals | Terracotta, rust, sand, olive |
| Coastal | Soft horizon abstracts, wave textures | Sea glass blue, sand, white |
| Farmhouse | Textured plaster look, simple florals | Cream, sage, warm gray |
| Mid-century | Geometric tape designs, overlapping circles | Mustard, teal, orange, walnut brown |
Stretched Canvas Art vs a Canvas Roll
Pre-stretched canvas is the convenient choice for most DIY projects: it arrives primed, square and ready to hang. A canvas roll for art makes sense when you need a size that is not sold off the shelf, such as a long panoramic piece over a headboard, or when you want to paint several large pieces at a lower cost per square foot. The trade-off is time. You will need to cut, stretch and often prime it yourself, and very large pieces need a center brace to stay flat.
Cheap Canvas Art: Ways to Save
- Buy canvases in multi-packs or during art supply sales.
- Repaint thrift-store canvases: sand any heavy texture, apply two coats of gesso and start fresh.
- Use a canvas roll and staple it to a simple frame of 1×2 lumber for oversized pieces.
- Choose designs that rely on a few colors; you will buy fewer tubes.
- Use craft acrylic for large flat backgrounds and save artist-grade paint for accents.
How to Stretch Canvas Art for Oversized Pieces
For walls that need something bigger than standard sizes, stretching your own canvas is often cheaper. Assemble stretcher bars (or a frame of straight 1×2 boards with a center brace), cut canvas 3 inches larger on all sides, staple the center of each side first while pulling taut, then work out toward the corners, alternating sides. Fold the corners neatly and prime with two thin coats of gesso if using raw canvas.
Finishing: The Steps That Make It Look Professional
Edges
Unfinished, white canvas edges are the biggest giveaway of homemade art. Paint them a solid color (often black, white or the background color), wrap the design around them, or add a frame.
Varnish
Once the paint has cured (often 24 to 72 hours for thin layers, longer for heavy texture), apply a satin or matte varnish. It evens out patchy sheen, deepens color slightly and protects against dust and UV light.
How to Frame a Painted Canvas
A floater frame is the most popular option for painted canvas. The canvas sits inside the frame with a small gap around it, appearing to float. Attach it from the back with screws through the frame’s inner lip into the stretcher bars. Traditional frames hold the canvas from the front with offset clips. Glass is generally not used on painted canvas.
Hanging
- Attach D-rings to the stretcher bars about one-third of the way down from the top, with wire between them for larger pieces.
- Mark the wall so the center of the canvas sits around 57 to 60 inches from the floor, or 8 to 10 inches above furniture.
- Use hooks or anchors rated above the canvas weight.
- Level the piece and add small bumpers on the bottom corners to stop it from tilting.
Canvas Art for Kids’ Rooms
The best canvas art for kids is bright, simple and durable. Rainbow arches, polka-dot abstracts, simple animal silhouettes and handprint designs work well. Let children help with taped designs, sponge painting or a splatter background. Use non-toxic, washable-labeled paints for young children, and varnish finished pieces to make them easier to wipe.
Common DIY Wall Art Mistakes
- Too small for the wall. Size up or use a grouping.
- Too many colors. Stick to three or four plus a neutral.
- Hanging too high. Art floating near the ceiling disconnects from the room.
- Skipping the swatch test. Paint colors shift under different light.
- Peeling tape too late. Fully dried paint can tear along tape lines.
- Varnishing too soon. Trapped moisture can cloud the finish.
FAQs
What paint is best for DIY canvas wall art?
Acrylic paint is the usual choice. It dries quickly, is water-based and sticks well to primed canvas. Craft acrylic is fine for flat designs, while artist acrylic offers better coverage and richer color.
How big should canvas art be over a couch?
A common guideline is about two-thirds to three-quarters of the sofa’s width. For an 84-inch sofa, that means a single piece or grouping around 56 to 63 inches wide.
How do I make DIY canvas art look expensive?
Use a restrained palette pulled from the room, choose a generous size, paint or frame the edges, add texture or depth and finish with varnish. Thoughtful hanging height also makes a big difference.
Do I need to varnish acrylic canvas wall art?
It is not strictly required, but varnish evens the sheen, deepens colors and protects the surface from dust and UV light, which helps homemade art look finished.
How to frame a canvas art piece I painted?
A floater frame is a popular option. Place the canvas inside and secure it from the back with screws or offset clips into the stretcher bars. Glass is usually not needed.
Can I paint over an old canvas print?
Often yes. Lightly sand the surface, clean it, apply two coats of gesso and let dry. Some printed canvases have a slick coating, so test adhesion in a corner first.
Next Step
Plan the size, borrow the palette from your room, pick one of the six designs and finish the edges and varnish properly. That combination turns a weekend project into wall art that looks deliberate. If you are still deciding on scale or style, see our guide to choosing canvas for wall art for large abstract options that show how size and color work on a real wall.



One Comment