
Cotton ball painting is a creative and enjoyable way for children to explore art. It uses simple materials, making it perfect for home, school, or daycare. Kids love the process because it feels playful and hands-on, while parents and teachers appreciate how easy and low-cost it is to set up.
Cotton ball painting helps young children develop fine motor skills, understand colors, and express themselves without the need for expensive art supplies.
Many parents and teachers look for activities that are mess-friendly, safe, and suitable for different ages. Cotton ball painting fits all these needs. Even better, it offers endless ways to play and create—from simple color dabbing to more advanced designs and themed projects.
If you want to help kids enjoy art, learn new skills, and even calm down after a busy day, this activity is a top choice. Let’s dive into how to do cotton ball painting for kids and make the most of this versatile technique.
What Is Cotton Ball Painting?
Cotton ball painting is an art activity where children use cotton balls instead of brushes to apply paint to paper or other surfaces. Kids hold the cotton ball with their fingers, tongs, or clothespins, dip it into paint, and dab or drag it to create colorful designs. This approach gives a soft, spongy effect and allows for easy blending of colors.
The technique is popular with children ages 2 to 8, but older kids can enjoy it, too. It’s especially useful for toddlers and preschoolers who aren’t ready for fine brushes. Because the cotton is soft and large, it’s easy for small hands to grip and control.
Benefits Of Cotton Ball Painting
Cotton ball painting is much more than just fun. It helps children in several ways:
- Fine motor skills: Squeezing, pinching, and dabbing the cotton ball builds hand strength and control.
- Hand-eye coordination: Kids practice aiming and pressing the cotton ball where they want it.
- Color recognition: Mixing and layering paints teaches about primary and secondary colors.
- Creativity: There are no strict rules, so every child’s work is unique.
- Sensory play: The soft texture of the cotton feels pleasant and can be calming.
- Easy clean-up: Cotton balls are disposable, and the activity uses little water.
Studies show that art activities like this support early childhood development, helping children express feelings and solve problems in new ways.
Materials Needed
One reason cotton ball painting is popular is its simplicity. You don’t need fancy or expensive supplies. Here’s what you need:
- Cotton balls (regular or jumbo size)
- Washable paint (tempera or poster paint)
- Paper (thick paper works best, such as cardstock or construction paper)
- Clothespins or tongs (optional, for holding cotton balls)
- Paint trays or plates
- Aprons or old shirts (to protect clothes)
- Wet wipes or a damp cloth (for quick clean-up)
- Table covering (old newspaper, plastic, or a washable mat)
Optional materials:
- Markers or crayons (to add details)
- Stencils or cookie cutters (for shape outlines)
- Glitter or stickers (for decoration)
Most items can be found at home or in any school supply store. If you want to use cotton swabs for more detailed work, they can be used alongside cotton balls for extra variety.
Step-by-step Guide To Cotton Ball Painting
Let’s look at how to do cotton ball painting with kids, step by step. Whether you’re planning a simple activity or a themed project, these instructions will help you get started.
1. Set Up Your Painting Area
Cover your table or floor with newspaper, plastic, or a mat. Set out your paints in shallow trays or plates—one color per plate works best. Put out enough cotton balls for each color. If you want to keep hands clean, stick each cotton ball into a clothespin or hold it with tongs.
2. Prepare The Paint
Pour small amounts of washable paint onto the plates. If the paint is thick, add a little water to make it easier to dab. This helps the cotton ball pick up and release the paint smoothly.
3. Choose Your Paper
Use thick paper like cardstock. Thin paper may tear or curl when wet. Place the paper in the center of your work area.
4. Start Painting
Let the child pick up a cotton ball, dip it into a color, and dab or drag it across the paper. Encourage them to experiment with pressing lightly or firmly, making dots, or swirling the cotton. Change colors by switching to a new cotton ball or rinsing the old one.
5. Try Different Techniques
- Stamping: Press and lift the cotton ball for round, dot-like marks.
- Dragging: Pull the cotton ball to make lines or streaks.
- Twisting: Roll the cotton ball for a blended, cloudy look.
You can use stencils or cookie cutters to create shapes—just hold the stencil on the paper and paint inside the edges.
6. Add Details
When the paint dries a bit, children can add details with markers, crayons, or stickers. This step lets them personalize their work and add faces, borders, or extra colors.
7. Let It Dry
Lay the finished artwork flat in a safe place. Drying usually takes 30 minutes to an hour, depending on the amount of paint used.
8. Clean Up
Throw away used cotton balls and wipe up any spills. Wash hands and any reusable tools. Because the paint is washable, clean-up is usually quick.
Creative Ideas For Cotton Ball Painting
Cotton ball painting can go far beyond simple dabbing. Here are some project ideas to inspire you and your kids:
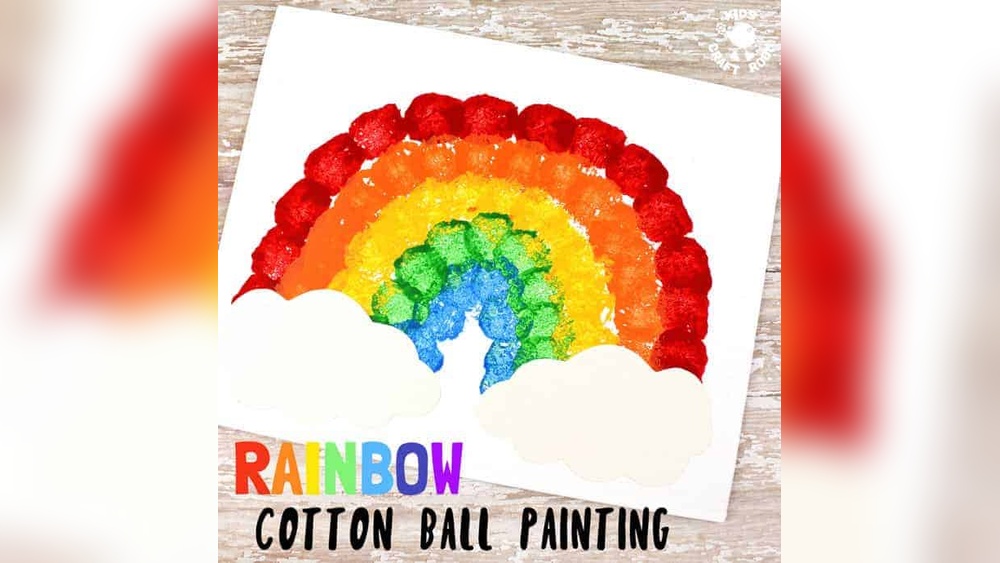
- Rainbow scenes: Paint curved lines in rainbow colors, blending the edges for a soft effect.
- Animal shapes: Use stencils or draw outlines of animals, then fill them in with colorful cotton ball dabs.
- Underwater world: Create fish, seaweed, and bubbles on blue paper.
- Seasonal art: Make autumn trees, snowmen, or spring flowers.
- Clouds and sky: Dab white cotton balls on blue paper for fluffy clouds.
- Abstract art: Let kids mix colors and shapes as they wish—no rules needed.
- Fireworks: Dab bright colors in bursts to look like fireworks at night.
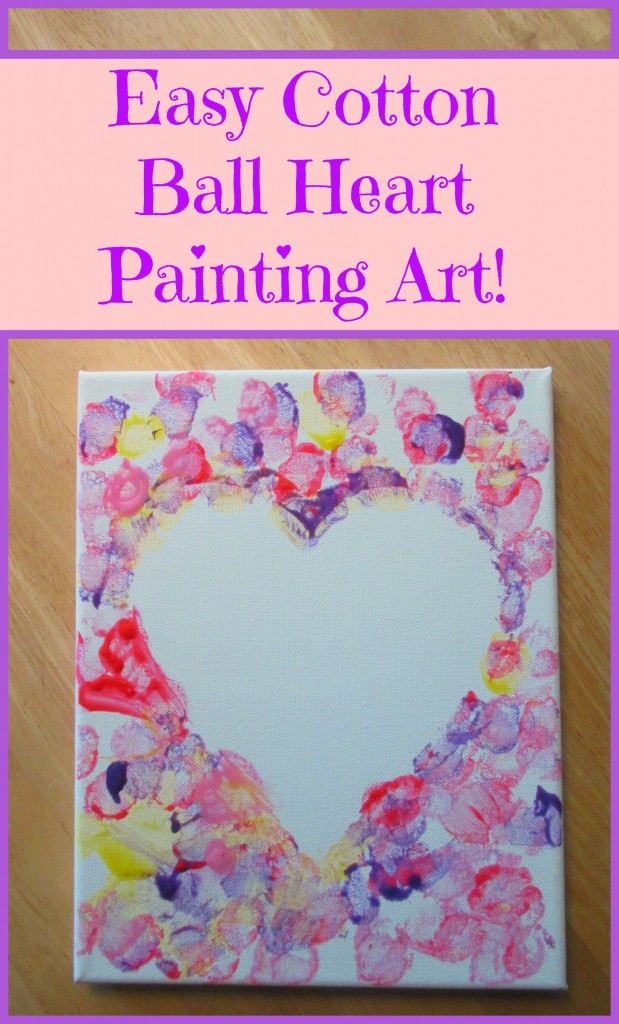
- Cards and gifts: Decorate greeting cards, bookmarks, or gift tags.
To compare the flexibility of cotton ball painting with brush painting for these projects, see the table below:
| Project | Cotton Ball Painting | Brush Painting |
|---|---|---|
| Rainbow Scenes | Easy blending, soft edges | More defined lines |
| Animal Shapes | Textured, fuzzy look | Smoother fill, sharp outlines |
| Abstract Art | Playful, less controlled | Detailed, precise shapes |
Tips For Success
Cotton ball painting is simple, but a few tips can make it even better:
- Use washable paint to avoid stains.
- Have enough cotton balls for each color to prevent muddy colors.
- Encourage kids to experiment—there’s no wrong way.
- For younger children, supervise closely to prevent putting cotton balls in the mouth.
- If kids don’t like the feel of paint, use gloves or stick the cotton ball in a clothespin.
- Lay finished art flat to dry and avoid stacking.
A non-obvious trick: If you want to save cotton balls, cut them in half. Kids can still paint, but you’ll use half the supplies.
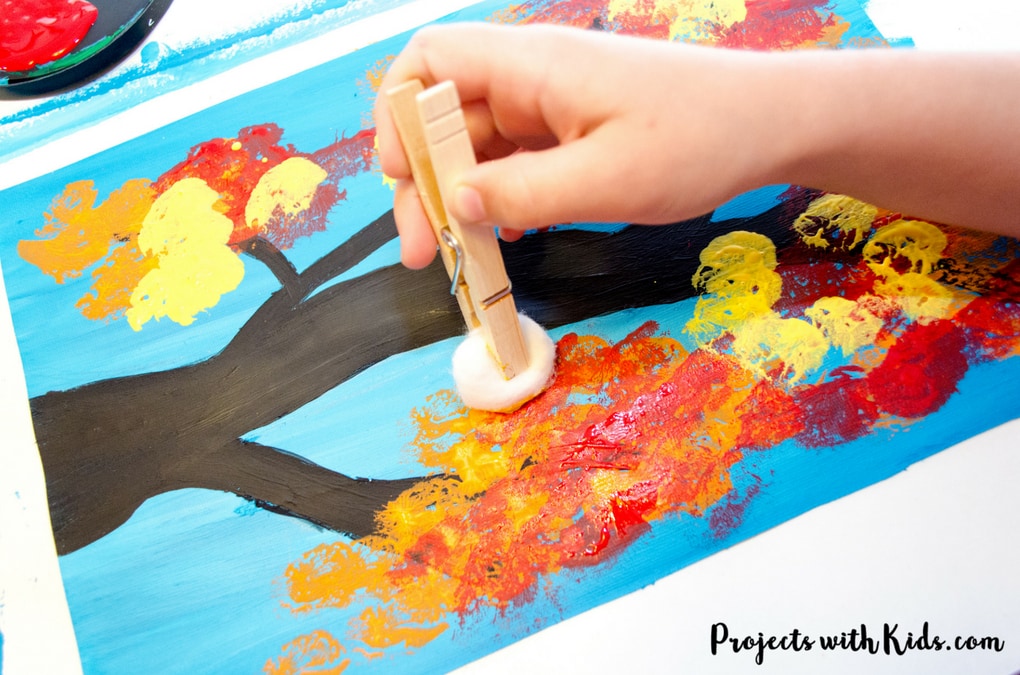
Credit: www.projectswithkids.com
Common Mistakes And How To Avoid Them
Beginners sometimes run into small problems. Here’s what to watch out for:
- Using thin paper: It tears easily when wet. Always use thick paper.
- Mixing too many colors: This can make the art look brown or gray. Use a new cotton ball for each color.
- Too much paint: If the cotton ball is soaked, the paint can drip. Dab off extra paint on the tray before using it on paper.
- Not letting layers dry: If you want to add details, wait until the base paint is dry.
These small adjustments make a big difference in the final result and the child’s enjoyment.
The Best Age Groups And Adaptations
Cotton ball painting can be adapted for many ages:
- Toddlers (2–3 years): Focus on dabbing and simple color play. Use larger cotton balls and supervise closely.
- Preschoolers (4–5 years): Try simple shapes, patterns, and short art lessons about colors.
- Early elementary (6–8 years): Encourage themed projects, layered techniques, or more detailed designs.
For children with sensory challenges, try using gloves or tongs to hold the cotton ball. The activity can also be done outdoors for an even more relaxed experience.
Comparing Cotton Ball Painting With Other Kids’ Art Activities
To see how cotton ball painting matches up with other popular art activities, consider this comparison:
| Activity | Mess Level | Motor Skills | Cost | Setup Time |
|---|---|---|---|---|
| Cotton Ball Painting | Low to Medium | High | Low | Short |
| Finger Painting | High | High | Low | Short |
| Brush Painting | Low | Medium | Medium | Short |
| Crayon Drawing | Very Low | Medium | Low | Very Short |
As you can see, cotton ball painting balances creativity, low cost, and manageable mess, making it ideal for busy parents and teachers.
Safety Tips
While cotton ball painting is safe, always keep these tips in mind:
- Supervise children under four closely.
- Make sure kids don’t put cotton balls or paint in their mouths.
- Use non-toxic, washable paints.
- Wash hands after the activity.
- Dispose of used cotton balls properly.
If a child has allergies to cotton or certain paints, check labels and choose alternatives.
Credit: sunshinewhispers.com
Making Cotton Ball Painting Educational
This art activity can also support learning:
- Color lessons: Teach primary and secondary colors by mixing paints on the tray.
- Counting: Count how many dots or shapes the child makes.
- Storytelling: Paint a picture, then ask the child to tell a story about it.
- Science: Discuss how colors blend or how materials absorb liquid.
Many teachers use cotton ball painting in early education for both fun and learning. For more ideas on using art for learning, see this National Association for the Education of Young Children resource.
Cleaning Up After Cotton Ball Painting
Clean-up is usually quick:
- Throw away used cotton balls and any disposable table covers.
- Wash reusable trays and tools with warm, soapy water.
- Wipe tables and chairs with a damp cloth.
- Wash hands with soap and water.
- Let paintings dry flat before displaying or storing.
If paint gets on clothes, rinse with cold water as soon as possible for best results.
Credit: growingupgabel.com
Frequently Asked Questions
What Age Is Best For Cotton Ball Painting?
Cotton ball painting is best for children ages 2 to 8, but older kids can enjoy it, too. For toddlers, always supervise and use large cotton balls to avoid choking hazards.
Is Cotton Ball Painting Messy?
It’s less messy than finger painting but more than crayons or markers. Use washable paint, cover surfaces, and have wet wipes nearby for easy clean-up.
Can I Use Regular Paint For Cotton Ball Painting?
Use washable tempera or poster paint for kids. Avoid acrylic or oil paint, as they are harder to wash out and may not be safe for young children.
How Do I Keep The Cotton Ball From Slipping?
Try sticking the cotton ball in a clothespin or holding it with tongs. This keeps hands cleaner and gives better control, especially for little hands.
What If My Child Doesn’t Like The Feel Of Cotton Balls?
Let them use gloves, tongs, or even try cotton swabs instead. The key is to keep the activity comfortable and fun.
Cotton ball painting is a wonderful way for children to discover art, learn new skills, and have fun. With simple supplies, easy setup, and endless options for creativity, it’s a must-try for any parent, teacher, or caregiver. Give it a try and see what colorful creations your child will make!


