Are you ready to unlock the secret to creating stunning oil paintings with the perfect colors? Mixing oil paint colors might seem tricky at first, but once you understand the simple steps, it becomes an exciting part of your creative process.
Imagine being able to blend your own unique shades, giving your artwork depth and life that stand out. In this guide, you’ll discover easy techniques to mix colors like a pro, avoid common mistakes, and make your palette work exactly how you want it to.
Keep reading, and you’ll soon feel confident turning basic colors into endless possibilities for your next masterpiece.

Credit: www.amazon.com
Essential Materials
Gathering the right materials is the first step to mixing oil paint colors successfully. Quality supplies help you achieve smooth blends and vibrant results. This section covers the key tools you need to start mixing like a pro.
Choosing Quality Oil Paints
Select paints with rich pigments for bright, lasting colors. Avoid cheap paints that have less pigment and more fillers. Choose tubes from trusted brands to ensure consistency. Pick primary colors first: red, yellow, and blue. These colors form the base for all mixes.
Selecting Brushes And Palettes
Use brushes with stiff bristles to handle thick oil paints easily. Flat and round brushes work well for mixing and applying. Choose a palette made of wood, glass, or plastic. A smooth surface helps blend colors cleanly. Keep your palette size big enough to mix several colors at once.
Using Mediums And Solvents
Mediums thin paint and change drying time. Linseed oil is a popular medium for a glossy finish. Solvents like turpentine clean brushes and thin paint. Use solvents with good ventilation to avoid fumes. Mix mediums and solvents carefully to control paint flow and texture.
Color Basics
Understanding color basics is the first step in mixing oil paint colors. Colors create mood and bring paintings to life. Knowing how colors relate helps you mix new shades with confidence. This section covers primary, secondary, tertiary colors, and the difference between warm and cool tones.
Primary Colors In Oil Painting
Primary colors are the base of all color mixing. In oil painting, these are red, yellow, and blue. You cannot make these colors by mixing others. Every other color comes from combining primary colors. Having good quality primary paints is important for vibrant mixes.
Secondary And Tertiary Colors
Secondary colors form by mixing two primary colors. Red and yellow make orange, yellow and blue make green, blue and red make purple. Tertiary colors come from mixing a primary and a secondary color. These create subtle shades like red-orange or blue-green. Tertiary colors add depth and variety to your palette.
Warm Vs Cool Colors
Colors feel warm or cool based on their temperature. Warm colors include red, orange, and yellow. They bring energy and brightness. Cool colors like blue, green, and purple create calm and distance. Using warm and cool colors together adds balance and contrast in your painting.
Mixing Techniques
Mixing oil paint colors requires patience and a good technique. Proper methods help you create smooth, rich hues. These mixing techniques improve control over color results. They make your painting process more enjoyable and effective.
Starting With Light And Dark Hues
Begin with a larger amount of light color on your palette. Dark hues have stronger tinting power and can quickly change the mix. Add dark colors in small amounts to the light base. This prevents the color from becoming too dark too fast. It also helps you see the subtle changes in tone as you mix.
Gradual Dark Color Addition
Mix colors step by step, adding dark paint slowly. Stir well after each addition to check the shade. This gradual approach lets you control the depth of color precisely. It reduces waste by avoiding overuse of darker pigments. Take your time to find the perfect balance between light and dark.
Blending On Palette Vs Canvas
Mixing on the palette gives you a preview of the final color. It lets you adjust tones before applying paint on the canvas. Blending directly on the canvas creates natural transitions and softer edges. Use palette mixing for exact color matching and canvas blending for dynamic effects. Combining both techniques offers versatility in your artwork.

Credit: www.youtube.com
Mastering Color Matching
Color matching is a vital skill in oil painting. It helps bring harmony and realism to your artwork. Understanding how to mix colors accurately saves time and paint. It also boosts your confidence in creating the exact shade you want. This section focuses on key tips to refine your color mixing techniques and avoid common mistakes.
Creating Neutral Tones
Neutral tones balance your color palette and add depth. You can create them by mixing complementary colors, such as blue and orange. Start with small amounts and mix slowly to control the shade. These tones help to soften bright colors and create realistic shadows. Experiment with different pairs to discover subtle variations in your neutrals.
Adjusting Saturation And Value
Saturation refers to the intensity of a color. To reduce saturation, add a small amount of its complementary color. Value means the lightness or darkness of a color. Add white to lighten or black to darken a hue carefully. Adjusting saturation and value gives your painting more dimension. It also helps to create contrast and focus within your composition.
Avoiding Muddy Colors
Muddy colors happen when too many colors mix without planning. Avoid mixing all colors at once. Clean your palette and brushes often to keep colors pure. Use limited color combinations for clearer results. Pay attention to the ratio of colors you mix. This prevents dull or dirty-looking shades and keeps your painting vibrant and fresh.
Color Mixing Tips
Mixing oil paint colors can be tricky without the right approach. Using simple tips helps create the exact shades you want. These tips improve your mixing skills and keep your artwork consistent. Follow these color mixing tips for better results with your oil paints.
Using Limited Color Palettes
Start with a small set of colors. Limited palettes make mixing easier and reduce confusion. Choose basic colors like red, blue, and yellow. Mix these to create many different shades. This method helps you learn color relationships clearly. It also saves paint and cuts waste.
Testing Small Batches First
Always mix tiny amounts before large batches. Small tests let you see how colors blend. This prevents wasting paint on unwanted shades. Use a palette knife to mix a little paint first. Check the color in natural light for accuracy. Adjust the mix until you get the right tone.
Keeping Consistency Across Layers
Keep your colors consistent in all painting layers. Mix enough paint for each section to avoid color shifts. Note the ratios of colors used in your mix. Use the same mix for touching up or adding details. This keeps your painting balanced and smooth. Consistency helps layers blend well without harsh edges.
Fat Over Lean Rule
The Fat Over Lean Rule is essential in oil painting. It guides how to layer your paint for durability and a smooth finish. This rule means applying layers with increasing oil content as you build up your painting. Following it helps prevent common problems like cracking and peeling.
Understanding this rule improves your painting technique. It ensures each layer dries properly and lasts long. The “fat” layers contain more oil, making them flexible. The “lean” layers have less oil, so they dry faster and are firmer.
Applying Layers Correctly
Start with lean layers that have less oil and more pigment. These dry faster and create a firm base. Add fat layers on top by mixing more oil into your paint. Each new layer should be more flexible than the one below. This prevents the paint from cracking as it dries and ages.
Importance Of Oil Content
Oil controls how flexible your paint layer will be. More oil means slower drying but greater flexibility. Less oil means faster drying but more stiffness. Balancing oil content keeps your painting stable. Adjust oil levels by mixing linseed or walnut oil with your paint.
Preventing Cracking And Peeling
Applying lean layers under fat layers prevents cracking. Fat layers remain flexible and can move with the drying paint underneath. Without this rule, stiff layers on flexible ones can crack or peel. Follow the fat over lean rule to protect your artwork for years.
Common Challenges
Mixing oil paint colors can be tricky. Several challenges often arise during the process. These challenges can affect the final look and quality of your painting. Understanding these common issues helps you avoid frustration and improve your technique. Below are some frequent problems artists face and how to handle them.
Fixing Overmixed Colors
Overmixing oil paint can result in dull, muddy colors. The vibrancy disappears as colors blend too much. To fix this, add fresh paint of the original hues. Use a palette knife to gently remix without overblending. Keep colors separate on the palette before mixing. This method preserves brightness and clarity in your colors.
Dealing With Drying Times
Oil paints dry slowly compared to other paints. This slow drying can delay your work process. Thicker layers take even longer to dry. To speed drying, use thinner paint layers. Add a drying medium designed for oil paints. Work in a well-ventilated, warm room. Proper drying time helps layers set well and prevents cracking.
Handling Color Shifts
Colors may shift in tone as oil paint dries. Some colors darken, while others lighten slightly. This change can surprise beginners. Test colors on a small surface before applying. Use colors known for stable drying properties. Adjust your mixes to anticipate these shifts. Awareness of this helps you keep your intended color balance.
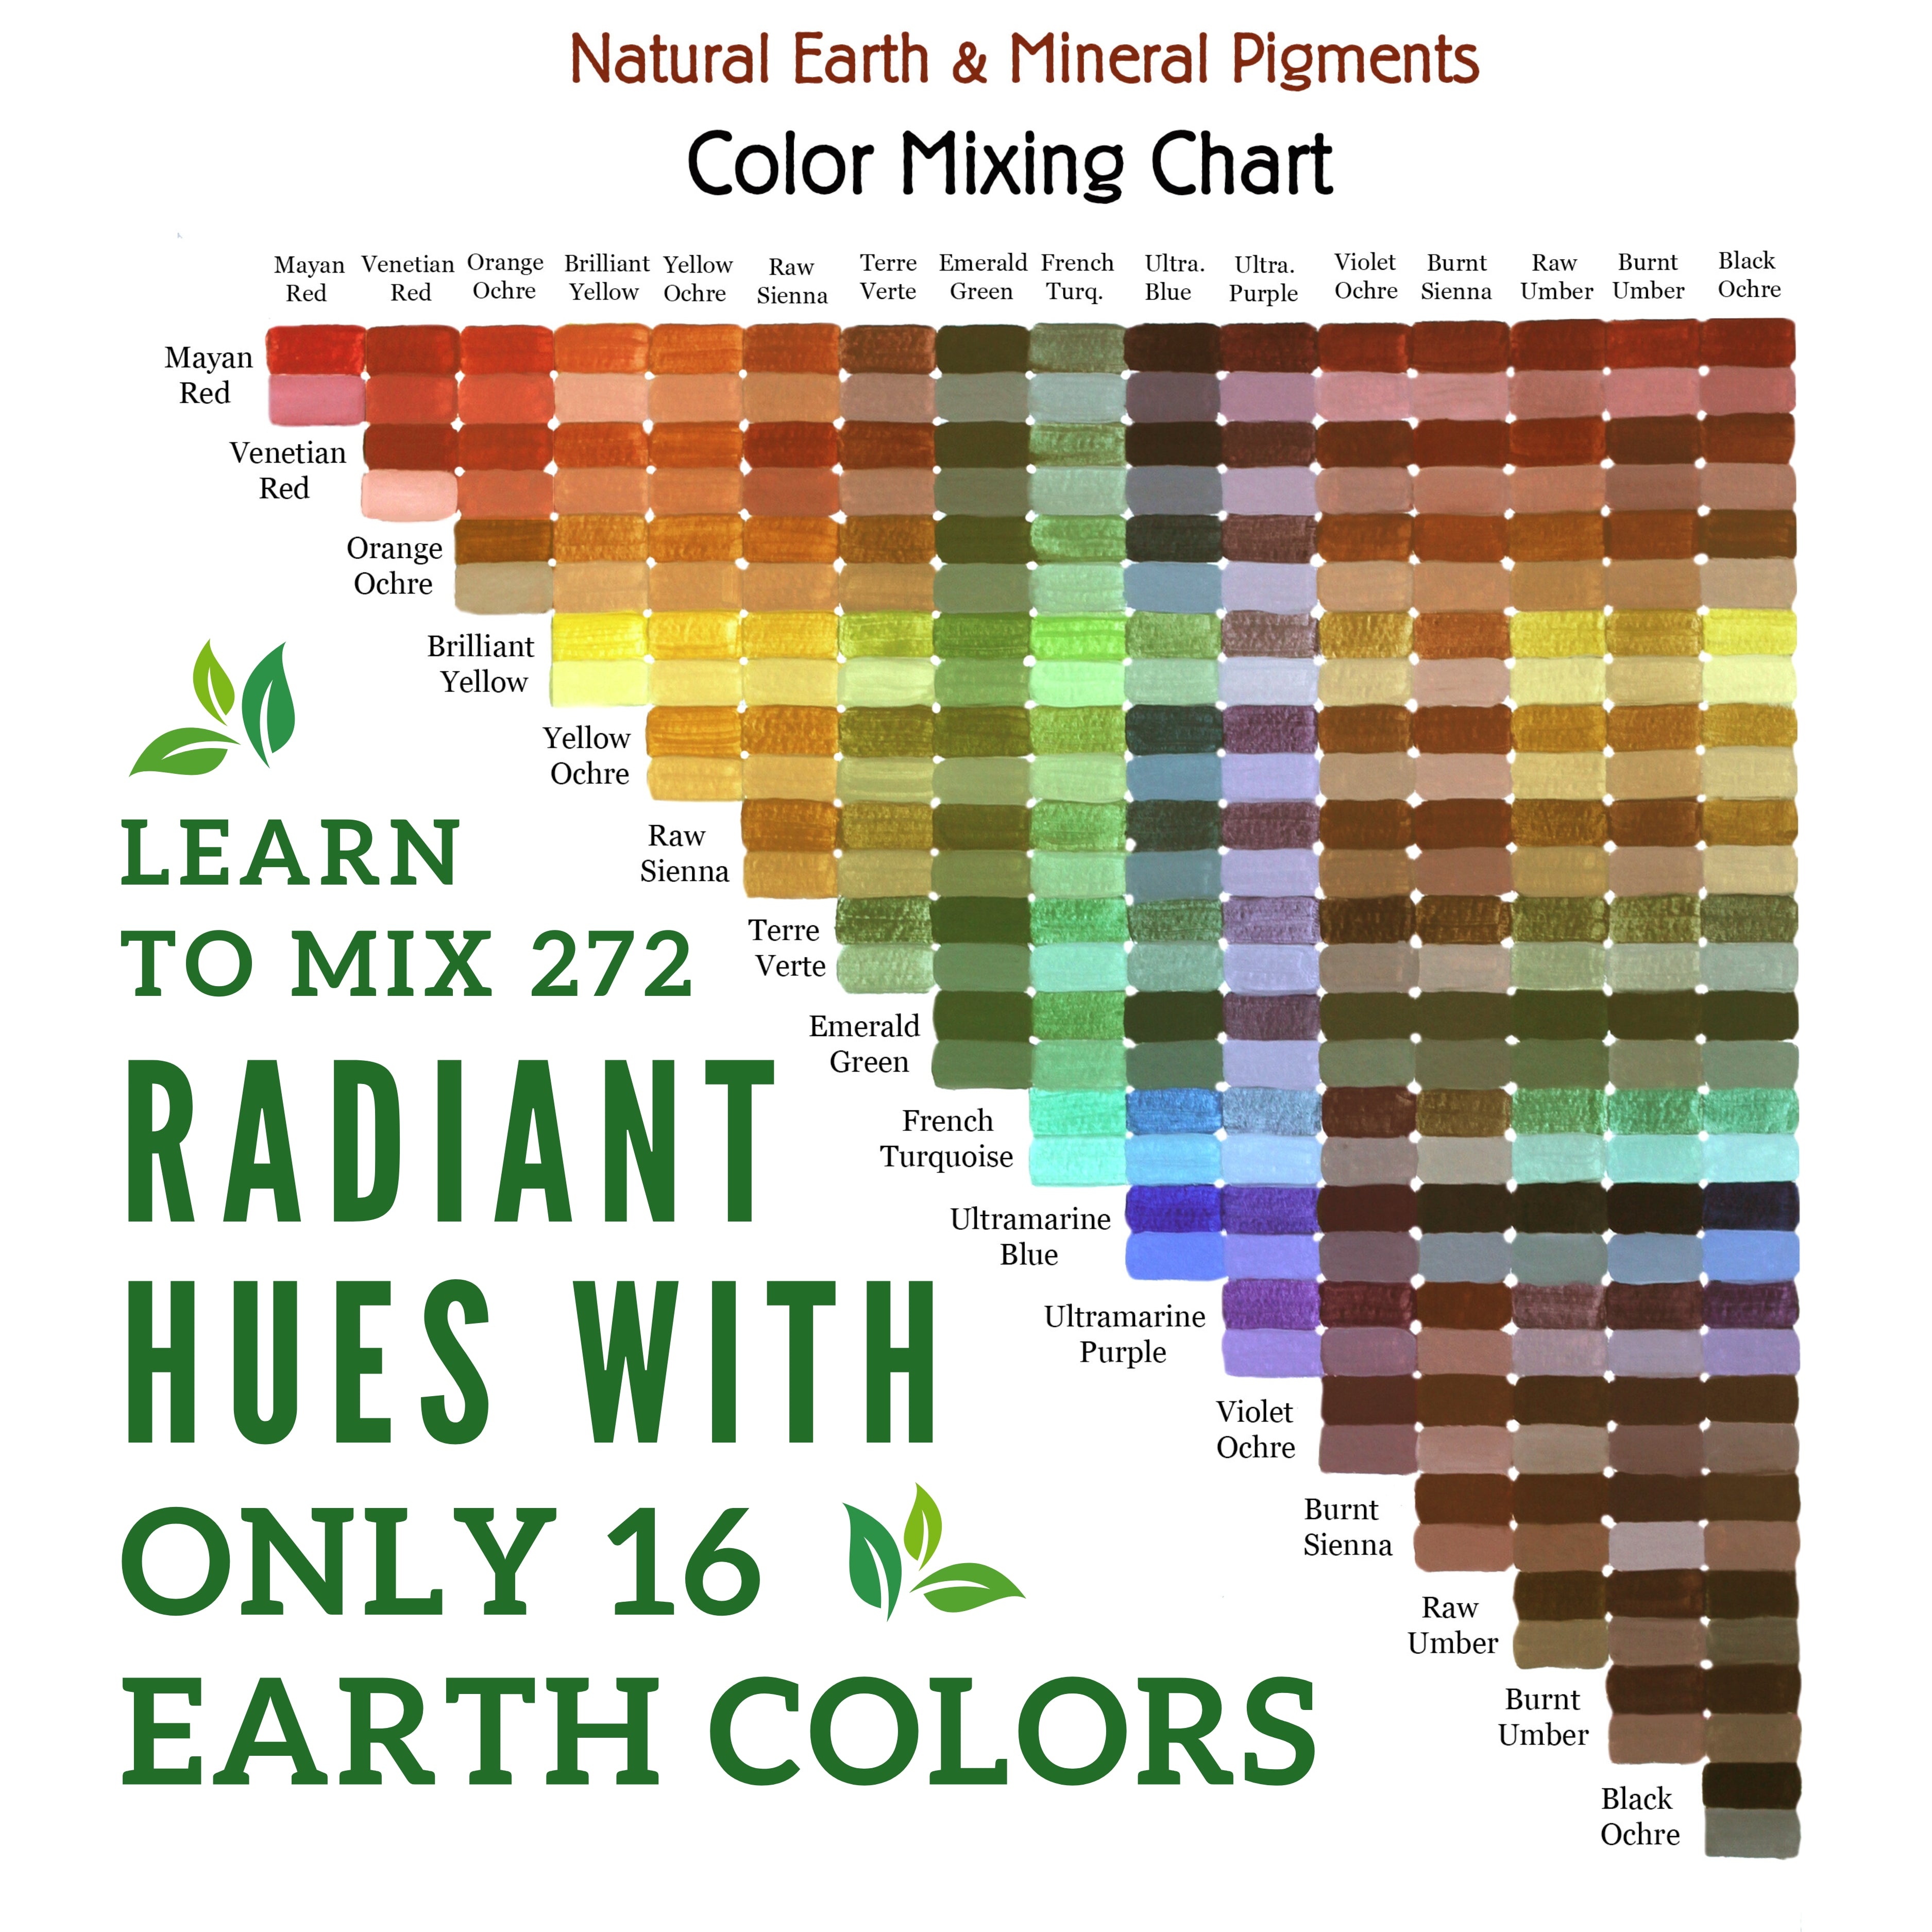
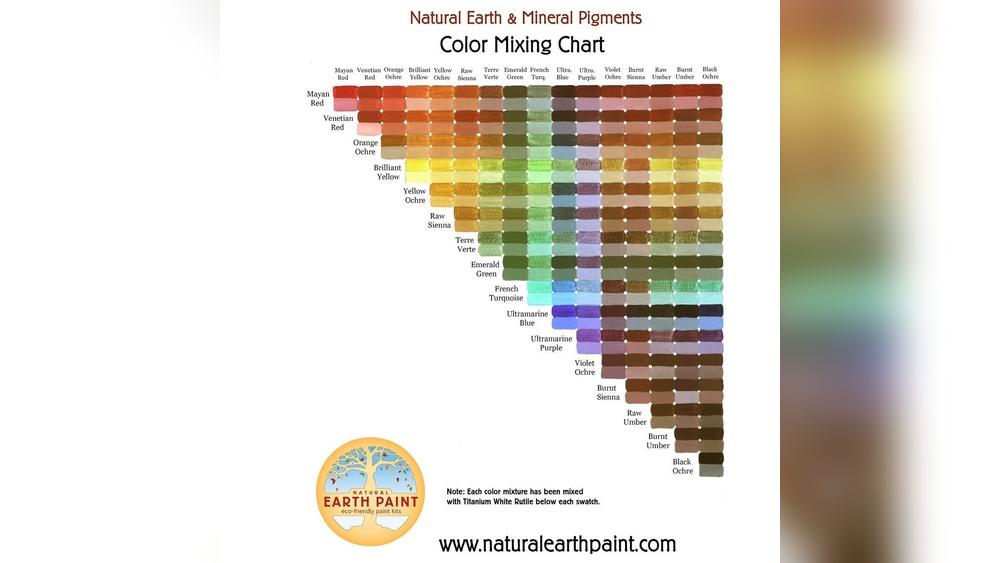
Credit: naturalearthpaint.com
Practice Exercises
Practice exercises are essential for improving your oil paint mixing skills. These exercises help you understand color relationships and develop control over your palette. Regular practice builds confidence and sharpens your eye for subtle differences in hue and tone.
Start simple, then try more complex mixes. Use these exercises to explore color possibilities and improve your technique step by step.
Mixing Primary Color Variations
Begin with the three primary colors: red, yellow, and blue. Mix them in different amounts to create a range of secondary and tertiary colors. Try adding small amounts of one primary to another. Notice how the shades change with each mix. This practice helps you see how colors interact and blend.
Creating Gradients And Transitions
Practice blending two colors smoothly from one edge of your canvas to the other. Start with pure colors on each side. Then, mix small steps between them to create a gradient. This exercise trains your hand to control paint and helps you understand how colors transition naturally. Gradients are useful for skies, backgrounds, and shading.
Reproducing Natural Hues
Try mixing colors that match real objects like leaves, skin tones, or wood. Observe the object closely and note its main colors. Use your palette to recreate these hues by combining primary and secondary colors. Adjust the mix by adding small amounts of white, black, or complementary colors. This exercise improves your ability to capture lifelike colors in your paintings.
Advanced Mixing Methods
Advanced mixing methods help create richer, more dynamic oil paintings. These techniques go beyond simple color blending. They add depth, texture, and unique effects that bring your art to life. Experimenting with these methods can elevate your painting skills and produce stunning results.
Using Glazes For Depth
Glazing means applying thin, transparent layers of paint. Each glaze changes the color and adds depth. It lets light pass through layers and reflect back, creating a glowing effect. Use slow-drying oil paints and mix paint with a medium to thin it. Build multiple layers slowly, letting each dry before adding the next. This method adds richness and subtle color shifts.
Scumbling Techniques
Scumbling is a dry brush technique. Use a stiff brush with little paint and drag it lightly over the surface. This lets the underlayer show through. It creates a broken, textured look with soft, muted colors. Scumbling is perfect for adding atmosphere, highlights, or rough textures. It works well for skies, water, and natural surfaces.
Impasto And Texture Effects
Impasto means applying paint thickly to make texture stand out. Use a palette knife or a brush loaded with paint. Thick layers catch light and cast shadows, adding dimension. Impasto creates a tactile surface you can see and feel. Combine it with color mixing on the palette or canvas for bold, expressive strokes. This technique gives your painting a lively, sculptural quality.
Maintaining Your Palette
Maintaining your palette is essential for smooth oil painting sessions. A clean, well-organized palette helps you mix colors accurately. It also saves time and reduces waste. Taking care of your palette ensures your paints stay fresh longer. This section covers practical tips to keep your palette in top shape.
Cleaning And Storage Tips
Clean your palette after each painting session. Use a palette knife to scrape off excess paint. Wipe the surface with a soft cloth and a little solvent. Avoid harsh chemicals that damage the palette material. Store your palette in a cool, dry place. Cover it with plastic wrap to keep dust away. Proper cleaning prevents paint build-up and color contamination.
Organizing Colors Efficiently
Arrange colors in a logical order on your palette. Group warm colors on one side and cool colors on the other. Place primary colors near the center for easy access. Keep frequently used colors separate to avoid mixing mistakes. Label tubes or spots if needed to remember color names. A tidy palette speeds up the mixing process and improves color accuracy.
Extending Paint Life
Seal your palette with airtight containers or wrap it tightly. This slows down the drying of oil paints. Use a palette with a wet surface or a dedicated palette keeper. Avoid exposing paint to direct sunlight or heat. Mix only the amount you need to reduce waste. Proper storage keeps paint usable for future sessions and saves money.
Frequently Asked Questions
How To Mix Oil Colors Guide?
Start with more light color and less dark color. Gradually add small amounts of dark to light. Mix thoroughly on a palette for even color. Test on paper before applying. Use primary colors to create secondary shades.
What Is The 80/20 Rule In Painting?
The 80/20 rule in painting means focusing 80% effort on key elements and 20% on details. It boosts efficiency and impact.
What Three Colors Cannot Be Mixed Together?
The three colors that cannot be mixed together are red, yellow, and blue. These are the primary colors in traditional art. All other colors come from mixing these three. They form the base for creating secondary and tertiary colors in painting.
What Is The Golden Rule Of Oil Painting?
The golden rule of oil painting is “fat over lean. ” Apply lean, fast-drying layers first, then add fatter, oil-rich layers to prevent cracking.
Conclusion
Mixing oil paint colors takes practice and patience. Start with small amounts and blend slowly. Use primary colors as your base for mixing new shades. Remember, darker colors are stronger and affect mixtures more. Keep notes of your mixes to repeat favorite tones.
Enjoy experimenting with colors to create your unique palette. With time, your color mixing skills will improve naturally. Painting becomes more fun when colors match your vision. Keep exploring and practicing to gain confidence and control.