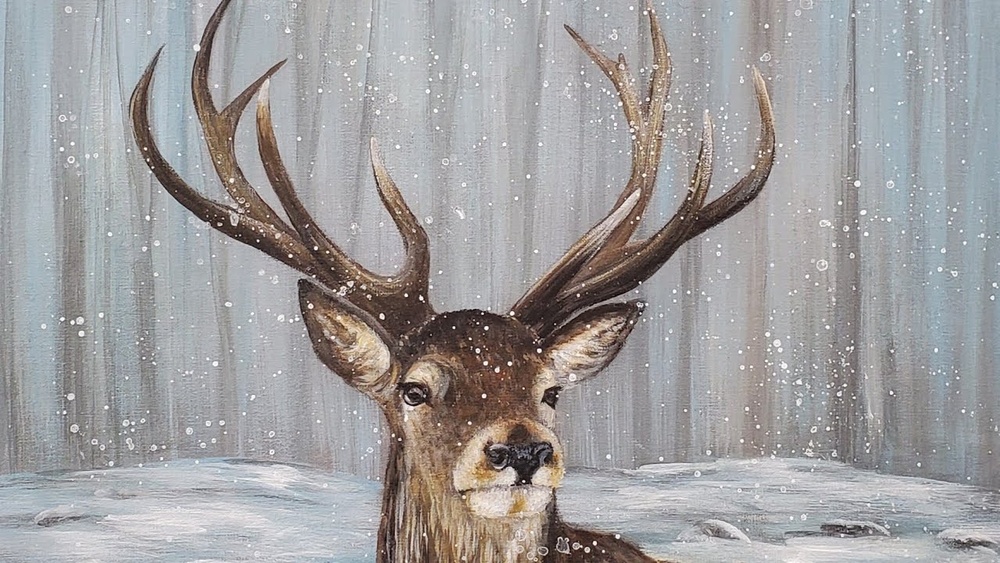
Are you ready to create a beautiful acrylic painting of a deer that captures its graceful spirit and natural beauty? Whether you’re a beginner or have some painting experience, this guide will walk you through each step in a simple and clear way.
You’ll learn how to shape your deer’s silhouette, build up colors with rich browns and soft highlights, and bring out fine details like eyes and antlers that make your artwork come alive. By the end, you’ll have a stunning deer painting that you’ll be proud to display or gift.
Let’s dive in and turn your creative vision into a vibrant acrylic masterpiece!
Credit: theartsherpa.com
Materials Needed
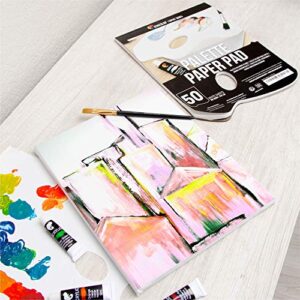
Gathering the right materials sets the foundation for painting a deer with acrylic paint. Quality supplies make the process smooth and enjoyable. Prepare all items before starting to avoid interruptions. This section lists key materials needed for your painting project.
Essential Acrylic Paint Colors
Start with basic colors for a natural deer look. Burnt umber creates rich brown tones. Raw umber adds deep shadows and texture. Earth green works for grassy backgrounds and foliage. Cadmium yellow highlights lighter areas and adds warmth. White helps with blending and creating soft edges. These colors cover most deer painting needs.
Brush Types And Sizes
Use a variety of brushes for different details. Flat brushes help fill large areas quickly. Round brushes are perfect for fine lines and details like eyes and antlers. Fan brushes add texture to fur and grass. Small detail brushes ensure precision on delicate parts. Synthetic brushes work best with acrylic paints for smooth application.
Additional Supplies
Prepare extra tools for a complete setup. A palette or mixing tray keeps your colors organized. Water containers help clean brushes between colors. Paper towels or cloth rags absorb excess paint and water. Canvas or acrylic paper provides a good surface to paint on. Easels hold your work steady and comfortable during painting.
Preparing The Canvas
Preparing the canvas is the first step in painting a deer with acrylic paint. It sets the stage for your artwork and helps you create a clean, smooth surface. Proper preparation improves paint adhesion and enhances colors. This part focuses on sketching the deer outline and setting up background colors.
Sketching The Deer Outline
Start by lightly sketching the deer on the canvas with a pencil. Use simple shapes like circles and ovals to map the head and body. Draw the legs and antlers with gentle lines. Keep the sketch light to avoid visible marks later. Focus on capturing the deer’s basic posture and proportions. This outline guides your painting and keeps your work accurate.
Setting Up Background Colors
Choose background colors that suit the scene you want to create. Use soft, natural tones like greens, browns, or blues for a forest or meadow look. Apply these colors broadly with a large brush. Blend the shades smoothly to avoid harsh lines. A well-chosen background makes the deer stand out and adds depth. Keep the background simple to focus attention on the deer.
Blocking In Shapes
Blocking in shapes is the first step in painting a deer with acrylic paint. It helps create the basic form and structure. This stage sets the foundation for details and colors later.
Focus on large shapes and simple outlines. Avoid small details now. Use smooth, broad strokes to cover the canvas quickly. This method keeps the painting balanced and clear.
Base Tones For Deer Body
Start by choosing base tones for the deer’s body. Use earthy colors like burnt umber and raw umber. These colors give warmth and depth to the deer’s coat.
Apply these tones in large blocks. Cover the main body areas such as the torso, neck, and legs. Keep your brush strokes loose and smooth to blend easily later.
Establishing Light And Shadow
Next, add light and shadow to define the deer’s shape. Decide where the light source is coming from. Use lighter colors like cadmium yellow mixed with white for highlights.
For shadows, mix darker tones such as earth green with burnt umber. Paint shadows on the opposite side of the light source. This contrast makes the deer look three-dimensional and lifelike.

Credit: www.youtube.com
Adding Fur Texture
Adding fur texture is key to making your deer painting look realistic. It gives life to the animal and shows the softness of its coat. This step helps separate the deer from the background and adds depth to your artwork. You need patience and careful brushwork to create fine fur details.
Use the right tools and techniques to mimic the natural flow of fur. Observe deer fur direction and color changes closely. This helps you paint strokes that follow the body’s shape. Two important methods are using small brushes for detail and layering colors to build depth.
Using Small Brushes For Detail
Small brushes allow you to paint thin, fine lines that look like fur strands. Choose brushes with pointed tips for precision. Light, quick strokes work best to mimic short fur. Keep your hand steady and use gentle pressure. Vary your stroke length to avoid a flat look. Paint along the fur’s natural growth direction. This brings a realistic flow to the texture. Clean your brush often to keep lines sharp and clear.
Layering Colors For Depth
Layering colors creates a rich, three-dimensional effect on fur. Start with a base color that matches the deer’s main coat. Let it dry before adding lighter and darker shades. Use thin layers and build up the paint slowly. Darker shades add shadow and contour. Lighter colors highlight raised fur areas. Blend edges softly to avoid harsh lines. This technique gives volume and realism to your painting. Each layer adds complexity and makes the fur look natural.
Painting Facial Features
Painting the facial features of a deer brings your artwork to life. These details make the deer appear realistic and expressive. Focus on key areas like the eyes, antlers, and nose. Each part has unique shapes and colors. Use fine brushes and careful strokes to add depth and character. Let’s explore how to paint these important features step by step.
Detailing The Eyes
The eyes show the deer’s mood and soul. Start with a small, round shape using dark brown or black paint. Leave a tiny white spot to mimic light reflection. This adds sparkle and realism. Use a thin brush to paint the eyelashes and soft shadows around the eyes. Blend gently to create a smooth transition. Avoid harsh lines for a natural look.
Defining The Antlers And Nose
Antlers have rough textures and curves. Use a mix of brown and gray shades. Apply short, uneven strokes to show their rugged surface. For the nose, paint a small oval shape in black or dark brown. Add a soft highlight on one side to suggest moisture. Blend edges softly for a rounded appearance. These touches make the face more lifelike and detailed.
Enhancing Highlights And Shadows
Enhancing highlights and shadows brings your deer painting to life. It creates a sense of depth and form. Proper use of light and dark tones makes the deer appear three-dimensional. This section explains how to add white highlights and deepen shadow areas effectively.
Adding White Highlights
White highlights represent where light touches the deer’s fur. Use a small, fine brush for precision. Apply white paint lightly on raised areas like the nose, ears, and forehead. Blend the edges softly to avoid harsh lines. Highlights add brightness and realism to the painting. Focus on spots that naturally catch light for the best effect.
Deepening Shadow Areas
Shadows give the deer shape and contrast. Use darker colors such as burnt umber or raw umber to deepen shadows. Paint under the neck, behind the legs, and around the eyes. Blend shadows smoothly into midtones for a natural look. Shadows create volume and make the deer stand out on the canvas.
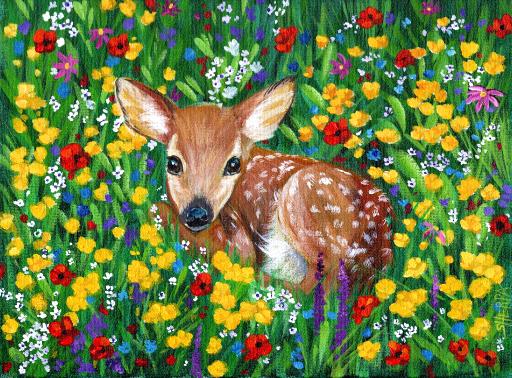
Background Techniques
Background techniques set the stage for your acrylic deer painting. A well-crafted background adds depth and mood. It can highlight the main subject without stealing attention. Focus on texture and natural tones for a balanced look. Use simple brush strokes for an abstract feel. Here are two effective methods to enhance your painting.
Creating Abstract Grass Texture
Start with a mix of green, yellow, and brown tones. Use a wide, flat brush to apply paint in quick, vertical strokes. This mimics the look of tall grass. Vary the pressure to create uneven heights and gaps. Let some white spaces peek through for light effects. Avoid detailed blades of grass; keep it loose and suggestive. This technique gives a lively, natural base without overpowering the deer figure.
Incorporating Natural Elements
Add simple shapes to hint at leaves, twigs, or small plants. Use a smaller brush and darker shades for these details. Dab or flick the brush lightly to create texture and randomness. Keep these elements soft and blended with the background colors. This approach enhances realism while maintaining an artistic style. It connects the deer to its environment gently and naturally.
Blending And Finishing Touches
Blending and finishing touches bring life to your deer painting. These steps create smooth color transitions and sharp details. They make your artwork look polished and realistic. Take time to blend colors softly and add final highlights or shadows. This enhances depth and texture in the painting.
Using Mist Spray For Smooth Blending
Mist spray helps keep acrylic paint wet longer. This allows for easier blending between colors. Lightly spray the paint surface to prevent quick drying. Use a soft brush to gently blend edges where colors meet. This creates a smooth gradient without harsh lines.
Be careful not to spray too much water. Excess moisture can damage the paper or canvas. Apply mist spray in small amounts and blend quickly. This technique works best on larger color areas like the deer’s body or background.
Final Details And Corrections
After blending, check the painting for small mistakes or spots. Use a fine brush to fix sharp edges or add fine lines. Paint details like the deer’s eyes, nose, and fur texture carefully. These details give character and realism to the deer.
Use darker or lighter shades to add shadows and highlights. This makes the deer look three-dimensional. Make small corrections gradually. Step back often to see the painting as a whole. This helps you spot areas that need improvement.
Common Mistakes To Avoid
Painting a deer with acrylic paint can be rewarding. Avoiding common mistakes improves your artwork. These errors can make your painting look less natural. Focus on each step carefully for the best results.
Overworking The Paint
Applying too many layers can muddy colors. Acrylic paint dries quickly, so repeated brushing can lift paint from the canvas. This causes uneven texture and dulls the colors. Let each layer dry before adding more. Use light, confident strokes to maintain freshness. Avoid scrubbing the same area multiple times.
Ignoring Light Source
Light direction defines the shape and form of the deer. Without a clear light source, the painting looks flat. Decide where the light comes from before starting. Shade the opposite side of the deer to add depth. Highlight areas that catch light for realism. Consistent lighting makes your deer appear three-dimensional and lifelike.

Credit: studiowildlife.com
Tips For Acrylic Painting Success
Success in acrylic painting comes from good habits and smart techniques. These tips help keep your painting smooth and vibrant. They also save time and avoid common problems. Follow these simple rules to make painting your deer easier and more enjoyable.
Brush Care And Cleaning
Clean your brushes immediately after use. Acrylic paint dries fast and can ruin brushes if left to harden. Use warm water and mild soap to wash your brushes well. Gently reshape the bristles before letting them dry. Store brushes flat or with bristles up to keep their shape. Proper brush care helps you paint fine details on your deer.
Working Quickly With Acrylics
Acrylic paint dries fast, so work at a good pace. Plan your colors and strokes before applying paint. Use small amounts of paint to control drying time. Blend colors quickly while the paint is wet for smooth transitions. If paint dries too fast, mist your palette with water. Fast work keeps your deer painting fresh and lively.
Frequently Asked Questions
How To Make Deer Color With Acrylic Paint?
Mix Burnt Umber, Raw Umber, Earth Green, Cadmium Yellow, and White for deer color. Apply broad brushstrokes to mimic fur and grassy textures. Layer darker browns for shadows and lighter tones for highlights. Use small brushes for fine details like eyes and antlers.
How To Draw Deer Easily For Beginners?
Start by sketching a simple deer outline using basic shapes. Draw the head, body, and legs with light lines. Add details like antlers and eyes gradually. Keep shapes rounded and proportionate. Use reference images for accuracy. Practice shading to add depth and texture.
How To Correctly Paint With Acrylic Paint?
Start with a clean canvas and sketch your design lightly. Use synthetic brushes and apply acrylic paint in thin layers. Work quickly to blend colors while wet. Add texture with palette knives and fine details with small brushes. Finish with highlights using warm and cool tones for depth.
Can I Use Acrylic Paint For Taxidermy?
Yes, you can use acrylic paint for taxidermy. It adheres well, dries quickly, and offers vibrant, durable colors. Choose high-quality acrylics for the best finish on taxidermy mounts.
Conclusion
Painting a deer with acrylics can be simple and fun. Start with basic shapes and add layers for depth. Use natural colors like browns and greens to create realism. Take your time blending shadows and highlights. Remember, practice improves your skill and confidence.
Enjoy the process and watch your artwork come alive. Keep experimenting with brush strokes and color mixing. Soon, you will create beautiful deer paintings with ease.