Are you ready to bring the delicate beauty of lavender into your acrylic paintings? Painting lavender can seem tricky at first, but with the right techniques and color mixing tips, you can easily create soft, vibrant blooms that capture its charm perfectly.
In this guide, you’ll discover simple step-by-step methods to paint lavender using acrylics, from mixing the ideal shades to choosing the best brushes for those fine floral details. Whether you’re a beginner or looking to improve your floral painting skills, this article will help you unlock the secrets to painting lavender that looks fresh and lifelike.
Keep reading to transform your canvas into a soothing lavender field with confidence and ease!
Materials Needed
Gathering the right materials is essential for painting lavender with acrylics. The quality and type of supplies affect your final artwork. Focus on choosing paints, brushes, and additional tools designed for acrylic painting. Proper materials help create vibrant colors and detailed textures that bring lavender to life.
Prepare all materials before you start. This saves time and keeps your workflow smooth.
Choosing Acrylic Paints
Select acrylic paints with good pigmentation and smooth consistency. You will need shades of purple, blue, white, and green. Choose artist-grade paints for richer colors and better blending. Student-grade paints work for practice but may lack vibrancy. Consider tubes or small jars based on your usage and budget.
Brush Types
Use a variety of brushes for different effects. Flat brushes work well for backgrounds and broad strokes. Round brushes are perfect for fine details and delicate petals. Filbert brushes help blend edges smoothly. Synthetic brushes hold acrylic paint better and are easier to clean. Choose brushes in small to medium sizes for detailed work on lavender flowers.
Additional Tools
Prepare a palette for mixing colors. A plastic or glass palette works best to avoid staining. Use a cup of water for rinsing brushes between colors. Paper towels or cloths help remove excess paint and clean brushes. A canvas or acrylic paper provides a good surface to paint on. Optional items include palette knives for texture and masking tape for clean edges.
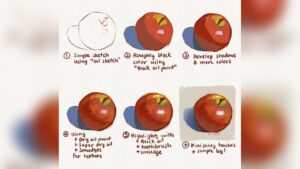
Credit: www.youtube.com
Mixing Lavender Color
Mixing the perfect lavender color with acrylic paint requires balance and patience. Lavender is a soft, light purple that leans toward either warm or cool tones. Understanding the right mix helps you capture this delicate hue. Start with basic colors and adjust as you go. Small changes can make a big difference in the final shade. Experiment with ratios and tones to find the lavender that fits your painting.
Basic Color Ratios
Begin with white paint as your base. Add small amounts of blue and red to the white. A common ratio is 4 parts white, 1 part blue, and 1 part red. Mix thoroughly after each addition. This creates a gentle purple tone. Adjust the ratio slightly to get lighter or darker lavender. Keep the white dominant for a soft look.
Adjusting Warm And Cool Tones
Lavender can be warm or cool depending on your mix. For a warm lavender, add a bit more red or magenta. For a cool lavender, increase the blue slightly. Test the color on a scrap piece before applying it to your canvas. This helps you avoid unwanted shades. Use small amounts to keep control over the tone.
Creating Pastel Lavender
Pastel lavender is light and airy. Start with a lot of white paint. Add very little blue and red. Mix well to avoid streaks. Pastel lavender works well for soft backgrounds or floral details. The key is to keep the color pale and soft. Use layering to build up the shade gently.
Tips For Vibrant Purple
Use pure, bright blue and red paints for vivid purple. Avoid mixing dull or muddy colors. Add a touch of white to lighten without losing vibrancy. Keep your brush clean to prevent color contamination. Mix colors on a palette, not directly on the canvas. This gives you better control over the color intensity.
Preparing Your Canvas
Preparing your canvas is the first step in creating a beautiful acrylic painting of lavender. A well-prepared surface helps the paint stick better and shows colors more vividly. This preparation influences how smooth your brush strokes will be and how long your artwork lasts. Spend time choosing the right surface and applying the correct primer to get the best results.
Surface Selection
Choose a canvas that suits acrylic paint well. Cotton or linen canvases work great for beginners and experts. Cotton is affordable and easy to find. Linen is stronger but costs more. Canvas boards are a good option for practice. Avoid very smooth surfaces like glass or metal. They do not hold acrylic paint well and can cause peeling.
Canvas size matters too. Pick a size that matches your skill and workspace. Smaller canvases are easier to handle and finish quickly. Larger canvases give more space for detail but need more paint and time.
Priming Techniques
Apply a primer called gesso to your canvas before painting. Gesso creates a smooth, even surface and seals the fibers of the canvas. This prevents paint from soaking in and dulling colors. Use a wide brush or a roller to spread an even coat of gesso over the entire canvas.
Let the first coat dry completely. Then apply a second coat for better coverage and texture. Sand the surface lightly with fine sandpaper if you want it smoother. Avoid thick layers of gesso as they can crack when dry.
Some artists prefer tinted gesso to save time. Use a light lavender or soft grey tint to enhance your painting’s color harmony. This can make your lavender colors pop right from the start.
Painting Lavender Stems
Painting lavender stems requires a gentle touch and careful color choices. The stems are thin and delicate, so your brushwork must reflect that. Use fine brushes and steady strokes to capture their slender shape. Focus on simplicity and subtlety to bring out the natural beauty of lavender stems.
Brush Strokes For Stems
Use a small round brush for thin, precise lines. Start at the base and paint upward with light pressure. A single, smooth stroke works best to avoid a stiff look. Vary your brush angle to create natural curves and bends in the stems. Avoid heavy paint buildup to keep the stems looking fresh and light.
Adding Depth And Shadows
Mix a darker green or brown to add shadows along one side of each stem. Use a thin brush to apply these shadows carefully. Blend softly to create a gradual transition from light to dark. Shadows give the stems a three-dimensional feel. This step makes the lavender appear more lifelike and vibrant.
Painting Lavender Flowers
Painting lavender flowers with acrylic paint brings a fresh and calming touch to your artwork. This flower’s delicate shape and soft colors create a peaceful scene. Use simple methods to capture its unique look.
Focus on the small petals and their subtle color changes. Layer your paint lightly to show depth and texture. Let’s explore easy ways to paint lavender flowers step by step.
Techniques For Flower Shapes
Start with a thin brush or a small round tip. Dab the brush gently to form tiny oval petals. Paint short, vertical strokes close to each other. This method mimics the clustered flower heads of lavender. Keep the shapes loose, not perfect. It makes the flowers look natural and lively.
Using Highlights And Details
Add lighter shades of purple or white on the petals. Use these highlights to show sunlight or petal edges. A fine brush helps add small dots and lines for details. These details bring the flowers to life. Paint the stems with a mix of green and brown to look real. Shadows under petals give depth and roundness.
Using Cotton Swabs For Texture
Cotton swabs make texturing easy and fun. Dip a swab in paint and gently press on the flower area. This creates soft, round dots like lavender buds. Use different colors on the swab for a mixed effect. It adds variety without hard edges. Cotton swabs are perfect for beginners and quick work.
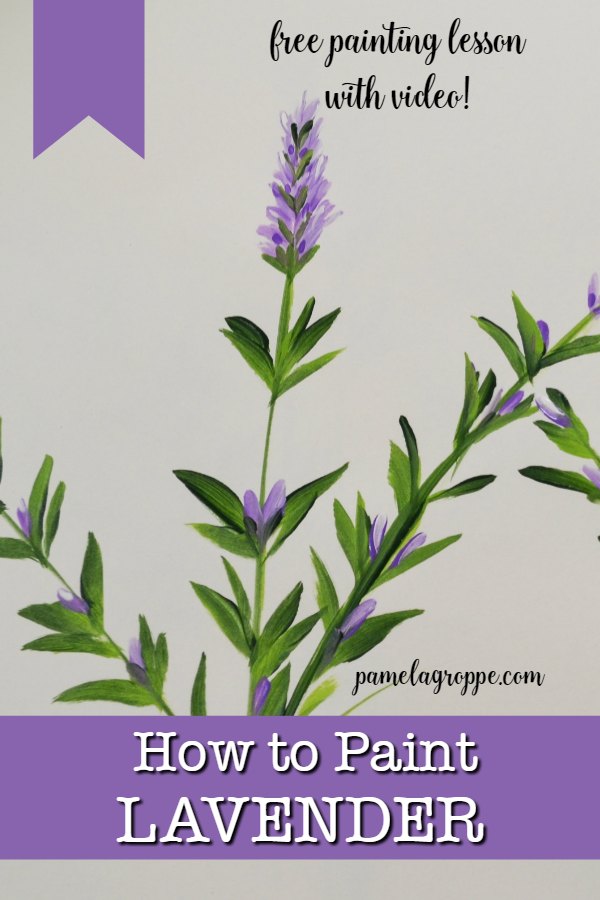
Credit: www.pamelagroppe.com
Layering And Blending
Layering and blending are key to painting realistic lavender with acrylics. These techniques help create depth and softness in your floral artwork. By carefully building layers and mixing colors smoothly, your lavender will appear vibrant and lifelike. This section explains two effective methods: wet-on-wet techniques and dry brushing for texture.
Wet-on-wet Techniques
Wet-on-wet means applying new paint while the first layer is still wet. This method allows colors to blend naturally on the canvas. Start with a light base color of lavender mixed with white. While it is wet, add darker purple or blue tones with a clean brush. Gently blend the edges using soft strokes. This creates a smooth transition between shades. Wet-on-wet helps capture the soft, delicate look of lavender petals.
Dry Brushing For Texture
Dry brushing uses a small amount of paint on a dry brush to add fine details. After your base layers dry, lightly drag a nearly dry brush over the surface. Use a lighter lavender or white to highlight the top edges of petals. This technique adds texture and the illusion of light hitting the flower. Dry brushing works well to show the fuzzy, soft feel of lavender blooms. It also gives depth without heavy paint buildup.
Final Touches
Final touches bring your lavender painting to life. This stage focuses on refining and protecting your work. Small adjustments improve the overall look. Sealing preserves your painting for years.
Refining Details
Use a fine brush to sharpen lavender tips. Add tiny highlights with white or light purple. Darken shadows gently for depth. Check leaves and stems for smooth edges. Blend softly to avoid harsh lines. Step back often to view your painting. This helps spot areas needing improvement. Make small changes carefully. Avoid overworking the paint to keep it fresh.
Sealing The Painting
Choose a clear acrylic varnish to seal your painting. It protects from dust, dirt, and fading. Apply thin, even coats with a clean brush. Let each coat dry fully before adding another. Use matte or glossy finish based on your preference. Seal both front and edges for full protection. Keep your painting away from direct sunlight to maintain color. Proper sealing ensures your lavender stays vibrant and beautiful.

Credit: feelingnifty.com
Common Mistakes To Avoid
Painting lavender with acrylics can be rewarding but tricky. Avoiding common mistakes improves your results. Focus on color mixing and brush handling. These areas often cause frustration for beginners. Simple adjustments can make your lavender look fresh and natural.
Color Mixing Errors
Lavender needs the right mix of purple and white. Too much blue makes it cold and unnatural. Too much red makes it look like pink. Start with white paint and add small amounts of blue and red. Mix slowly to find the soft lavender shade.
Avoid using pure purple straight from the tube. It is often too dark or intense. Add white to lighten it gently. Test your color on scrap paper before painting. This saves time and prevents mistakes on your artwork.
Brush Handling Tips
Use a small, round brush for lavender petals. Large brushes can make the petals look messy. Hold your brush lightly for better control. Pressing too hard spreads paint unevenly.
Clean your brush between colors to avoid muddy paint. Dab excess paint on a palette before applying. Use quick, light strokes for delicate lavender petals. This creates natural texture and flow.
Frequently Asked Questions
What Colors Do I Mix To Get Lavender?
Mix white with purple or violet to create lavender. Adjust by adding a little red or blue to balance the shade.
What Brushes Are Best For Painting Lavender?
Flat or filbert brushes work best for painting lavender, capturing soft petals and fine details. Use a small fan brush for texture. Synthetic brushes hold acrylic paint well and provide smooth strokes. Choose brush sizes 4 to 8 for flexibility and precision in lavender painting.
What Color Makes Up Lavender?
Lavender is made by mixing purple (a blend of blue and red) with white. Adding a touch of pink or magenta softens the hue.
How To Make Purple 💜 Color?
Mix red and blue paint equally to create purple. Adjust tones by adding more red for warm purple or more blue for cool purple. Add white to lighten and create lilac or lavender shades.
Conclusion
Painting lavender with acrylics can be simple and rewarding. Use the right colors to mix soft purples and add white for lightness. Pay attention to brush techniques for petal details. Practice layering colors to create depth and texture. Keep your strokes gentle to capture lavender’s delicate look.
Enjoy the process and watch your painting come alive. With patience, your lavender artwork will bloom beautifully on the canvas. Keep experimenting and have fun with each brushstroke.