
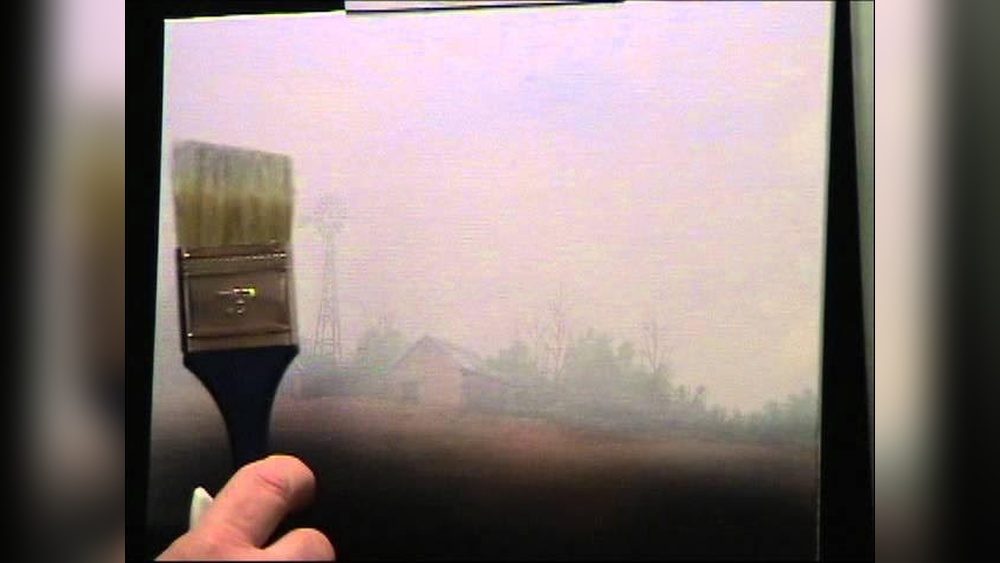
Quick answer: To paint fog in oil painting, push every value toward one light middle gray, cut color saturation as objects recede, and soften edges until shapes barely separate from the air around them. Work wet-into-wet so forms dissolve naturally, then add a thin, slightly opaque scumble of a warm or cool gray over dry passages to deepen the haze. Keep a few crisp, darker shapes in the foreground so the fog reads as distance rather than blur.
Fog is not a thing you paint on top of a landscape. It is a change in how light behaves across the whole scene. Water droplets scatter light in every direction, so contrast collapses, colors drift toward the color of the air, and edges lose their bite. Once you understand that, learning how to paint fog in oil painting becomes a matter of controlling three dials: value, saturation and edges.
This guide walks through those dials, the palette that makes them easy to manage, a full step-by-step sequence, and the fixes for fog that looks like smoke, dirty milk or an out-of-focus photograph.
Why Fog Looks the Way It Does
Before mixing any paint, it helps to know what you are imitating. Three optical effects happen at once inside fog, and each one maps directly to a painting decision.
Values compress toward the fog color
On a clear day a dark pine might sit at value 2 on a 1-to-10 scale (1 being black). In medium fog, that same tree 50 yards away might read as a 6, and at 150 yards it might be an 8, almost indistinguishable from the sky. Every object loses darkness in proportion to how much fog sits between it and the viewer. Lights also drop slightly, so the whole picture squeezes into a narrow band of values.
Saturation drains away
Fog acts like a filter that adds its own color. A red barn becomes dusty rose, then pinkish gray, then gray. Morning fog lit by low sun carries warm notes of cream and peach; overcast fog tends toward cool blue-gray or green-gray. Your mixtures should drift toward whichever fog color you choose, not simply toward white.
Edges dissolve
Light scattering softens the boundary between an object and the air. Near shapes keep firm edges; mid-distance shapes have soft but readable edges; far shapes have lost edges so completely that you sense them more than see them. Edge control does more than any other single tool to convince a viewer they are looking into fog.
Materials for Painting Fog in Oils
You need nothing exotic. Fog rewards a restrained setup, since too many colors makes it harder to keep a scene unified. If you are still putting together a basic kit, our guide to oil painting styles, tips and supplies covers paints, mediums and surfaces in more depth.
- Paints: titanium white, a warm yellow (yellow ochre or a cadmium yellow hue), a red (alizarin crimson or a cadmium red hue), a blue (ultramarine), and optionally burnt umber and Payne’s gray. Limited palettes make harmonious grays easier.
- Brushes: one or two large soft synthetic flats or filberts (1 to 2 inches) for blending, medium filberts for shapes, a small round for the few sharp accents, and a clean, dry fan or mop brush for softening.
- Medium: odorless mineral spirits for the first thin layers, plus a fat medium such as a linseed-oil based medium for later layers and scumbles.
- Surface: a smooth primed panel or fine-weave canvas. Heavy canvas texture catches paint and fights the soft, continuous look of fog.
- Extras: lint-free rags, a palette knife for mixing large piles of gray, and a value scale or gray card.
Mixing Fog Colors: A Practical Palette
Most failed fog paintings fail at the mixing stage. Gray straight from black and white looks dead, and pure white glazes over dark paint turn chalky or bluish. Instead, build a “mother color” for the fog and use it in every mixture.
| Fog type | Mother color mix (approximate) | Feel |
|---|---|---|
| Warm morning fog | White + small touch of yellow ochre + tiny touch of alizarin, neutralized with a speck of ultramarine | Soft, glowing, early light |
| Cool overcast fog | White + ultramarine + a touch of burnt umber | Quiet, damp, wintry |
| Green coastal or river fog | White + ultramarine + a little yellow ochre + speck of red | Moist, marshy, natural |
| Evening or city fog | White + alizarin + ultramarine, lightly warmed with ochre | Violet, moody, artificial light |
Mix a generous pile, at least the size of a walnut, so you never run out midway. Then use this rule for every object in the scene: the farther away it is, the more mother color it contains. A distant hill might be 85 percent fog mix and 15 percent local color; a mid-ground tree might be 50/50; a foreground fence post might have almost none.
Premixing three or four value steps between your darkest foreground color and the fog color, arranged in a row on the palette, is one of the simplest ways to stay consistent. Each step represents a distance band in the painting.
How to Paint Fog in Oil Painting: Step by Step
The sequence below works for a typical foggy landscape: a field or lake, a line of trees in mid-distance, and faint forms beyond. Adapt the subjects, but keep the order.
- Plan your distance bands. Make a small thumbnail sketch in pencil, about 3 by 4 inches, using only three or four values. Label each zone: foreground, middle ground, far ground, sky. This prevents the most common problem, where every element ends up the same value.
- Tone the surface. Brush on a thin wash of the mother color, slightly darker than its final value, thinned with solvent. Wipe it back with a rag until it is even. A toned ground means you never fight raw white, and it pre-unifies the whole painting with fog color.
- Block in the sky and far ground together. Using the lightest premixed values, cover the top of the canvas and the most distant zone in one session, wet into wet. Blend the horizon so the land and sky barely separate. In heavy fog there may be no visible horizon at all.
- Add distant shapes as ghosts. With a mixture only one step darker than the sky, suggest far trees or buildings. Paint them directly into the wet sky, then pass a clean dry brush lightly across the edges. Do not outline; let shapes emerge as slightly darker patches.
- Build the middle ground. Move one or two value steps darker. Shapes here are readable, but their edges are soft and their bases often disappear into ground fog. A useful trick is to fade the bottom of each tree into the field color, since fog tends to pool close to the ground.
- Place foreground anchors. Paint a small number of darker, more saturated, harder-edged elements near the viewer: a fence, reeds, a branch, a boat. These give the eye a reference point. Without them, the painting reads as blurry instead of foggy.
- Soften selectively. While the paint is still workable, use a large dry soft brush to drag lightly across edges in the mid and far zones. Clean the brush on a rag after every few strokes so you blend rather than smear. Leave a few edges firm, especially where the strongest contrast lives.
- Let it dry, then scumble. Once the layer is touch dry (often two to five days, depending on paints and climate), scrub a thin veil of fog color over the far and middle zones with a stiff brush, using a little fat medium. A scumble is semi-opaque, which reads as atmosphere in a way that a transparent glaze cannot.
- Restate key accents. After scumbling, put back a few touches of light, such as a glow where the sun breaks through, or a pale reflection on water. Add the final crisp darks in the foreground last.
Wet-on-Wet vs. Layered Fog
Both approaches work. Many painters combine them, as in the sequence above. The table helps you pick a starting point based on your subject and schedule.
| Approach | Best for | Strengths | Watch out for |
|---|---|---|---|
| Wet-on-wet (alla prima) | Small studies, plein air, quick moods | Natural soft edges, fresh color, finished in one sitting | Mud from overworking; hard to recover lost darks |
| Layered scumbles | Larger studio pieces, dense fog, luminous effects | Gradual control of density, glowing depth | Chalkiness if scumbles are too white or too thick |
| Hybrid | Most landscapes | Soft base plus adjustable haze later | Must respect drying times between stages |
Painting Different Kinds of Fog
Ground fog and mist over fields
Ground fog sits low, often in a horizontal band, while tree tops and sky above remain relatively clear. Paint the scene with normal contrast above the band, then lay a soft horizontal stripe of fog color across the bottoms of trees and hills. Feather its upper edge so it fades upward. Light ground mist looks convincing when a few dark tree trunks poke through it.
Fog over water
Water and fog share similar values, so the line where they meet may vanish. Keep reflections soft and vertical, and lighten them toward the far shore. Pairing this with ideas from our article on painting sand and beach scenes in oil works well for misty coastal compositions, where a damp, darker strip of sand provides the foreground anchor.
Forest fog and light rays
In woodland, fog often shows up as light shafts. Establish the darker forest first, let it dry, then drag thin, semi-opaque strokes of warm light gray diagonally from the light source. Soften both sides of each ray so they are wider and fainter at the bottom. Trees behind the rays should be lighter than trees in front of them.
Urban fog
Streetlights in fog produce halos. Paint a soft circle of glow around each lamp, warmest and lightest at the center, fading into the surrounding fog color over a distance of roughly two to four times the lamp’s size. Buildings follow the same distance rules as trees, just with straighter edges in the foreground.
Edge Control Cheat Sheet
If you take away only one skill, make it this. Use these guidelines while you work:
- Hard edges: only in the foreground, and only where you want the viewer to look first.
- Firm but soft edges: foreground elements away from the focal point.
- Soft edges: middle ground. You can still see the shape clearly.
- Lost edges: far ground and the tops or bases of mid-ground forms where fog thickens.
A good test: squint at your painting. If any distant edge pops out while squinting, it is too hard or too dark.
Common Mistakes When Painting Fog
Fog looks like smoke
Smoke has visible structure and drifting shapes; fog is more even. If your fog has swirls or clear-edged patches, blend it more uniformly and reduce texture in the brushwork. Drag large brushes horizontally for flat landscape fog.
Fog looks chalky or milky
This happens when pure white is glazed or scumbled over darker passages, which can create a cool, bluish cast and a flat, opaque look. Tint your white with the mother color, use less of it, and apply it more thinly. A slight warm note often cures the chalky feel.
Everything looks blurry instead of foggy
Uniform softness reads as a focus problem, not as atmosphere. Fix it by adding crisp, dark foreground accents and keeping a gradient of clarity from front to back.
Muddy grays
Overmixing on the canvas and using too many complementary pairs at once causes mud. Mix grays on the palette, apply them with confident strokes, and stop blending once the edge looks right.
Values too dark in the distance
Distant objects nearly always need to be lighter than you first think. Compare them directly with the sky using a value scale held at arm’s length.
Tips by Skill Level
Beginners
- Start with a 6 by 8 inch panel and a three-color palette plus white.
- Paint the same simple scene twice: once clear, once foggy. Comparing them teaches value compression faster than any explanation.
- Keep the subject simple: a field, a tree line and one foreground post.
Intermediate painters
- Experiment with warm vs. cool fog in a series of small studies of the same composition.
- Practice scumbling over fully dry layers to adjust density without repainting.
- Try a foggy scene with a single area of color, such as a red boat, and watch how much restraint it takes to keep it believable.
Advanced painters
- Use multiple scumble layers, each slightly different in temperature, for shimmering depth.
- Paint fog lit from behind, where the brightest value sits in the fog itself and forms appear as silhouettes.
- Combine fog with detailed textures, such as the techniques in our guide to painting realistic grass in oil, keeping detail only in the nearest foreground.
Drying, Fat Over Lean and Longevity
Because fog paintings often rely on several thin layers, the fat-over-lean principle matters. Use more solvent in early layers and more oil in later ones, so each upper layer is slightly more flexible than the one beneath. Scumbles applied with oil-rich medium over a lean, solvent-thinned underlayer follow this rule naturally.
Avoid scumbling over a layer that is only partly dry, since the fresh paint can lift or muddy what is underneath. A layer is generally ready when it feels dry to a light touch and no paint transfers to your fingertip. Thick passages take longer. Final varnishing is typically done months later, once the painting is fully cured; follow the guidance for your varnish and paint brand.
FAQs
What color is best for painting fog in oil?
There is no single fog color. A slightly tinted light gray works best: warm cream-gray for sunlit morning fog, blue-gray for overcast conditions, or a soft violet-gray for evening and city scenes. Mixing it from white and your landscape colors keeps the painting harmonious.
Can I use a glaze to create fog?
Transparent glazes darken and deepen rather than haze. For fog you generally want a scumble, a thin semi-opaque layer of light color. A very thin, slightly opaque glaze containing a little white can work, but too much white in a glaze tends to look chalky.
How do I keep fog from looking muddy?
Mix your grays on the palette instead of on the canvas, limit your palette to three colors plus white, and stop blending once edges look soft. Clean your blending brush on a rag frequently so it does not drag darker paint into lighter areas.
Should I paint the fog first or last?
Both. Fog is established first through the toned ground, light values and soft edges, then reinforced last with a scumble once the paint is dry. Painting objects in full contrast and adding fog only at the end tends to produce a hazy veil that looks pasted on.
How long should I wait before scumbling over a layer?
Wait until the layer is touch dry, which often takes a few days for thin paint. Fast-drying colors like umbers dry sooner, and whites and thick passages take longer. Test in a corner before scumbling the whole area.
What brushes help most with soft fog edges?
Large, soft synthetic flats, filberts or mop brushes do most of the work. Keep one completely dry and clean just for softening edges, and wipe it often while you blend.
Final Thoughts
Fog paintings succeed through restraint: fewer values, gentler color and softer edges, with just enough sharp foreground detail to show the viewer where they are standing. Practice with small studies, keep your mother color on every brushload, and the atmosphere will start to build itself.
When you are ready to choose paints, mediums and surfaces that suit soft, layered work like this, browse our complete oil painting resource with styles and buying advice for recommendations that fit your budget and level.





8 Comments