Choosing the right brush for acrylic painting can feel overwhelming, especially if you are just starting out. The huge range of shapes, sizes, and bristle types can confuse even experienced artists. Yet, your brush is your main tool—it affects every stroke, texture, and detail you create on canvas.
Selecting the right brush is not just about buying something expensive or pretty. It’s about matching your brush to your technique, style, and the effect you want in your artwork.
Knowing what to look for, and understanding why different brushes matter, will help you paint with more confidence and achieve better results. This guide breaks down everything you need to know—from brush shapes and bristle types to sizes and care—so you can choose wisely and avoid common mistakes that frustrate many beginners.
Understanding Acrylic Brushes
Acrylics are unique. They dry fast, can be layered, and work on many surfaces. Because of this, the right brush must be durable, flexible, and able to handle both thick and thin paint. Brushes for acrylics are different from those for watercolor or oil paints.
How Acrylic Paint Affects Brush Choice
Acrylic paint is water-based but dries to a tough plastic-like film. This means:
- Brushes get stiff if paint dries on them
- Synthetic bristles are often better because natural hairs can be damaged by acrylics
- You need brushes that clean up easily with water
Natural Vs. Synthetic Bristles
Natural bristles come from animal hair (like hog or sable). They are good for oil paints because they hold a lot of liquid. But acrylics can make these bristles wear out fast and become limp.
Synthetic bristles (usually nylon or polyester) are designed to resist the harshness of acrylics. They keep their shape, are easy to wash, and last longer.
Many artists use only synthetic brushes for acrylics because they are tough, affordable, and consistent.
Key Brush Shapes And Their Uses
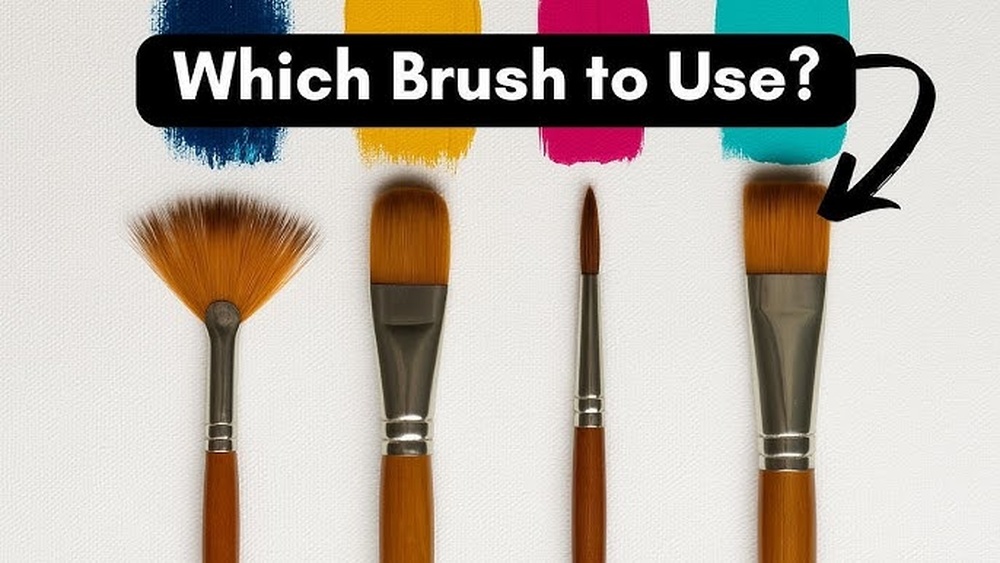
Brush shape is more than just about appearance. Each one does a specific job. Here are the most useful shapes for acrylic painting:
| Brush Shape | Best For | Common Mistake |
|---|---|---|
| Flat | Bold strokes, filling large areas, edges | Using too small for backgrounds |
| Round | Detail work, lines, sketching shapes | Choosing too thick for detail |
| Filbert | Soft edges, blending, petals, leaves | Using for hard lines |
| Fan | Textures, grass, clouds, fur | Overloading with paint |
| Angle | Sharp edges, precise lines, corners | Ignoring for architectural work |
| Detail/Liner | Thin lines, writing, tiny details | Using poor quality for fine work |
Let’s look more closely at the most useful brush shapes:
Flat Brush
The flat brush has a straight edge and is perfect for strong, controlled strokes. You can use the wide side for large areas and the thin edge for lines. It is a must-have for backgrounds, sharp edges, and blocking in shapes.
Round Brush
A round brush has a pointed tip and a round body. It is very flexible: use the tip for details, or press down for thicker lines. This is the brush most people start with. It’s great for drawing, outlining, and small shapes.
Filbert Brush
The filbert brush combines the best of flat and round brushes. It has a flat body with a rounded tip, making it perfect for blending, soft edges, and natural shapes like petals or faces.
Fan Brush
The fan brush spreads out like a fan. It’s not for broad areas but for special effects—making grass, hair, clouds, or fur. With practice, you can create beautiful textures.
Angle Brush
The angle brush (or angular shader) has slanted bristles. This lets you paint sharp corners, edges, or flowing lines with control. It’s especially useful for painting leaves, petals, and architectural details.
Detail/liner Brush
The detail or liner brush is thin and long. It’s for the smallest details—signatures, eyelashes, or thin branches. A high-quality liner brush makes a big difference for clean, sharp lines.
Brush Size: Why It Matters
Brushes come in many sizes, often numbered (like 0, 2, 6, 12). But there’s no industry standard, so sizes may change by brand. The right size depends on your painting style and the area you want to cover.
- Large brushes are good for backgrounds and big shapes.
- Medium brushes handle most work—shapes, blocking, and blending.
- Small brushes are for details and fine lines.
A common beginner mistake is using brushes that are too small. This makes painting slow and less smooth. For most acrylic painting, a set with three to five sizes (small, medium, large) in flat and round shapes will cover most needs.
Here’s an example of how brush size affects your work:
| Brush Size | Typical Use | Best For |
|---|---|---|
| 2-4 (small) | Details, lines, edges | Signatures, eyelashes, small objects |
| 6-8 (medium) | General work, blending | Faces, flowers, main shapes |
| 10-16 (large) | Backgrounds, big shapes | Skies, sea, broad areas |
Handle Length: Short Vs. Long
Brushes come with short or long handles. This affects comfort and control.
- Short-handled brushes are for detail work and close-up painting, such as at a table.
- Long-handled brushes are for standing at an easel. They let you paint with your whole arm and see the whole picture.
If you mostly paint at a desk, short handles may feel better. For larger canvases and looser styles, choose long handles.
Comparing Brush Brands And Prices
Quality matters more than brand name, but some brands are known for reliable brushes. Cheap brushes can shed bristles, lose shape, and make painting harder. It’s worth investing in a few good brushes rather than buying large, poor-quality sets.
Here’s a quick comparison of popular brush brands for acrylics:
| Brand | Price Range | Features |
|---|---|---|
| Princeton | $$ | Durable, good for beginners, synthetic |
| Winsor & Newton | $$$ | High quality, varied shapes, long-lasting |
| Royal & Langnickel | $ | Affordable, basic sets, good for practice |
| Da Vinci | $$$$ | Professional, excellent spring, handmade |
A beginner can start with mid-priced synthetic brushes. Upgrade to more expensive brands as you develop your style.
Common Mistakes When Choosing Brushes
Many new acrylic painters make these mistakes:
- Buying the cheapest set – Cheap brushes lose bristles and deform quickly. Even one good brush is better than ten poor ones.
- Using watercolor or oil brushes – These may not survive acrylics’ fast drying and tough clean-up.
- Ignoring brush shape – Every shape has a job. Using only round or flat brushes limits your results.
- Neglecting brush care – Not cleaning brushes after use ruins them fast.
- Choosing only small brushes – Makes painting slow and tiring.
A non-obvious tip: Test brushes in the store if possible. Dip them in water and see how they feel. A brush should spring back and keep its shape after bending.
How To Test A Brush Before You Buy
If you can visit an art store, try these simple checks:
- Run your fingers through the bristles. They should feel springy, not floppy.
- Press the bristles gently on your hand. The brush should return to its original shape.
- Look for a smooth, even tip and no loose hairs.
- Check the ferrule (the metal part holding bristles). It should be tight and secure.
A brush that passes these tests is likely to last longer and perform better.
How Many Brushes Do You Really Need?
You don’t need a huge set to start. A good starter kit for acrylic painting includes:
- 1 large flat brush (size 12-16)
- 1 medium flat brush (size 6-8)
- 1 medium round brush (size 6-8)
- 1 small round brush (size 2-4)
- 1 filbert brush (medium size)
- 1 liner/detail brush
With these, you can paint almost anything, from big backgrounds to tiny details. Add specialty brushes (like fan or angle) as you discover new techniques.
Credit: glitterplanetuk.com
Caring For Acrylic Brushes
Taking care of your brushes is as important as choosing them. Acrylic paint dries fast—even on your brush. Here’s how to keep them in top shape:
- Clean immediately after use – Rinse in water, then wash with mild soap.
- Don’t let paint dry on bristles – Dried acrylic is almost impossible to remove.
- Reshape the bristles while damp, so they dry in the right form.
- Store upright (bristles up) or flat, not resting on the bristles.
- Deep clean every few weeks with brush soap or conditioner.
An advanced tip: Avoid soaking brushes in water for long periods. This can loosen the glue inside the ferrule and make bristles fall out.
Matching Brush To Painting Style
Your style affects your brush choice. For example:
- Loose, expressive painters may prefer bigger brushes and filberts for blending.
- Realists or detail artists use more small rounds and liners.
- Abstract artists might add sponges, palette knives, or fan brushes for texture.
Experiment with different shapes to see what feels natural. Don’t be afraid to break “rules” if a certain brush gives you the effect you want.

Credit: grabieart.com
Environmental And Animal-friendly Choices
Many synthetic brushes today are as good as, or better than, natural hair. Brands now offer vegan and cruelty-free options. These are often labeled as “synthetic,” “taklon,” or “nylon. ” They last longer with acrylics and are a responsible choice for most artists.
For more on brush types, you can check Wikipedia’s paintbrush guide.
Frequently Asked Questions
What Is The Best Brush For Beginners Using Acrylics?
A medium-sized synthetic flat brush is the most versatile for beginners. It handles large areas and details. Add a medium round and a detail brush for more options.
Are Natural Hair Brushes Good For Acrylics?
No, natural hair brushes (like sable or hog) wear out quickly with acrylics. Synthetic brushes last longer, clean up easily, and are more affordable.
How Can I Tell If A Brush Is Good Quality?
A good brush has springy, even bristles that return to shape after bending. The ferrule is tight, and no hairs fall out when gently pulled.
How Often Should I Clean My Brushes?
Clean brushes after every painting session. If paint dries in the bristles, it can ruin the brush. Deep clean with soap every few weeks.
Can I Use The Same Brush For Acrylics And Other Paints?
You can use synthetic brushes for both acrylics and watercolors, but don’t mix brushes between acrylic and oil paints. Residue from oils can affect acrylic paint quality.
Choosing the right brush for acrylics is about understanding your needs, testing quality, and caring for your tools. With the right brushes, your painting experience becomes smoother, more enjoyable, and your results improve. Remember, a good brush is an investment in your art—choose wisely, and your creativity will thank you.

Credit: www.youtube.com