Are you ready to bring a skull to life with your acrylic paints? Painting a skull might seem tricky at first, but with the right steps, you can create a stunning piece that captures every shadow, highlight, and detail perfectly.
Whether you want to add a spooky vibe to your artwork or simply master a new skill, this guide will walk you through each stage, from sketching the basic shape to adding those final, realistic touches. You’ll learn how to mix colors for natural bone tones, avoid common mistakes, and use layering techniques that make your skull pop off the canvas.
Keep reading, and soon you’ll have the confidence to paint a skull that looks both haunting and beautiful.
Materials And Tools
Gathering the right materials and tools is key to painting a skull with acrylic paint. Each item plays a role in bringing your artwork to life. Knowing what to use helps you create smooth strokes and vibrant colors. Prepare your workspace with all essentials ready before you start painting.
Choosing Acrylic Paints
Select paints made for acrylic use. They dry fast and offer bright colors. Choose a set with basic colors like white, black, red, and yellow. These colors mix well to create shades needed for a skull. Look for paints with good coverage and smooth texture. Avoid cheap paints that may crack or fade.
Brush Types And Sizes
Use different brushes to achieve fine details and broad strokes. Flat brushes work well for covering large areas. Round brushes help with detailed lines and curves. Small brushes, size 0 to 4, are perfect for teeth and cracks. Medium brushes, size 6 to 10, fit for shadows and mid-sized areas. Clean brushes often to keep paint fresh and colors sharp.
Additional Supplies
Prepare extra tools to improve your painting process. A palette for mixing colors keeps paints fresh and ready. Water containers help clean brushes between colors. Paper towels or rags remove excess paint and water. Use a pencil to sketch skull outlines before painting. Seal your work with a clear acrylic varnish to protect it after drying.
Credit: www.reddit.com
Preparing The Surface
Preparing the surface is the first step in painting a skull with acrylics. A well-prepared surface helps paint stick better and last longer. It also makes your artwork look smooth and professional.
Taking time to prepare the surface improves the final result. It ensures the paint colors show true and details stand out clearly.
Selecting The Canvas Or Object
Choose a canvas or object suitable for acrylic paint. Common choices include stretched canvas, wood panels, or even real skull replicas. Smooth surfaces work best for detailed skull paintings.
Make sure the size fits your design. Larger canvases give more room for detail. Smaller ones are good for quick projects or practice.
Cleaning And Priming
Clean the surface thoroughly before painting. Remove dust, dirt, and oils. Use a soft cloth or mild soap and water for cleaning.
After cleaning, apply a primer. Acrylic gesso is the most popular choice. It creates a slightly rough surface for better paint grip.
Apply one or two thin coats of primer. Let each coat dry fully before applying the next. This step prevents paint from soaking in unevenly.
Sketching The Skull
Sketching the skull is the first step to a great acrylic painting. It sets the foundation for your work. A clear sketch helps you paint details with ease and accuracy. Focus on simple shapes and key marks before adding depth and texture.
Take your time and observe the skull’s unique structure. Use light lines to allow easy corrections. This part builds confidence and guides your brush strokes later.
Basic Skull Shape
Start by drawing a large oval for the main skull area. This shape represents the cranium. Add a smaller oval or square below for the jaw. Connect these two shapes with smooth lines to form the outline. Keep your lines light and simple. Avoid too much detail at this stage.
Placing Key Features
Mark the eye sockets with two large circles inside the skull shape. Place the nose cavity as an upside-down heart or triangle below the eyes. Sketch the mouth line across the lower part of the skull. Add small vertical lines for the teeth. These marks help position facial features correctly. They act as guides for painting.
Avoiding Common Sketch Mistakes
Do not make the skull too round or too narrow. Keep proportions balanced by comparing width and height. Avoid placing the jaw too far from the skull. Use gentle curves instead of harsh angles. Don’t press hard with your pencil; it makes erasing difficult. Check your sketch often and fix errors early.
Credit: create.stepbysteppainting.net
Applying The Base Coat
Applying the base coat is the first step to create a realistic skull painting. This layer sets the foundation for all other colors. It helps the final painting look smooth and natural. Using the right base colors and techniques ensures better coverage and texture. Take your time to cover the entire skull evenly. Avoid thick paint spots that hide details.
Choosing Natural Bone Colors
Pick colors that match real bone shades. Beige, light yellow-ochre, or Titan Buff work well. Avoid pure white; it looks too bright and fake. Mix small amounts of brown or gray to add depth. These tones give the skull a natural, aged look. Test your color mix on paper before painting the skull. Adjust the shades for the best match.
Techniques For Smooth Coverage
Use a soft, flat brush to apply the base coat. Paint in thin layers to avoid clumps. Let each layer dry before adding the next. Use gentle, even strokes following the skull’s shape. This method prevents streaks and brush marks. Dab with a sponge for tricky areas to get smooth coverage. Thin the paint slightly with water for better flow.
Adding Shadows And Depth
Adding shadows and depth to your skull painting enhances its realism and dimension. Shadows create a sense of form and volume, making the skull look three-dimensional. Careful placement of darker tones contrasts with lighter areas. This contrast highlights the skull’s natural curves and cavities. Use acrylic paints to build soft or sharp shadows depending on the skull’s shape.
Mixing Shadow Colors
Start by mixing dark tones using burnt umber, raw umber, and a touch of black. Avoid pure black for shadows; it looks flat and unnatural. Add a small amount of violet or deep blue to your mix for cooler shadows. Test the color on a palette before applying. This mixture gives shadows a rich, realistic look. Adjust the ratio for warmer or cooler shadows depending on your skull’s lighting.
Painting Eye Sockets And Nasal Cavity
Eye sockets and the nasal cavity are the darkest parts of the skull. Paint these areas with your shadow mix using a small brush. Apply paint in thin layers and build up depth gradually. Leave tiny highlights on the edges to suggest light reflection. Blend softly where the sockets meet the skull surface. This technique adds a hollow, deep effect.
Under The Jaw And Cheekbones
Under the jaw and cheekbones, shadows fall naturally due to bone structure. Use a medium brush to apply shadow paint along these areas. Blend the edges gently into the base layer for a smooth transition. Darker tones under the jaw give the skull a lifted look. Shadows on the cheekbones emphasize their sharpness and shape. Keep the strokes light and controlled for subtle depth.
Blending Midtones
Blending midtones is a crucial step in painting a skull with acrylics. This process creates smooth color transitions and adds depth. Midtones sit between the darkest shadows and the brightest highlights. They help the skull look realistic and three-dimensional. Proper blending makes the paint appear soft and natural on the curved surfaces of the skull.
Using Warm Tones
Warm tones bring life to midtones in skull painting. Colors like burnt sienna, yellow ochre, and light orange work well. These shades mimic the natural warmth found in bone. Apply warm tones gently over the base coat. This adds subtle color variation and avoids a flat look. Use a soft brush to blend warm colors into the surrounding areas. This technique adds a realistic glow to your skull.
Smoothing Transitions
Smooth transitions between colors prevent harsh lines. Use a clean, dry brush to soften edges where midtones meet shadows and highlights. Work quickly while the paint is still wet for easy blending. Small circular motions help mix colors seamlessly. Thin layers of paint also improve blending. Avoid thick paint that creates rough texture. Smooth transitions give the skull a polished and lifelike finish.
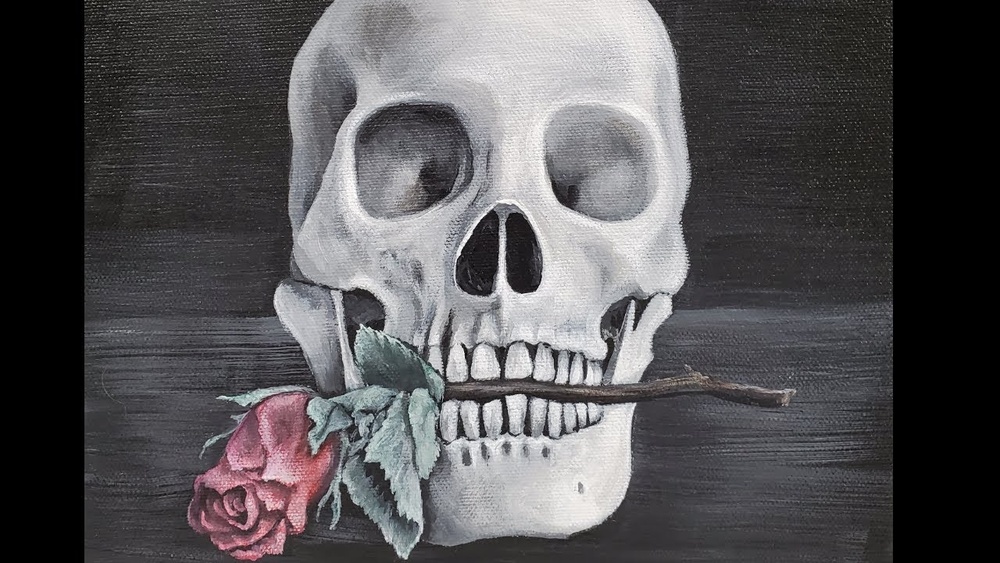
Detailing Teeth And Cracks
Detailing the teeth and cracks on your skull painting brings it to life. These small features add depth and realism. Focus on precision and subtle shading. Use fine brushes to keep lines clean and sharp. Patience is key to achieve a natural look.
Outlining Teeth With Fine Brushes
Choose a fine-tipped brush for outlining the teeth. Use a steady hand and thin black or dark brown paint. Draw thin lines around each tooth to separate them clearly. Avoid thick lines; keep them delicate to mimic real teeth edges. Paint slight curves to follow natural tooth shapes. This step defines the teeth and prevents them from blending together.
Adding Cracks And Texture
Mix a darker shade of your base color for cracks. Use a very fine brush or even a toothpick for tiny crack lines. Paint thin, irregular lines on the skull surface. Vary the length and direction to look natural. Add small dots or rough spots to create texture. These details give the skull an aged, weathered effect that stands out.

Credit: www.youtube.com
Highlighting And Texture
Highlighting and texture bring life and depth to your painted skull. They create a more realistic and interesting look. Using acrylic paint, you can add light and shadow effects. This makes the skull appear three-dimensional. Texture mimics the natural roughness and grooves of bone. Together, these techniques give your skull painting a strong visual impact.
Applying Light Highlights
Start by choosing a lighter shade of your base color. Use a small, soft brush to apply light highlights. Focus on raised areas like the forehead, cheekbones, and nose bridge. Dab the paint lightly to avoid harsh lines. Blend the edges gently with a dry brush or sponge. Highlights catch the light and make the skull look more solid. Avoid overdoing it; subtlety works best here.
Creating Bone Texture With Brush Strokes
To create texture, use varied brush strokes and paint thickness. Try short, uneven strokes to mimic natural bone grain. Use a fan brush or a stiff bristle brush for better effect. Apply paint in layers, letting each dry before adding more. Add tiny cracks and pits with a thin brush or a toothpick. This adds realism and character to the skull. Texture gives the painting a tactile, lifelike feel.
Final Touches And Drying
After completing the main painting of your skull, focus on the final touches. These steps bring depth and realism to your artwork. Small adjustments in shadows and highlights make a big difference. Proper drying ensures your painting stays flawless and ready for display.
Enhancing Shadows And Highlights
Use a fine brush to add deeper shadows in crevices and around edges. Choose darker shades like burnt umber or dark gray for shadows. Apply highlights with a lighter color such as white or pale yellow on raised areas. Blend these gently for smooth transitions. These touches create a 3D effect and make the skull appear more lifelike.
Allowing Proper Drying Time
Let the paint dry completely before handling the skull. Acrylic paint usually dries fast but thick layers need more time. Keep your artwork in a cool, dust-free space to avoid smudges. Drying fully prevents colors from mixing unintentionally. Patience here protects your hard work and keeps colors vibrant.
Tips For Realistic Effects
Creating realistic effects on a skull painting makes your artwork stand out. Small details and smart color choices bring the skull to life. Focus on shadows and brush strokes to add depth and texture.
Follow these tips to paint a skull that looks natural and three-dimensional. Avoid harsh contrasts and use soft transitions to mimic real bone structure. Let each brushstroke add character and realism.
Avoiding Pure Black Shadows
Pure black shadows can make your skull look flat and unnatural. Instead, mix black with dark browns or blues for softer shadows. This adds warmth and depth to your painting.
Use colors like burnt umber or raw sienna mixed with black. These tones create more realistic shading and avoid harsh edges. Shadows should blend smoothly into midtones.
Apply thin layers of shadow paint. Build the darkness gradually for better control. This technique keeps your skull looking three-dimensional and lifelike.
Using Painterly Techniques
Use loose brushstrokes to mimic the texture of bone. Vary your brush pressure and direction for natural effects. Avoid painting everything with smooth, even layers.
Dry brushing helps add subtle highlights and rough textures. Lightly drag a dry brush over raised areas to create natural wear marks. This adds age and character to your skull.
Layer colors for depth. Start with midtones, add shadows, then apply highlights. This layered approach builds a more realistic and detailed appearance.
Frequently Asked Questions
How To Prep A Skull For Painting?
Clean the skull thoroughly to remove dirt and oils. Sand rough areas lightly for smooth paint adhesion. Apply a primer to ensure paint sticks well. Let the primer dry completely before painting. Use acrylic paints for best results on the prepared skull surface.
What Are Common Skull Drawing Mistakes?
Common skull drawing mistakes include incorrect jaw placement, ignoring skull’s flat sides, and overusing pure white or black colors. Avoid flat shading and neglecting bone texture details.
What Colors To Use To Paint A Skull?
Use a base of beige, off-white, or light yellow-ochre for natural bone color. Add shadows with burnt umber, raw umber, or violet mixed with black. Highlight with white or light gray. Use black for details like eye sockets, nose, and teeth outlines.
How To Face Paint A Skull Step By Step For Beginners?
Start by painting a white half-skull shape, leaving eye spaces. Fill eyes and nose with black. Outline skull edges, add teeth and cracks using a fine brush. Use black for shadows and white for highlights to create depth. Keep strokes textured for a realistic look.
Conclusion
Painting a skull with acrylics can be simple and fun. Start with light base colors for a natural look. Add shadows with dark tones to create depth and realism. Use white highlights on raised areas to make the skull pop.
Take your time with small details like teeth and cracks. Practice helps improve your skills and confidence. Enjoy the process and express your creativity with each brushstroke. Keep experimenting to find your unique style. Painting a skull is a great way to learn acrylic techniques and have fun.