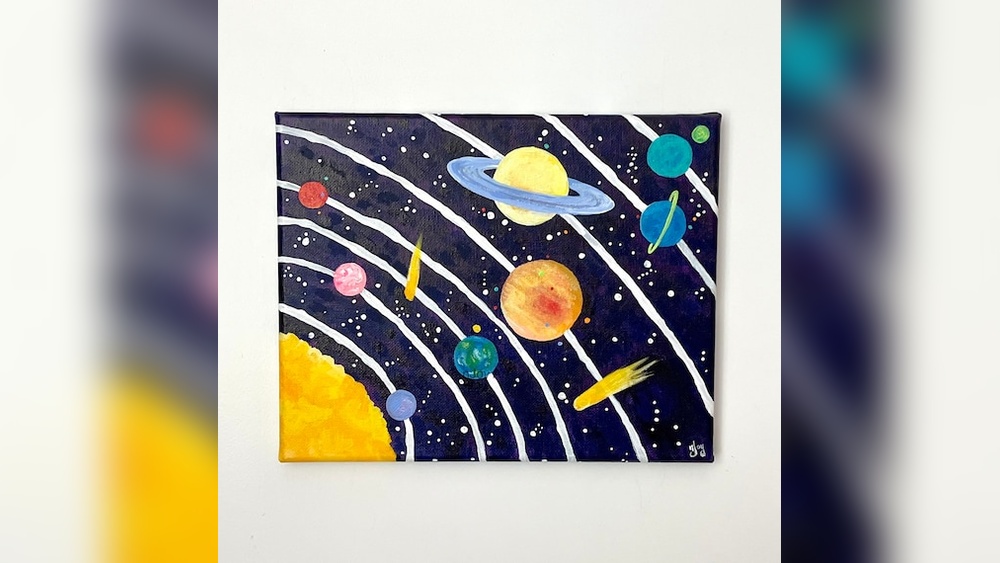
Quick answer: Here is how to paint space and planets for kids: start with a dark background of black, navy and purple blended together, and let it dry fully. Paint planets as circles in bold colors, adding swirls, stripes, craters or rings once the base is dry. Finish with stars by dotting white paint with a cotton swab or flicking it from an old toothbrush. Tracing cups and lids gives neat planet circles, and the whole scene takes about 45 to 60 minutes including drying time.
Space is a dream subject for kids’ painting. There is no “wrong” planet color, the background can be as messy and swirly as they like and stars cover up nearly any mistake. It is also a great excuse to learn a little about the solar system along the way.
This guide shows how to paint space and planets for kids step by step: a galaxy background, planets with different surface effects, a Saturn with rings, stars and extras like rockets and astronauts. It also includes a quick planet color guide, techniques by age and tips for keeping a dark painting from turning muddy.
Why Space Is Easy for Kids to Paint
- Circles are simple. Planets, moons and suns are all circles. Kids can trace lids and cups for perfect shapes.
- Dark backgrounds are forgiving. Streaks and uneven blending look like nebulas and cosmic clouds.
- Stars hide mistakes. A sprinkle of white dots over an awkward patch turns it into a star cluster.
- Imagination is welcome. Kids can paint real planets or invent their own alien worlds.
Space scenes combine several beginner skills, including blending, layering and stamping. For more projects that build those same skills, the guide to painting techniques for kids is a handy resource.
Supplies
| Supply | Suggestion | Tip |
|---|---|---|
| Surface | Heavy black or white paper, or a canvas panel | Black paper skips the background step for young kids |
| Paint | Washable tempera or student acrylic | Black, navy, purple, white plus bright planet colors |
| Brushes | Wide flat, medium round, small round | A sponge works great for galaxy backgrounds |
| Circle tools | Cups, lids, bottle caps, a toilet paper tube | For tracing or stamping planets |
| Star tools | Cotton swabs, an old toothbrush, a pencil eraser | Practice splatter on scrap paper |
| Extras | Pencil, water cups, paper towels, palette, smock | Optional: glitter glue, metallic paint |
How to Paint Space and Planets for Kids: Step-by-Step
Step 1: Sketch planet circles (optional)
Lightly trace a few circles of different sizes with cups and lids. Spread them around the paper, with one big planet as the star of the show and a few smaller ones. Kids can also skip the sketch and paint planets freely later.
Step 2: Paint the galaxy background
Paint around the circles with dark colors. A simple, effective method:
- Cover the paper with navy or black using a wide brush or sponge.
- While it is still wet, dab in patches of purple, dark blue and a little magenta with a sponge.
- Add a few soft dabs of white or light blue mixed into the purple to create glowing “nebula” clouds.
- Blend the edges gently so colors melt together.
Let the background dry completely, at least 15 to 20 minutes. Painting bright planets over wet dark paint turns them murky.
Step 3: Paint the planets
Fill each circle with a bright base color: orange, red, blue, green, yellow or anything kids like. Light colors such as yellow often need two coats over a dark background. If you traced circles before painting the background, they will still be white underneath, which helps colors stay bright.
Step 4: Add planet details
Once the base coats are dry, decorate each planet with one of the techniques below: swirls, stripes, craters or spots.
Step 5: Rings
Paint an oval ring around one planet, passing in front of the bottom half and appearing to go behind the top. See the Saturn steps below.
Step 6: Stars
Dot white stars with cotton swabs in a few sizes. For a starry sky, an adult can help flick white paint off a toothbrush: dip the bristles lightly, point them at the paper and run a thumb across them. Cover planets with a piece of paper first if you do not want stars on them.
Step 7: Extras
Add a rocket, an astronaut, a shooting star, a comet with a long tail or a crescent moon.
Planet Surface Techniques
| Effect | How to paint it | Good for |
|---|---|---|
| Swirls | Swirl a second color into the wet base with a brush tip | Gas giants, alien planets |
| Stripes | Paint curved horizontal bands across a dry base | Jupiter, Saturn |
| Craters | Dab small circles in a darker shade, then a lighter crescent on one edge of each | Moon, Mercury, Mars |
| Land and sea | Blue base with green and brown blobs, white swirls for clouds | Earth |
| Sponge texture | Dab a sponge with two colors over the base | Rocky planets |
| Shadow side | Paint a dark crescent along one side of the planet | Any planet, ages 8 and up |
How to paint Saturn’s rings
- Paint the planet as a circle in pale yellow or tan with soft stripes.
- Once dry, paint a flat oval around the planet, wider than the planet itself, using light tan, gold or white.
- Paint the ring fully across the front (bottom) of the planet.
- For the back (top) part of the ring, paint only the parts that stick out past the planet’s edges. Do not paint the ring across the top of the planet.
- Add a thin darker line inside the ring to show it has bands.
That “in front at the bottom, behind at the top” trick makes the ring look like it wraps around the planet.
Planet Color Guide
Kids who want to paint the real solar system can use this simple guide. Colors are approximate and simplified for painting.
| Planet | Paint colors | Fun detail |
|---|---|---|
| Mercury | Gray with darker craters | Smallest planet, closest to the Sun |
| Venus | Pale yellow and cream swirls | Covered in thick clouds |
| Earth | Blue, green, brown, white | The only planet known to have life |
| Mars | Rusty red and orange | Often called the Red Planet |
| Jupiter | Bands of tan, orange, cream; a red-orange oval spot | Largest planet, with the Great Red Spot storm |
| Saturn | Pale gold with wide rings | Famous for its bright rings |
| Uranus | Pale blue-green | Spins tipped on its side |
| Neptune | Deep blue | Farthest planet from the Sun |
Kids can paint the Sun as a big yellow and orange glowing circle at one edge of the paper, with planets lined up beside it. Real planet sizes and distances are far too different to fit on paper, so a painting will always be a simplified version, which is perfectly fine.
Space Painting Techniques by Age
Ages 2 to 4
- Use black construction paper to skip the background.
- Stamp planets with cups, lids and sponges dipped in bright paint.
- Make stars with fingertip dots.
- Focus on the fun of stamping and color.
Ages 5 to 7
- Paint a sponged galaxy background.
- Trace planets and paint them with simple swirls or stripes.
- Try Saturn’s rings with help.
- Learn planet names and colors as they paint.
Ages 8 and up
- Blend nebula clouds with three or four colors.
- Paint the full solar system in order.
- Add shadow sides to planets for a 3D effect.
- Try a tabletop galaxy painting on a larger canvas.
Tabletop Easel for Kids in Small Spaces
Space paintings with dark backgrounds can get messy, and many families paint at the kitchen table. A tabletop easel helps in small spaces: it holds the paper at an angle so kids can see their whole painting, keeps drips off the table surface and folds away when art time is over. A few tips:
- Choose a stable, wide-based easel that will not tip when a child leans on it.
- Clip paper firmly at the top and bottom, since wet paper can slide.
- Angle the easel only slightly when using watery paint, or drips will run down the galaxy.
- Lay paintings flat to dry once finished, especially if the paint is wet and thick.
- Place a tray or newspaper under the easel to catch splatters from star flicking.
A simple drying spot matters as much as the easel. Space paintings use a lot of dark paint, so they often stay damp longer than lighter pictures. Clear a shelf, the top of the fridge or a baking sheet where finished pieces can lie flat for an hour or two. If several children are painting, write names on the back before starting so wet pictures do not get mixed up.
Black paper versus painted background
Black construction paper is the fastest route to a space scene, but bright tempera can look slightly dull on it, and white paint may need two coats. A painted background on white paper takes longer, yet planets traced and left white glow more brightly. For young kids or short sessions, go with black paper. For a keepsake painting, the painted background is worth the extra time.
Fun Space Painting Projects
- Rocket launch: A red and white rocket with orange and yellow flames, blasting through stars.
- Astronaut floating: A white suit shape with a dark visor reflecting a tiny planet.
- Alien planet: Invent a planet with purple oceans, green rings and three moons.
- Moon phases: Paint a row of circles showing full, half and crescent moons.
- Blown nebula: Drop thinned purple and blue paint on a dark page and blow it with a straw. The straw painting tips for kids explain how to get the paint moving.
- Space rocks: Paint smooth rocks as planets for a 3D solar system.
Common Problems and Fixes
- Planets look dull or gray. They were painted on a wet dark background. Let the background dry and add two coats of bright color, or trace and leave planet circles unpainted when doing the background.
- Background looks flat black. Add patches of purple, blue and magenta while wet, plus a few light clouds.
- Splatter stars are big blobs. Too much paint on the toothbrush. Tap off excess and flick from about 6 inches away.
- Saturn’s ring looks flat. The ring was painted all the way across the top. Paint over the top section with planet color so it appears to go behind.
- Too many planets crowded together. Choose one big planet and three or four small ones, leaving dark space between them.
Learning While Painting
Space paintings make a natural bridge to science. While layers dry, talk about the order of the planets, why the Sun is a star and how the Moon reflects sunlight. A popular memory sentence for planet order is “My Very Educated Mother Just Served Us Nachos” (Mercury, Venus, Earth, Mars, Jupiter, Saturn, Uranus, Neptune).
If your child loves round, colorful subjects, the ladybug painting steps for kids use similar circle-and-dot techniques in a much quicker project.
Related Reading
FAQs
How do you paint space for kids easy?
Paint a dark background of navy, black and purple, sponging colors together while wet. Let it dry, then paint bright circle planets, add details like swirls or rings, and finish with white dot or splatter stars.
How do you paint planets for kids?
Trace circles with cups or lids, fill them with bright colors and let them dry. Add stripes, swirls, craters or land shapes for details, and paint rings around Saturn.
How do kids make stars in a space painting?
Dot white paint with cotton swabs or pencil erasers for big stars, and flick white paint off an old toothbrush for tiny stars. Practice the flicking technique on scrap paper first.
What colors do I need for a space painting?
Black, navy, purple and white for the background and stars, plus bright colors such as orange, red, yellow, blue and green for planets.
Is a tabletop easel good for kids in small spaces?
Yes. A tabletop easel holds paper at a comfortable angle, keeps the table cleaner and folds away after use. Choose a stable one and lay wet paintings flat to dry.
How long does a space painting take for kids?
About 45 to 60 minutes including drying time for the background. Using black paper cuts the time to around 30 minutes.
Final Thoughts
Space painting gives kids room to blend, stamp, splatter and imagine, all on one page. A dark background, a few bright planets and a sky full of stars add up to a painting they will want to hang right away.
For more projects, setup tips and kid-friendly techniques, explore the complete painting for kids resource for young artists and plan your next creative session.